


1. Remove all media from the drives and turn off all attached devices and the computer. Then, disconnect
all power cords from electrical outlets and disconnect all cables that are connected to the computer.
2. Place a soft, clean towel or cloth on the desk or other flat surface. Hold the sides of your computer and
gently lay it down so that the screen is against the surface and the cover is facing up.
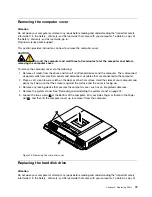
3. Remove the computer cover. See “Removing the computer cover” on page 79.
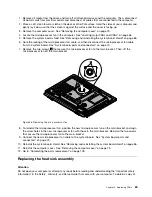
4. Locate the rear I/O assembly. See “Locating major FRUs and CRUs” on page 66.
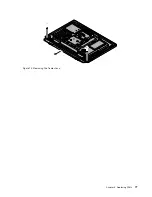
5. Remove the two screws
1
that secure the rear I/O assembly.
Figure 22. Removing the two screws that secure the rear I/O assembly
Chapter 9
.
Replacing FRUs
85
Summary of Contents for ThinkCentre M72z
Page 2: ......
Page 8: ...2 ThinkCentre Hardware Maintenance Manual ...
Page 15: ...Chapter 2 Safety information 9 ...
Page 19: ...Chapter 2 Safety information 13 ...
Page 20: ...1 2 14 ThinkCentre Hardware Maintenance Manual ...
Page 21: ...Chapter 2 Safety information 15 ...
Page 27: ...Chapter 2 Safety information 21 ...
Page 31: ...Chapter 2 Safety information 25 ...
Page 38: ...32 ThinkCentre Hardware Maintenance Manual ...
Page 68: ...62 ThinkCentre Hardware Maintenance Manual ...
Page 73: ...Figure 3 Locating major FRUs and CRUs Chapter 8 Locations 67 ...
Page 83: ...Figure 12 Removing the frame stand Chapter 9 Replacing FRUs 77 ...
Page 120: ...114 ThinkCentre Hardware Maintenance Manual ...
Page 125: ......
Page 126: ......