


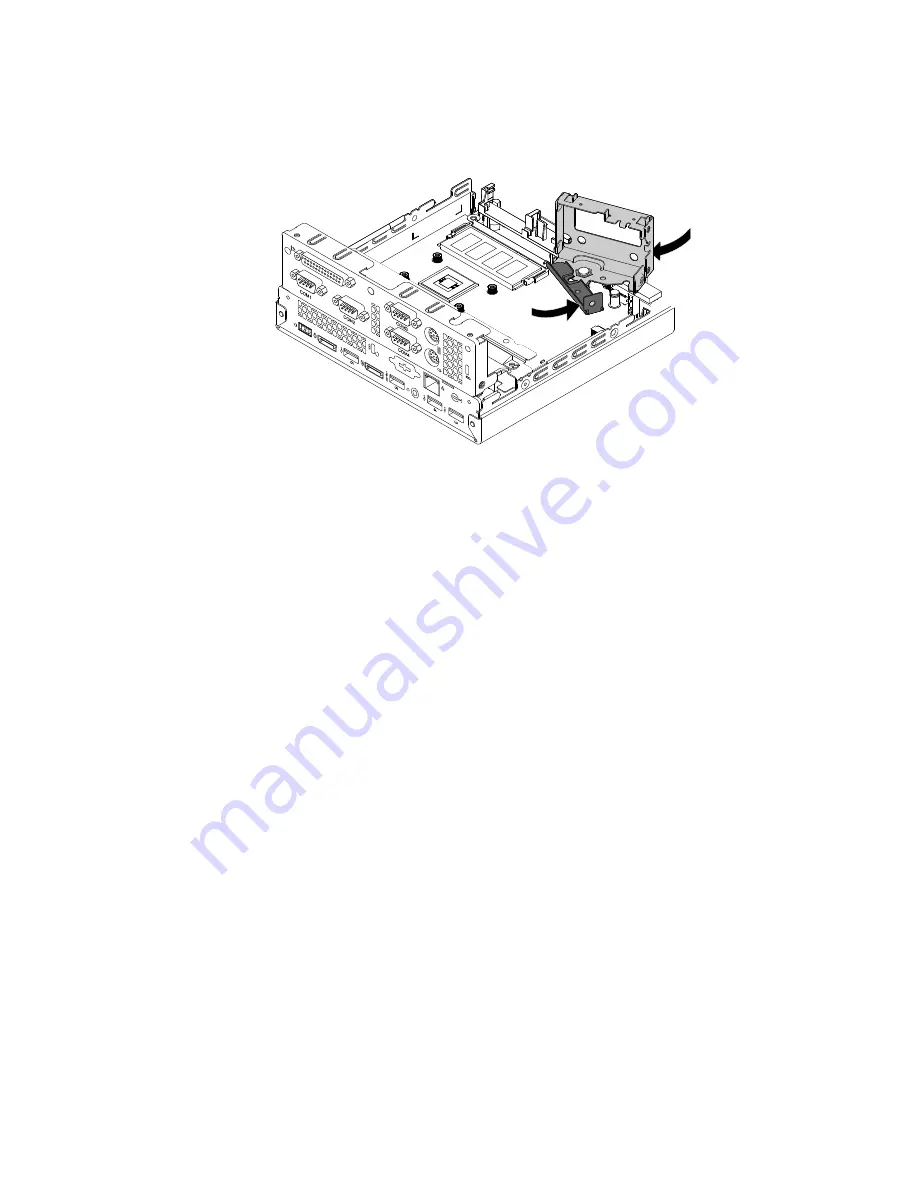
8. Pivot the bottom of the antenna bracket toward the rear of the computer, to insert the standoff on the
system board into the slot in the bracket. Then, pivot the top of the antenna bracket to close it.
Figure 54. Pivoting and closing the antenna bracket
9. Install the plastic fastener to secure the top of the antenna bracket to the bottom of the bracket.
10. Install the front Wi-Fi antenna. See “Replacing the Wi-Fi antennas” on page 102.
What to do next:
• To work with another piece of hardware, go to the appropriate section.
• To complete the installation or replacement, go to “Completing the parts replacement” on page 111.
Replacing the system board
Attention:
Do not open your computer or attempt any repair before reading and understanding the Chapter
1 “Read this first: Important safety information” on page 1.
Note:
Each computer has a unique Vital Product Data (VPD) code stored in the nonvolatile memory on
the system board. After you replace the system board, the VPD must be updated. To update the VPD,
see “Updating the BIOS” on page 59.
To replace the system board, do the following:
1. Remove any media from the drives and turn off all connected devices and the computer. Then,
disconnect all power cords from electrical outlets and disconnect all cables that are connected to the
computer.
2. Remove the computer cover. See “Removing the computer cover” on page 87.
3. Remove the heat sink. See “Replacing the heat sink” on page 89.
4. Remove the memory module. See “Replacing the memory module” on page 95.
5. Remove the internal speaker. See “Replacing the internal speaker” on page 96.
6. Remove the M.2 storage drive. See “Replacing the M.2 storage drive” on page 98.
7. Remove the front Wi-Fi antenna. See “Replacing the Wi-Fi antennas” on page 102.
8. Remove the antenna bracket. See “Replacing the antenna bracket” on page 106.
9. Remove the Wi-Fi card. See “Replacing the Wi-Fi card” on page 100.
10. Record the cable routing and cable connections, and then disconnect all cables from the system board.
See “Parts on the system board” on page 34.
.
Installing or replacing hardware
109
Summary of Contents for ThinkCentre M600
Page 1: ...ThinkCentre M600 Hardware Maintenance Manual Machine Types 10GJ and 10GK ...
Page 6: ...iv ThinkCentre M600 Hardware Maintenance Manual ...
Page 14: ...8 ThinkCentre M600 Hardware Maintenance Manual ...
Page 18: ...12 ThinkCentre M600 Hardware Maintenance Manual ...
Page 19: ...1 2 Chapter 1 Read this first Important safety information 13 ...
Page 20: ...1 2 14 ThinkCentre M600 Hardware Maintenance Manual ...
Page 25: ...1 2 Chapter 1 Read this first Important safety information 19 ...
Page 26: ...1 2 20 ThinkCentre M600 Hardware Maintenance Manual ...
Page 29: ...Chapter 1 Read this first Important safety information 23 ...
Page 46: ...40 ThinkCentre M600 Hardware Maintenance Manual ...
Page 56: ...50 ThinkCentre M600 Hardware Maintenance Manual ...
Page 66: ...60 ThinkCentre M600 Hardware Maintenance Manual ...
Page 120: ...114 ThinkCentre M600 Hardware Maintenance Manual ...
Page 124: ...118 ThinkCentre M600 Hardware Maintenance Manual ...
Page 132: ...126 ThinkCentre M600 Hardware Maintenance Manual ...
Page 134: ...China RoHS 128 ThinkCentre M600 Hardware Maintenance Manual ...
Page 135: ...Appendix D China Energy Label Copyright Lenovo 2016 129 ...
Page 136: ...130 ThinkCentre M600 Hardware Maintenance Manual ...
Page 138: ...132 ThinkCentre M600 Hardware Maintenance Manual ...
Page 141: ......
Page 142: ......


