


To replace the rear I/O assembly, do the following:
1. Remove all media from the drives and turn off all attached devices and the computer. Then, disconnect
all power cords from electrical outlets and disconnect all cables that are connected to the computer.
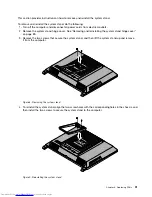
2. Place a soft, clean towel or cloth on the desk or other flat surface. Hold the sides of your computer and
gently lay it down so that the screen is against the surface and the cover is facing up.
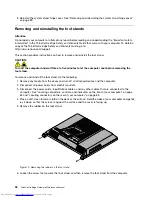
3. Remove the computer cover. See “Removing the computer cover” on page 95.
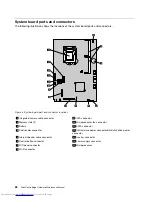
4. Locate the rear I/O assembly. See “FRU locations” on page 86.
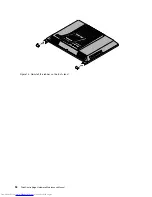
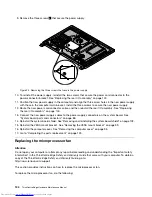
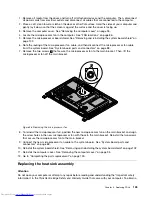
5. Remove the two screws
1
that secure the rear I/O assembly.
Figure 22. Removing the two screws that secure the rear I/O assembly
Chapter 8
.
Replacing FRUs
101
Summary of Contents for ThinkCentre Edge
Page 1: ...ThinkCentre Edge Hardware Maintenance Manual Machine Types 5068 7558 and 7567 ...
Page 2: ......
Page 3: ...ThinkCentre Edge Hardware Maintenance Manual Machine Types 5068 7558 and 7567 ...
Page 8: ...2 ThinkCentre Edge Hardware Maintenance Manual ...
Page 15: ...Chapter 2 Safety information 9 ...
Page 19: ...Chapter 2 Safety information 13 ...
Page 20: ...1 2 14 ThinkCentre Edge Hardware Maintenance Manual ...
Page 21: ...Chapter 2 Safety information 15 ...
Page 27: ...Chapter 2 Safety information 21 ...
Page 31: ...Chapter 2 Safety information 25 ...
Page 38: ...32 ThinkCentre Edge Hardware Maintenance Manual ...
Page 62: ...56 ThinkCentre Edge Hardware Maintenance Manual ...
Page 66: ...60 ThinkCentre Edge Hardware Maintenance Manual ...
Page 174: ...168 ThinkCentre Edge Hardware Maintenance Manual ...
Page 179: ......
Page 180: ...Part Number 0B03379 Printed in USA 1P P N 0B03379 0B03379 ...