


Replacing the optical drive
Attention
Do not open your computer or attempt any repair before reading and understanding the
“Important safety information” in the
ThinkCentre Safety and Warranty Guide
that came with
your computer. To obtain a copy of the
ThinkCentre Safety and Warranty Guide
, go to:
http://www.lenovo.com/support
This section provides instructions on how to replace the optical drive.
Removing the optical drive
To remove the optical drive, do the following:
1.
Turn off the computer.
2.
Disconnect all cables, power cords, and external options from your computer.
See “Rear connectors” on page 78.
3.
Place a soft, clean towel or cloth on the desk or surface. Hold the sides of your
computer and gently lay it down so that the screen is against the surface and
the cover is facing up.
4.
Remove the computer cover. See “Removing the computer cover” on page 83.
5.
Locate the optical drive. See “FRU locations” on page 79.
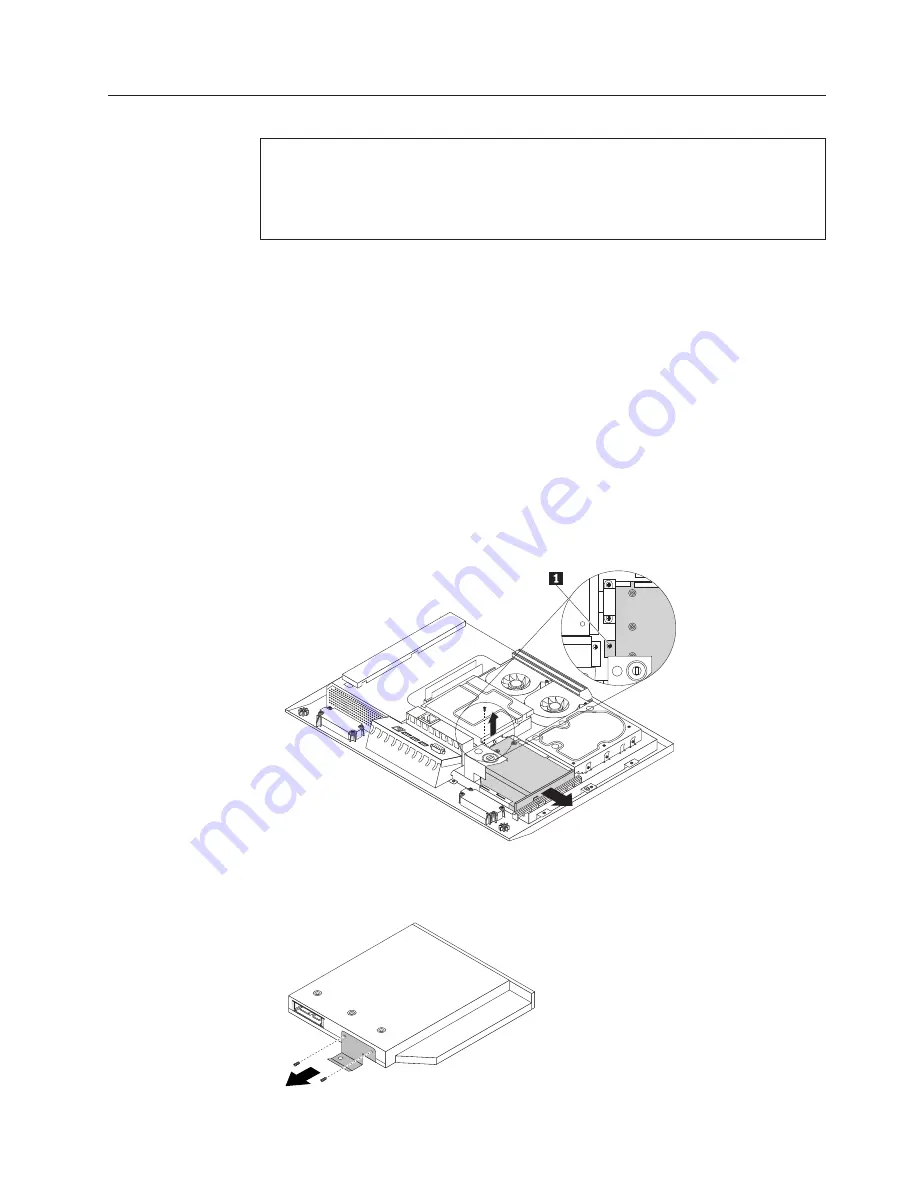
6.
Remove the screw
1
that secures the optical drive to the main bracket and
slide the optical drive out of the rail.
7.
Remove the retention clip from the optical drive by removing the two screws as
shown in the following illustration. Save the retention clip to use when you
install the replacement optical drive.
Chapter 8. Replacing FRUs
91
Summary of Contents for ThinkCentre 0401
Page 1: ...Machine Types 0401 0994 1165 1184 1186 and 2565 ThinkCentre Hardware Maintenance Manual ...
Page 2: ......
Page 3: ...ThinkCentre Hardware Maintenance Manual ...
Page 16: ...10 Hardware Maintenance Manual ...
Page 17: ...Chapter 2 Safety information 11 ...
Page 18: ... 18 kg 37 lbs 32 kg 70 5 lbs 55 kg 121 2 lbs 1 2 12 Hardware Maintenance Manual ...
Page 22: ...16 Hardware Maintenance Manual ...
Page 23: ...1 2 Chapter 2 Safety information 17 ...
Page 24: ...18 Hardware Maintenance Manual ...
Page 25: ...1 2 Chapter 2 Safety information 19 ...
Page 32: ...26 Hardware Maintenance Manual ...
Page 33: ...Chapter 2 Safety information 27 ...
Page 34: ...1 2 28 Hardware Maintenance Manual ...
Page 38: ...32 Hardware Maintenance Manual ...
Page 39: ...1 2 Chapter 2 Safety information 33 ...
Page 134: ...128 Hardware Maintenance Manual ...
Page 162: ...156 Hardware Maintenance Manual ...
Page 169: ......
Page 170: ...Part Number 71Y7087 Printed in USA 1P P N 71Y7087 ...