background image

24

Chapter 3. Connecting to the Internet

As a global network, the Internet connects computers worldwide, providing services such as
e-mailing, information searching, electronic commerce, Web browsing and entertainment.

You can connect the computer to the Internet in the following ways:

Wired connection: 

use physical wiring to connect.

Wireless network technology: 

connect without wiring.

Wired connection 

- - - - - - - - - - - - - - - - - - - - - - - - - - - - - - - - - - - - - - - - - - - - - - - - - - - - - - - - - - - - - - - - - - - - - - - - - - - - - - - - - - - - - - - - - - - - - - - - - - - - - - - - - - 

Wired connections are a reliable and safe way to connect the computer to the Internet. 
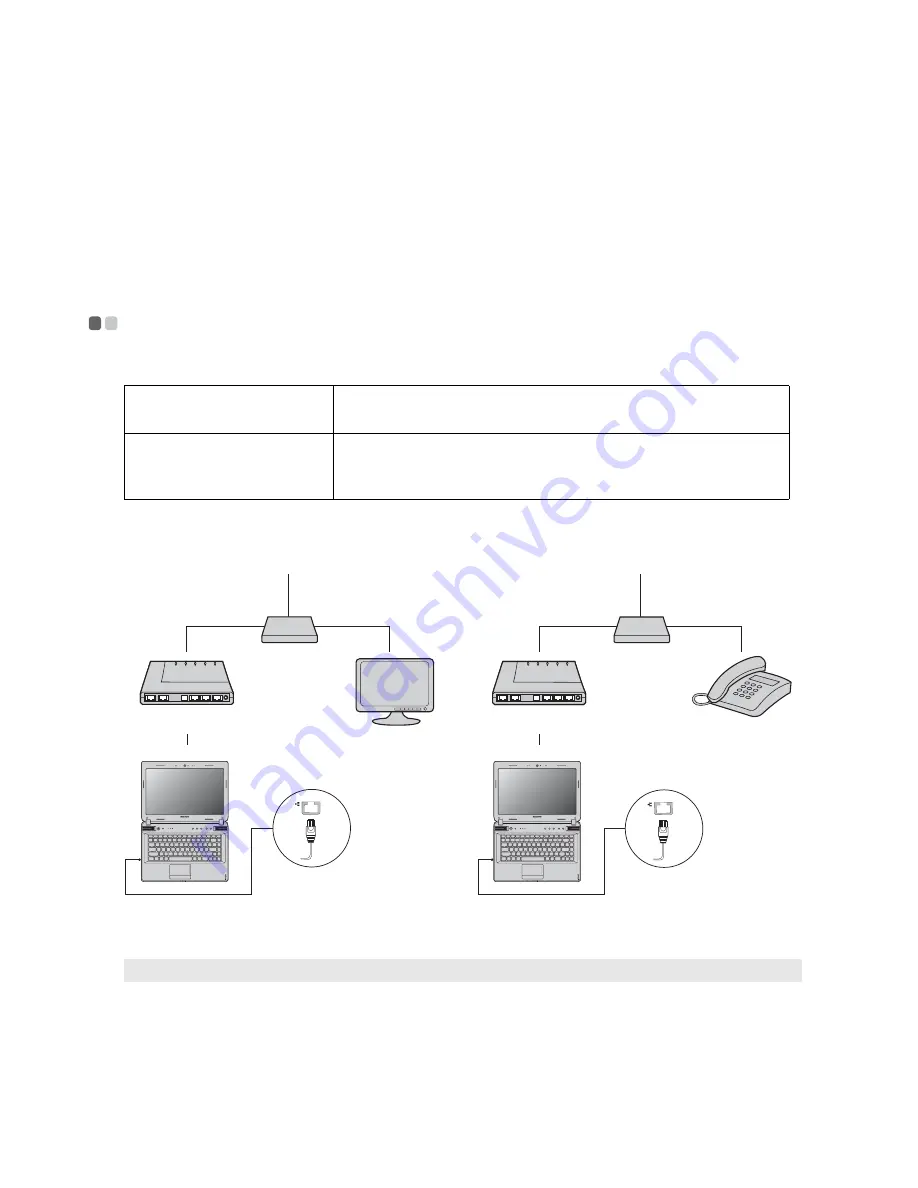
„

Hardware connection

Cable


DSL

„

Software configuration

Consult your Internet Service Provider (ISP) for details on how to configure your computer.

Cable

Cable Internet services use a cable modem connected to the 
residential cable TV line.

DSL

DSL is a family of related technologies that bring high-speed 
network access to homes and small businesses over ordinary 
telephone lines.

Note:

 The above diagrams are for reference only. Actual connection method may vary.

*

*

*

*

Y471A

Y471A

TV cable

Splitter 

*

Cable modem 

*

*

 Not supplied.

Telephone line

Splitter 

*

DSL modem 

*

Summary of Contents for IdeaPad Y471A

Page 1: ...IdeaPad Y471A Read the safety notices and important tips in the included manuals before using your computer User Guide V1 0 ...

Page 2: ...ting system some operations may be slightly different If you are using other operating systems some operations may not apply to you LENOVO products data computer software and services have been developed exclusively at private expense and are sold to governmental entities as commercial items as defined by 48 C F R 2 101 with limited and restricted rights to use reproduction and disclosure LIMITED ...

Page 3: ...19 Securing your computer 21 AMD Muxless ATI Switchable Graphics Technology PowerXpress 22 Switchable Graphics in two modes on select models 23 Chapter 3 Connecting to the Internet 24 Wired connection 24 Wireless connection 25 Chapter 4 OneKey Rescue system 26 OneKey Rescue system 26 Chapter 5 Troubleshooting 28 Frequently asked questions 28 Troubleshooting 30 Appendix CRU instructions 34 Replacin...

Page 4: ......

Page 5: ...actual product Please refer to the actual product Attention Do NOT open the display panel beyond 130 degrees When closing the display panel be careful NOT to leave pens or any other objects in between the display panel and the keyboard Otherwise the display panel may be damaged Y471A c l d a b f g h e b i j k ...

Page 6: ...ystem button Press this button to start OneKey Rescue system when the computer is powered off Note For details see OneKey Rescue system on page 26 System status indicators For details see System status indicators on page 19 Volume buttons Use these buttons to adjust volume OneKey Theater button Touch this button to select a preferred scenario mode Note For details see OneKey Theater button on page...

Page 7: ...e computer may occur RJ 45 port This port connects the computer to an Ethernet network Note For details see Wired connection on page 24 USB port Connects to USB devices Notes The blue port supports USB 3 0 on select models For details see Connecting USB devices on page 14 Microphone jack Connects to external microphones Headphone jack Connects to external headphones Attention Listening to music at...

Page 8: ...ptical disks USB port Connects to USB devices Notes The blue port supports USB 3 0 on select models For details see Connecting USB devices on page 14 AC power adapter jack Connect the AC adapter here Note For details see Using AC adapter and battery on page 9 Kensington slot Attach a security lock not supplied here Note For details see Attaching a security lock not supplied on page 21 e d c b a a ...

Page 9: ...e System status indicators on page 19 Memory card slot Insert memory cards not supplied here Note For details see Using memory cards not supplied on page 13 Integrated wireless device switch Use this switch to turn on off the wireless radio of all wireless devices on your computer c b a a b c ...

Page 10: ... battery latch keeps the battery pack secured in place Battery pack For details see Using AC adapter and battery on page 9 Battery latch manual The manual battery latch is used to keep the battery pack secured in place Hard disk drive HDD Memory Mini PCI Express Card slot compartment a b d c a b c d ...

Page 11: ...to the supplied Setup Poster to install the battery pack Connecting the computer to an electrical outlet 1 Connect the power cord to the AC adapter 2 Connect the AC adapter to the AC power adapter jack of the computer firmly 3 Plug the power cord into an electrical outlet Turning on the computer Press the power button to turn on the computer Configuring the operating system You may need to configu...

Page 12: ... To put the computer into sleep state do one of the following Click and select Sleep from the Start menu Press Fn F1 To wake the computer do one of the following Press the power button Press any key on the keyboard Shutting down your computer If you are not going to use your computer for a day or two shut it down To shut down your computer click and select Shut down from the Start menu Note Wait u...

Page 13: ...the environment pay attention to the following points Replace only with a battery of the type recommended by Lenovo Keep the battery pack away from fire Do not expose the battery pack to water or rain Do not attempt to disassemble the battery pack Do not short circuit the battery pack Keep the battery pack away from children Do not put the battery pack in trash that is disposed of in landfills Whe...

Page 14: ...er the pad in the direction in which you want the cursor to move Touchpad button The function of the left right side corresponds to that of the left right mouse button on a conventional mouse Notes You can enable disable the touchpad using Fn F6 When the touchpad indicator is lit the touchpad is disabled Y471A a b a b ...

Page 15: ...s keys that when enabled work as a 10 key numeric keypad To enable or disable the numeric keypad press Fn F8 Function key combinations Through the use of the function keys you can change operational features instantly To use this function press and hold Fn then press one of the function keys Note The Num lock indicator will light on if the numeric keypad is enabled a b b a ...

Page 16: ... Fn F5 Open the interface for integrated wireless devices settings on off Fn F6 Enable Disable the touchpad Fn F8 Enable Disable the numeric keypad Fn F9 Start Pause playback of Windows Media Player Fn F10 Stop playback of Windows Media Player Fn F11 Skip to the previous track Fn F12 Skip to the next track Fn PgUp Enable Disable the scroll lock Fn PrtSc Activate the system request Fn Home Activate...

Page 17: ...my card out of the memory card slot 2 Slide the memory card in until it clicks into place Removing a memory card 1 Push the memory card until you hear a click 2 Gently pull the memory card out of the memory card slot Notes Insert ONLY one card in the slot at a time This card reader does not support SDIO devices e g SDIO Bluetooth etc Note The dummy card is used for preventing dust and small partic...

Page 18: ...onnecting a USB storage device make sure your computer has finished transferring data by that device Click the Safely Remove Hardware icon in the notification area of Windows to remove the device before disconnecting Note Typically Windows detects a new device after connecting it and then installs the driver automatically However some devices may require you to install the driver before connecting...

Page 19: ...mputer 1 Slide the integrated wireless device switch from to 2 Press Fn F5 to make configuration Note The actual maximum range may vary due to interference and transmission barriers To get the best possible connection speed place the device as near your computer as possible Notes When you do not need to use the Bluetooth function turn it off to save battery power You need to pair the Bluetooth ena...

Page 20: ... computer is powered off press this button to start Lenovo OneKey Rescue system In Windows operating system press this button to start Lenovo OneKey Recovery system Volume buttons Note For details see OneKey Rescue system on page 26 Mute Unmute Volume down Volume up Y471A a b c d e f a b d b c d ...

Page 21: ...e To manually select a desired mode 1 Press and release the OneKey Theater button to display the on screen menu 2 Keep pressing and releasing the button until the icon of your desired mode is highlighted The computer switches to the selected mode after 2 seconds Normal mode The default mode Movie mode Provides enhanced visual and audio output Intelligent mode Lenovo OneKey Theater switches intelli...

Page 22: ...e around the heat sink of the computer s CPU over time reducing the dissipation capability of the heat sink You can reduce the amount of accumulated dust by performing dust cleaning To perform dust cleaning repeatedly press the thermal management button until is highlighted Dust cleaning will start after three seconds When dust cleaning is activated the heat dissipation fan spins at high and low s...

Page 23: ...Chapter 2 Learning the basics 19 System status indicators These indicators inform you of the computer status Y471A a b c d e f g ...

Page 24: ...apter 2 Learning the basics Caps lock indicator Num lock indicator Hard disk drive indicator Touchpad indicator Power status indicator Battery status indicator Wireless communication indicator a b c d e f g ...

Page 25: ...passwords helps prevent your computer from being used by others Once you set a password and enable it a prompt appears on the screen each time you power on the computer Enter your password at the prompt The computer cannot be used unless you enter the correct password For details about how to set the password see the Help to the right of the screen in BIOS setup utility Notes Before purchasing any...

Page 26: ...rated graphics processor unit iGPU which allows the system to switch between GPUs graphics processor units in order to achieve designed performance or power savings Notes PowerXpress is not supported by all operating systems Currently PowerXpress is supported by Windows 7 If you are using another operating system such as Windows XP it may not be possible to enable PowerXpress PowerXpress is not su...

Page 27: ...s Catalyst Control Center and run the CCC 3 Click Power Switchable Graphics on the Catalyst Control Center setting page 4 On the Switchable Graphics page the currently active GPU is displayed under the current active graphics processing unit You can click High performance GPU or Power Saving GPU under Choose a Graphics Processing Unit to switch the graphics processor Switching between Mode 1 and M...

Page 28: ...s are a reliable and safe way to connect the computer to the Internet Hardware connection Cable DSL Software configuration Consult your Internet Service Provider ISP for details on how to configure your computer Cable Cable Internet services use a cable modem connected to the residential cable TV line DSL DSL is a family of related technologies that bring high speed network access to homes and sma...

Page 29: ...ch from to 2 Press Fn F5 to make configuration Hardware connection Software configuration Consult your Internet Service Provider ISP and search Windows Help and Support Center for details on how to configure your computer Wi Fi Wi Fi networks cover a small physical area like a home office or small group of buildings An access point is necessary for the connection WiMAX WiMAX networks connect sever...

Page 30: ...ery system Icon on the desktop to launch Lenovo OneKey Recovery Within the program you can back up the system partition on the hard disk drive other storage devices or by creating recovery discs For more instructions see the Help file of Lenovo OneKey Recovery Using Lenovo OneKey Rescue system without Windows operating system In the event that the operating system cannot be loaded follow the steps...

Page 31: ...system partition and factory default recovery disc s Select the type of recovery disc you want to create and follow the on screen instructions Insert additional recordable disc s when prompted Note If your computer does not come with an integrated optical drive or if the integrated optical drive does not support disc creating connect an appropriate external optical drive to your computer Notes The...

Page 32: ... the recovery discs Your computer did not come with a recovery disc For an explanation of the alternative recovery methods offered by Lenovo see Chapter 4 OneKey Rescue system on page 26 How can I contact the customer support center See Chapter 3 Getting help and service of Lenovo Safety and General Information Guide Where can I find warranty information For the warranty applicable to your compute...

Page 33: ...ature when your system fails or you need to re install your operating system This will restore your computer back to the initial status when you first booted up your computer after receiving it from the store If there is critical data on your current partition back it up before you run this recovery feature ...

Page 34: ...our screen saver or power management may be enabled Do one of the following to exit from the screen saver or to resume from sleep or hibernation mode Touch the touchpad Press any key on the keyboard Press the power button Press Fn F2 to confirm whether the LCD screen has been turned off A Password problem I forgot my password If you forget your user password you must take your computer to a Lenovo...

Page 35: ... does not return from sleep mode your system has stopped responding and you cannot turn off the computer reset the computer Unsaved data may be lost To reset the computer press and hold the power button for 4 seconds or more If the computer is still not reset remove the AC adapter and the battery Computer screen problems The screen is blank Do the following If you are using the AC adapter or using...

Page 36: ...n Chapter 2 A hard disk drive problem The hard disk drive does not work In the Boot menu in BIOS setup utility make sure that the hard disk drive is included in the Boot Device Priority correctly A startup problem The Microsoft Windows operating system does not start Use the OneKey Rescue system to help solve or identify your problem For details about OneKey Rescue system see Chapter 4 OneKey Resc...

Page 37: ...y in the BIOS setup utility is set so that the computer starts from the device you want Also make sure that the device from which the computer starts is enabled In the Boot menu in the BIOS setup utility make sure that the device is included in the Boot Device Priority list Press F12 when the Lenovo logo appears on the screen while the computer is starting up to select the device you want the comp...

Page 38: ...ter over 3 Unlock the manual battery latch Holding the spring loaded battery latch in the unlocked position remove the battery pack in the direction shown by the arrow 4 Install a fully charged battery 5 Slide the manual battery latch to the locked position 6 Turn the computer over again Connect the AC adapter and the cables to the computer again Note Use only the battery provided by Lenovo Any ot...

Page 39: ...he information on the hard disk and then turn the computer off Never remove the drive while the system is operating in sleep mode or in hibernation mode Notes Replace the hard disk drive only if you upgrade it or have it repaired The connectors and bay of the hard disk drive were not designed for frequent changes or drive swapping The preinstalled software are not included on an optional hard disk...

Page 40: ...ct the AC adapter and all cables from the computer 2 Close the computer display and then turn the computer over 3 Remove the battery pack 4 Remove the Hard disk drive HDD Memory Mini PCI Express Card slot compartment cover a Loosen the screws that secure the compartment cover b Remove the compartment cover a b a b ...

Page 41: ...Appendix CRU instructions 37 5 Remove the frame fixing screws 6 Pull the tab in the direction shown by arrow c c c d d ...

Page 42: ...drive and tighten the screws 0 Put the hard disk drive gently into the hard disk drive bay with the tab facing upwards and the connectors facing each other then push it firmly into space A Reinstall the frame fixing screws B Reinstall the compartment cover and tighten the screws C Reinstall the battery pack D Turn the computer over again Connect the AC adapter and the cables to the computer again ...

Page 43: ... body which could damage the DDR3 SDRAM Do not touch the contact edge of the DDR3 SDRAM 2 Turn off the computer Disconnect the AC adapter and all cables from the computer 3 Close the computer display and turn the computer over 4 Remove the battery pack 5 Remove the Hard disk drive HDD Memory Mini PCI Express Card slot compartment cover a Loosen the screws that secure the compartment cover b Remove...

Page 44: ...ure use 7 Align the notch of the DDR3 SDRAM with the protrusion of the socket and gently insert the DDR3 SDRAM into the socket at a 30 45 angle 8 Push the DDR3 SDRAM inward toward the socket until the latches on both edges of the socket are pushed into the closed position 9 Reinstall the compartment cover and tighten the screws 0 Reinstall the battery pack A Turn the computer over again Connect th...

Page 45: ... the computer on 2 Hold F2 during startup The BIOS setup utility screen opens The System Memory item shows the total amount of memory installed in your computer Note If only one DDR3 SDRAM is used on the computer you are servicing the card must be installed in SLOT 0 lower slot but not in SLOT 1 upper slot ...

Page 46: ...over 2 Remove the screw shown in the illustration 3 Gently pull the optical drive out The following table provides a list of CRUs Customer Replaceable Units for your computer and informs you of where to find replacement instructions Setup Poster User Guide AC adapter O Power cord for AC adapter O Battery O O Bottom access doors O Hard disk drive O Memory O Optical drive O a b b a ...

Page 47: ...ration in the United States other countries or both AMD and PowerXpress are trademarks of Advanced Micro Devices Inc is a trademark of SRS Labs Inc Premium Surround Sound technology is incorporated under license from SRS Labs Inc SRS Premium Surround Sound provides the ultimate audio experience for music movies and games on the PC Other company products or service names may be trademarks or servic...

Page 48: ......

Page 49: ... Lenovo China 2011 New World New Thinking TM www lenovo com V1 0_en US ...

Reviews: