background image

12

Chapter 2. Input and Interactions

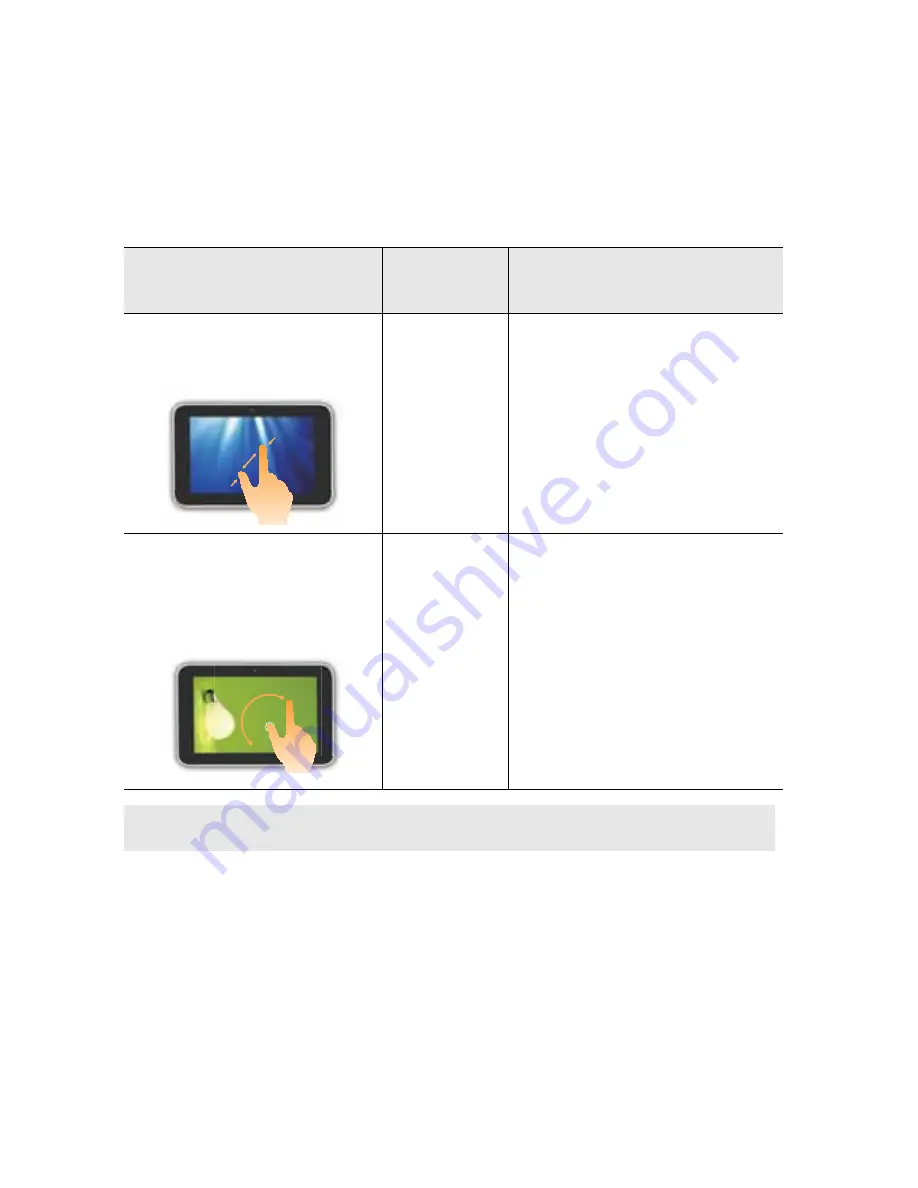
Frequently used gestures

Number of 
fingers used

Tasks performed

Pinch

Move two fingers together or 
apart on the screen.

2

• Reduces the view of an image 

or document (zoom in).

• Enlarges the view of an image 

or document  (zoom out).

Rotate

Anchor one finger on the 
screen, and then use another 
finger to move around in a 
semicircular motion.

2

Rotates an image.

Note:

The touch screen can respond to up to 4 fingers registering. The gestures that can be 

used depend on the software you are running.

Summary of Contents for ideapad P1

Page 1: ...IdeaPad Tablet P1 Read the safety notices and important tips in the included manuals before using your computer User Guide V1 0 ...

Page 2: ...nual may differ from the product you are using Preinstalled applications referred to in this manual vary with geographical location and are subject to change LIMITED AND RESTRICTED RIGHTS NOTICE If data or software is delivered pursuant to a General Services Administration GSA contract its use reproduction and disclosure are subject to restrictions set forth in Contract No GS 35F 05925 Note ...

Page 3: ...VeriTouch 14 Using the optional digitizer pen 18 Chapter 3 Preinstalled Applications 22 Lenovo App Manager 22 TotalMedia Center 25 Lenovo Photo Frame 26 Chapter 4 Power Management 28 Adjusting screen brightness 28 Applying power schemes 28 Changing detailed settings of a power scheme 28 Chapter 5 Connecting to the Internet 29 Enabling the WLAN adapter 29 Connecting to a WLAN 30 Chapter 6 Lenovo On...

Page 4: ......

Page 5: ...ures and videos and can be used for video conferencing WLAN Bluetooth antennas Connected to the WLAN Bluetooth adapter and are used for sending and receiving wireless signals Multi touch screen Functions as both the primary output and the primary input component For details refer to Using the multi touch screen on page 9 1 2 3 2 a b c ...

Page 6: ... 4 Volume up down Adjusts system sound USB port Accommodates USB cables Note The plastic cover over the USB port and the microSD slot is used to prevent dust from going inside the tablet Put the cover back in place when the USB port is no longer used MicroSD slot Accommodates microSD card Composite audio jack Accommodates headsets or headphones This jack does not support conventional microphones S...

Page 7: ...tarted 3 Power button Powers on the tablet For details refer to Power button on page 4 Screen rotation lock Keeps the screen in portrait or landscape orientation Power connector Accommodates the AC adapter 11 12 13 k l m ...

Page 8: ...er button in Windows Puts the tablet into sleep Pressing it again will wake the tablet Press the Power button while holding the Function button and then release both when the tablet is off Starts Lenovo OneKey Rescue system Button action Function Press the Function button Displays PadManage Press and hold the Function button for at least 4 seconds Starts Windows Task Manager Press the Power button...

Page 9: ... Lenovo OneKey Rescue system For details refer to Chapter 6 Lenovo OneKey Rescue System on page 31 Putting the tablet into sleep If you are going to leave the tablet idle for a while you can put it into sleep You can do this in one of the following ways Press the power button on the top edge of the tablet In Windows tap the Start button tap the small arrow next to the Shut down button and then tap...

Page 10: ...nd files will be closed and the tablet will be completely turned off Be sure to save your work before shutting down the tablet If the tablet is unresponsive and you are unable to use the preceding shutdown methods try the following emergency methods in the sequence provided Press and hold the Function button for at least 4 seconds to start Windows Task Manager end tasks that are not responding and...

Page 11: ...m that device To safely remove the device tap the Safely Remove Hardware icon in the notification area of Windows before disconnecting the plug When the USB port is not in use put the plastic cover back in place to prevent dust from going inside the tablet Inserting and removing microSD cards The tablet comes with one microSD slot on its left edge You can insert a microSD memory card into this slo...

Page 12: ...connection To pair a Bluetooth enabled device with your tablet do the following 1 In Windows press the Function button to display PadManage 2 Tap The color of the icon turns blue indicating WLAN Bluetooth communication is enabled 3 Make sure the device you are pairing is discoverable 4 On the tablet tap Control Panel and then Add a device Names of the devices that have had Bluetooth communication ...

Page 13: ...h screen is the primary input and output component of the tablet Viewing the screen As the primary output component the screen displays all the visual content You can view the screen in either portrait or landscape orientation with the help of a built in gyroscope You may prefer portrait orientation for viewing webpages If so hold the tablet vertically When you want to watch movie clips or to view...

Page 14: ...10 Chapter 2 Input and Interactions If you want to keep the screen from rotating to a different orientation slide the screen rotation lock switch to the locked position Rotation lock ...

Page 15: ...ks performed Tap or double tap Tap the screen once or twice in quick succession 1 Selects an item Inputs text using Lenovo Soft Keyboard Starts software Touch and hold Touch and hold your finger on the screen When a circle appears lift your finger off the screen 1 Displays the context menu Flick Draw a short line in horizontal or vertical directions 1 Navigates in the active window ...

Page 16: ...Reduces the view of an image or document zoom in Enlarges the view of an image or document zoom out Rotate Anchor one finger on the screen and then use another finger to move around in a semicircular motion 2 Rotates an image Note The touch screen can respond to up to 4 fingers registering The gestures that can be used depend on the software you are running ...

Page 17: ...rd icon appears Drag the icon onto the desktop When text entry is required tap on the insertion point A keyboard icon appears next to the insertion point Tap the icon to bring up the keyboard The on screen keyboard of Windows 7 also features a writing pad that supports direct handwriting on the screen Handwriting by the user is converted into typed text For detailed instructions tap Tools on the k...

Page 18: ...r Account and Family Safety tap User and then create a password for your account Setting a touch password Once a character based password is set you can set a touch password in Lenovo VeriTouch To do this follow the steps below 1 Start Lenovo VeriTouch by double tapping the software icon on the desktop 2 On the main screen of the software tap the setup button and then tap Set password Lenovo VeriT...

Page 19: ...ackground image appears Each of the 9 squares in the diagram corresponds to a code Touch the squares in an order you can remember and then touch these squares in the same order again for the touch password to take effect Note The number of touches should be at least 4 and less than 30 included ...

Page 20: ... randomly arranged pieces of the background image will be reorganized and assembled to a whole image and you will be logged in to Windows If you prefer to enter the account password just close the VeriTouch panel and enter your account password on the Welcome screen Note When you are trying to log in the pieces of the background image in the diagram are displayed in random order You can try to ass...

Page 21: ...o execute system commands through Lenovo VeriTouch do the following 1 Start Lenovo VeriTouch by double tapping the software icon on the desktop 2 On the active area in grey draw the figure corresponding to the command you want to execute If the figure you drew is identified the corresponding command will be executed Note The names of the supported commands and their respective figures are displaye...

Page 22: ...ther brands may not be compatible with your tablet or even damage the screen of your tablet Overview of the digitizer pen and charge base Pen point Function button Right click button Power Battery indicator Metal contacts Indicator status Meaning Solid red The digitizer pen is powered on and the battery is low Solid blue The digitizer pen is powered on Off The digitizer pen is powered off 1 2 3 4 ...

Page 23: ...Chapter 2 Input and Interactions 19 Mini B USB port Pen receptacle Type A USB plug Mini B USB plug 5 pin 1 2 a b 1 2 a b ...

Page 24: ...izer pen before using it for the first time To charge the digitizer pen do the following 1 Use the supplied USB cable to connect the charge base to the USB port on the tablet 2 Hold the upper end the digitizer pen the end with the metal contacts downwards and slide it into the receptacle of the base until it reaches the end 2 1 3 ...

Page 25: ...ows 7 can recognize handwriting and quick editing using a digitizer pen In such a case you can use the digitizer pen to write on the screen just as you would with a normal pen on a piece of paper Using the right click button When the point of the digitizer pen is placed over the screen pressing the right button on the digitizer pen will display the context menu This is equivalent to touching and h...

Page 26: ...y Lenovo App Manager Lenovo App Manager manages access to frequently used applications documents or webpages It includes two panels for accommodating shortcuts work panel and play panel Overview Work panel Play panel Help button Minimize button Shortcut icons Add button Note Preinstalled applications vary with geographical location and are subject to change 1 5 6 2 3 4 a b c d e f ...

Page 27: ...e following 1 Tap the work or play panel where you want to add shortcuts 2 Tap the Add button in the lower right corner The Add panel appears You will then notice that an active area with a dotted rectangle appears to the left of this panel at the same time 3 Tap the Add URLs bar 4 Several URLs are provided by default for your convenience If the URL you want to add is in the list drag the thumbnai...

Page 28: ...he size of shortcut icons to make more room To do this pinch to zoom out on the panel For details refer to Multi touch gestures on page 11 Navigating through shortcut icons If one panel is fully populated later added shortcut icons will be placed rightwards Flick left to display those later added shortcut icons Reordering shortcut icons To reorder a shortcut icon do the following 1 Touch and hold ...

Page 29: ... consists of three separate software components Photo Music and Video Starting TotalMedia Center By default shortcut icons for the three components of TotalMedia Center are provided on the play panel of App Manager You can start each component by tapping its icon on the play panel of App Manager Using TotalMedia Center For details on how to use the three components of TotalMedia refer to the docum...

Page 30: ... clock mode In clock mode the system time and date is displayed You can flick up left or down right to adjust the backlight brightness Setting the alarm To set the alarm do the following 1 Tap the setup icon in the upper right corner 2 In the Settings dialog box check the box prior to Enable Alarm Set the hour and minute of the alarm Minute is set in the unit of five minutes Silencing the alarm Wh...

Page 31: ...r 2 In the dialog box navigate to the folder where your photos are stored You can also set the transition type interval and background music Controlling slideshows During a slideshow tap anywhere on a slide A control bar appears in the lower part of the screen You can do the following Tap the sound button to control the sound of the background music Tap the pause button to pause the slideshow Tap ...

Page 32: ...emes Energy Star High Performance Balanced Super Energy Saver The default power scheme is Energy Star To apply a power scheme do the following 1 Tap the Energy Management icon in the notification area of Windows 2 On the main panel apply a power scheme by tapping its icon Changing detailed settings of a power scheme You can view and change detailed settings of each power scheme To do this follow t...

Page 33: ...N adapter You must enable your wireless LAN adapter on the tablet before you can connect to a wireless network To do this follow the steps below 1 In Windows press the Function button to display PadManage 2 Tap The color of the icon turns blue indicating the WLAN Bluetooth adapter has been enabled After the WLAN adapter is enabled you can connect to the Internet via a WLAN The following illustrati...

Page 34: ...et the network name and the security key you can connect to the WLAN To do this follow the steps below 1 Make sure the tablet is placed within the coverage range of the WLAN 2 In Windows tap Control Panel and then Network and Sharing Center and tap Connect to a network to display all wireless networks within range 3 Tap the name of the target network tap Connect and if prompted enter the security ...

Page 35: ...ce has a separate power adapter use it to connect the device to the power supply Performing backup To back up the system do the following 1 Start Lenovo OneKey Recovery system by double tapping the icon on the desktop 2 On the main screen tap System Backup 3 On the screen that pops up select the destination of the backup image The estimated image size is also displayed on this screen Important Sel...

Page 36: ...ive press and hold the power button for at least 4 seconds to completely turn it off 2 Press the Function button while holding the power button and then release both buttons to start Lenovo OneKey Rescue system 3 One the main screen tap OneKey Recovery and then select the path of the previously created backup image 4 Tap Next and follow on screen instructions to complete the restore process Import...

Page 37: ...rks of Lenovo in the United States other countries or both Lenovo IdeaPad OneKey Microsoft and Windows are trademarks of Microsoft Corporation in the United States other countries or both Other company products or service names may be trademarks or service marks of others ...

Page 38: ...Lenovo Ideapad Tablet P1 Regulatory Notice V1 0 ...

Page 39: ...devez installer et utiliser votre ordinateur en respectant scrupuleusement les instructions décrites ci après Il est interdit de remplacer ou de retirer l adaptateur sans fil pré installé sur votre ordinateur ce n est pas une unité remplaçable par l utilisateur CRU Si l une de votre carte a besoin d être remplacée ou reparée Lenovo va vous demander de lui envoyer votre ordinateur avec des cartes p...

Page 40: ...module IC 4324A BRCM1056 WLAN adapters marketed in the USA and Canada do not support nor function in the extended channels 12ch 13ch On the bottom side of your tablet computer you will find a printed label containing the IC ID for the BCM94319SDB wireless module that is preinstalled in your tablet computer II Low power license exempt radiocommunication devices RSS 210 Operation is subject to the f...

Page 41: ... aux appareils de communication radio de faible puissance sans licence CNR 210 Le fonctionnement de ce type d appareil est soumis aux deux conditions suivantes 1 Cet appareil ne doit pas perturber les communications radio et 2 cet appareil doit supporter toute perturbation y compris les perturbations qui pourraient provoquer son dysfonctionnement III Exposition des êtres humains aux champs radioél...

Page 42: ...ease the separation between the equipment and receiver Connect the equipment into an outlet on a circuit different from that to which the receiver is connected Consult an authorized dealer or service representative for help Lenovo is not responsible for any radio or television interference caused by unauthorized changes or modifications to this equipment Unauthorized changes or modifications could...

Page 43: ...h Hereby Lenovo Singapore Pte Ltd declares that the modem and wireless equipment listed in this section are in compliance with the essential requirements and other relevant provisions of Directive 1999 5 EC EU Frequency band restriction for a wireless LAN Mini PCI Express Card This device is restricted to indoor use in the band 2454 to 2483 5 MHz in France Usage of this device is limited to indoor...

Page 44: ...enbereich auf das Frequenzband von 5 150 bis 5 350 MHz Kanäle 36 40 44 48 52 56 60 64 beschränkt Estonian Lenovo Singapore Pte Ltd kinnitab selles jaotises nimetatud modemi ja traadita side seadmete vastavust direktiivi 1999 5 EÜ põhinõuetele ja nimetatud direktiivist tulenevatele muudele asjakohastele sätetele EL i sagedusvahemiku piirang raadiokohtvõrgu mini PCI ekspresskaardi kohta Seade on Pra...

Page 45: ... dans la bande de fréquence de 5150 à 5350 MHz canaux 36 40 44 48 52 56 60 64 Icelandic Hér með lýsir Lenovo Singapore Pte Ltd því yfir að mótaldið og þráðlausi búnaðurinn sem getið er í þessum hluta uppfylla allar kröfur og önnnur viðkomandi ákvæði tilskipunar 1999 5 EC ESB Takmarkanir á tíðnisviði þráðlauss LAN Mini PCI staðarnetkorts Í Frakklandi er þetta tæki eingöngu ætlað til notkunar innanh...

Page 46: ...0 64 Latvian Lithuanian Dutch Hierbij verklaart Lenovo Singapore Pte Ltd dat de modem en draadloze apparatuur die in dit gedeelte worden genoemd voldoen aan de essentiële vereisten en andere relevante bepalingen van Directive 1999 5 EC EU beperking van frequentieband voor een draadloze LAN Mini PCI Express Card Gebruik van dit apparaat is in Frankrijk beperkt tot binnenshuis gebruik in de band van...

Page 47: ...estemmelser i EU direktiv 1999 5 EØF Begrensinger for frekvensbånd i EU for et Mini PCI Express kort for trådløst lokalnett LAN Denne enheten er beregnet på innendørs bruk i frekvensbåndet 2454 til 2483 5 MHz i Frankrike Denne enheten er begrenset til innendørs bruk i frekvensbåndet 5150 til 5350 MHz kanal 36 40 44 48 52 56 60 64 Hungarian Polish ...

Page 48: ...as provisões relevantes da Directiva 1999 5 EC Restrição de frequência de bandas da EU para placas Mini PCI Express Card de rede local sem fios Na França este dispositivo destina se apenas a utilização no interior na banda de 2454 a 2483 5 MHz A utilização deste dispositivo está limitada à utilização no interior na banda de 5150 a 5350 MHz canais 36 40 44 48 52 56 60 64 Romanian Slovenian ...

Page 49: ...la 2454 2483 5 MHz Tämä laite on tarkoitettu käytettäväksi sisätiloissa taajuusalueella 5150 5320 MHz kanavat 36 40 44 48 52 56 60 ja 64 Swedish Härmed intygar Lenovo Singapore Pte Ltd att det modem och den trådlösa utrustning som anges i detta avsnitt överensstämmer med väsentliga krav och andra relevanta bestämmelser i direktiv 1999 5 EG Frekvensområdesbegränsning inom EU för ett PCI Express min...

Page 50: ...12 For model BCM94319SDB ...

Page 51: ...13 㪙㪚㪤㪐㪋㪊㪈㪐㪪㪛㪙 㪙㫉㫆㪸㪻㪺㫆㫄㩷㪚㫆㫉㫇㫆㫉㪸㫋㫀㫆㫅 㪇㪇㪎㪮㪮㪚㪬㪣㪇㪍㪎㪊 ...

Page 52: ...14 Notice for users in Taiwan For models B CM94319SDB Notice for users in Korea For models B CM94319SDB ...

Page 53: ... Lenovo China 2011 New World New Thinking www lenovo com TM ...

Page 54: ...n button 2 4 Lenovo App Manager 22 Lenovo Photo Frame 26 Clock 26 Photo frame 27 Lenovo VeriTouch 14 MicroSD 2 7 Multi touch 1 9 OneKey Rescue System 31 On screen keyboard 13 Password 14 Pinch 12 Power button 3 4 Rotation 3 Shortcuts 23 Tap 11 TotalMedia Center 25 USB port 2 WLAN 1 29 A B C D F L M O P R S T U W ...

Page 55: ... Lenovo China 2011 New World New Thinking TM www lenovo com V1 0_en US ...

Reviews: