background image

to IEC 60227 (designation H05VV-F 3G 0.75mm2 or H05VVH2-F2 3G 0.75mm2 ) 

shall be used. Alternative a flexible cord be of synthetic rubber according to IEC 60245 

(designation H05RR-F 3G 0.75mm2 ) shall be used.


10. 

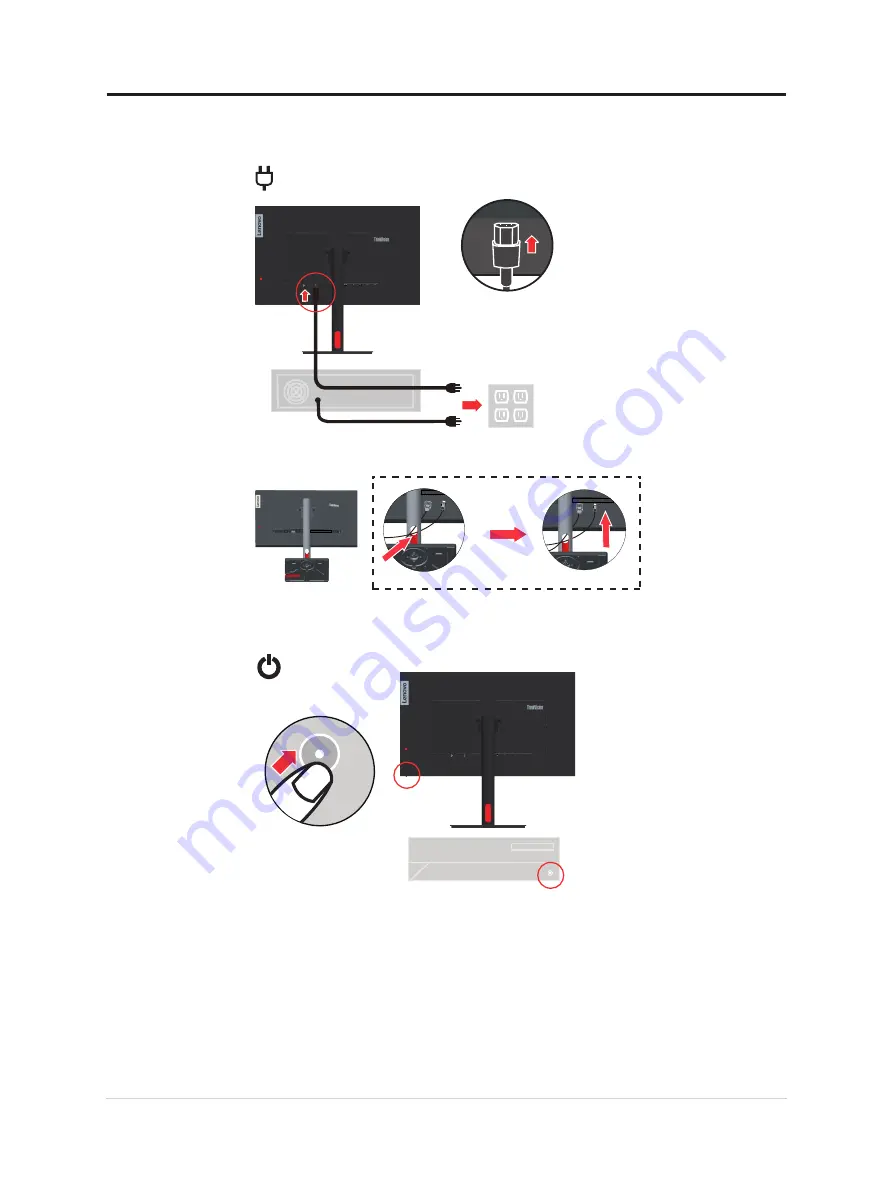
Assembled cables with Line Cleaner as shown below.


11. Power on the monitor and the computer.


12. 

When you install the monitor driver, download the driver that corresponds to your 

monitor model from the Lenovo website https://pcsupport.lenovo.com/solutions/t27i_30. 

Refer to the “Manually installing the monitor driver”on page 3-5

 section to install the 

driver.

 Chapter 1.Getting started  1-9

Summary of Contents for 63A4-MAR1-WW

Page 1: ...ThinkVision T27i 30 User Guide Machine Types 63A4 MAR1 WW ...

Page 2: ...old to governmental entities as commercial items as defined by 48 C F R 2 101 with limited and restricted rights to use reproduction and disclosure LIMITED AND RESTRICTED RIGHTS NOTICE If products data computer software or services are delivered pursuant a General Services Administration GSA contract use reproduction or disclosure is subject to restrictions set forth in Contract No GS 35F 05925 i ...

Page 3: ... 1 Comfort and accessibility 2 1 Adjusting your monitor image 2 3 Selecting a supported display mode 2 7 Understanding power management 2 8 Caring for your monitor 2 11 Detaching the monitor base and stand 2 11 Wall Mounting Optional 2 11 Chapter 3 Reference information 3 1 Monitor specifications 3 1 Troubleshooting 3 3 Manually installing the monitor driver 3 5 Service information 3 7 Appendix A ...

Page 4: ...Online technical support A 1 Telephone technical support A 1 Appendix B Notices B 1 Recycling information B 2 Trademarks B 3 Power cords and power adapters B 3 iii ...

Page 5: ...ou use your computer safely go to http www lenovo com safety Before installing this product read the Safety Information This equipment is not suitable for use in locations where children are likely to be present avoid hurting your child when machine falling down iv ...

Page 6: ...at Panel Monitor Power Cord Type A B Cable DisplayPort Cable USB A B HDMI Standalone Depending on many factors such as the processing capability of peripheral devices file attributes and other factors related to system configuration and operating environments the actual transfer rate using the various USB connectors on this device will vary and is typically slower than the data rates as defined by...

Page 7: ... area is glass and can be damaged by rough handling or excessive pressure 1 2 1 Place your monitor with the screen face down on a soft flat surface 2 Insert base into stand and lock 3 Insert the stand base assembly into the monitor Note To install a VESA mount please see Wall Mounting Optional on page 2 11 Chapter 1 Getting started 1 2 ...

Page 8: ...adjustments Tilt Please see the illustration below for an example of the tilt range 5 0 23 5 Swivel With the built in pedestal you can tilt and swivel the monitor for the most comfortable viewing angle 45 o 45 o Height Adjustment For height adjustment user needs to press down or lift up the monitor 155mm 1 3 T27i 30 Flat Panel Monitor User s Guide ...

Page 9: ...kwise until the monitor stops at 90 5 0 23 5 90 90 155mm Monitor controls The keypad controls on the back cover are accesses to various functions For information on how to utilize these keypad controls please see Adjusting your monitor image on page 2 3 Cable lock slot Your monitor is equipped with a cable lock slot located on the rear of your monitor Chapter 1 Getting started 1 4 ...

Page 10: ...er off your computer and all attached devices and unplug the computer power cord 2 Connect the cables according to below icon indication 3 For computer in DisplayPort connecting For other regions Lenovo recommends that customers who require to use the DP Cable on their monitor purchase the Lenovo DisplayPort to DisplayPort Cable 0A36537 www lenovo com support monitoraccessories 1 5 T27i 30 Flat Pa...

Page 11: ...HDMI connecting Lenovo recommends that customers who require to use the HDMI input on their monitor purchase the Lenovo HDMI to HDMI cable OB47070 www lenovo com support monitor accessories Chapter 1 Getting started 1 6 ...

Page 12: ...5 For computer in USB type A B connecting 6 Connect your mouse to the USB port on the monitor 1 7 T27i 30 Flat Panel Monitor User s Guide ...

Page 13: ...sert the power cord into the monitor then plug the monitor power cord and the computer cord into grounded electrical outlets Note A certified power supply cord has to be used with this equipment The relevant national installation and or equipment regulations shall be considered A certified power supply cord not lighter than ordinary polyvinyl chloride flexible cord according 1 8 T27i 30 Flat Panel...

Page 14: ...l be used 10 Assembled cables with Line Cleaner as shown below 11 Power on the monitor and the computer 12 When you install the monitor driver download the driver that corresponds to your monitor model from the Lenovo website https pcsupport lenovo com solutions t27i_30 Refer to the Manually installing the monitor driver on page 3 5 section to install the driver Chapter 1 Getting started 1 9 ...

Page 15: ...1 10 T27i 30 Flat Panel Monitor User s Guide ...

Page 16: ...luable to us in developing product and services that are important to you as well as in developing better ways to communicate with you Register your option on the following Web site http www lenovo com register Lenovo will send you information and updates on your registered product unless you indicate on the Web site questionnaire that you do not want to receive further information 1 11 T27i 30 Fl...

Page 17: ...comfortable viewing by considering the following items Viewing distance Recommended viewing distance between the eye and the monitor screen is 1 5 x the diagonal of the screen Solutions in meeting this required distance in cramped office situations include pulling desk away from wall or divider to make room for monitor using flat panel or compact displays placing the monitor in the desk corner or ...

Page 18: ...mputer components and office furniture to best suit your preferences now and as your preferences change over time Minor changes in posture can help avoid discomfort The longer you sit and work in front of your computer the more important it is to observe your working posture Avoid as summing any one posture for an extended period of time Periodically make minor modifications in your posture to hel...

Page 19: ...from the previous function 2 UP UP browsing key For increasing the value on adjustment bar tune in 3 Input Source Switches the video input source Press and hold for 10 seconds to Enable Disable the DDC CI 4 Down Down browsing key For decreasing the value on adjustment bar tune in 5 Menu To access OSD menu Press to confirm selection Press and hold for 10 seconds will lock menu un lock menu 6 Right ...

Page 20: ...a symbol of energy conservation and environmental protection It improves the concept of energy efficiency of consumers and manufacturers and effectively guides the market The regulation of Energy Star improves energy efficiency and reduces air pollution by using more energy efficient equipment in homes offices and factories One way to achieve this goal is to use management to reduce energy consump...

Page 21: ...e image Blue Increases or decreases the saturation of blue in the image Quick settings Right key Brightness Contrast Automatic language color mode All input ports Up key Down key Port Settings Input Signal Auto DisplayPort HDMI VGA All input ports USB Charging On Off DP Select DP 1 2 DP 1 1 Advanced settings Image Position Horizontal Position Vertical Position All input ports Image Setup Automatic...

Page 22: ...tory reset Reset No The use of Extreme Mode response time may result in reduced display quality when fast moving video graphics are displayed Users should check Extreme Mode response time to verify if it is compatible with any applications they would like to use it with Low Blue Light The display uses the low blue light panel It complies with TÜV Rheinland Low Blue Light Hardware Solution certific...

Page 23: ...usly been used with a CRT monitor and is currently configured to a display mode outside the range of this monitor you may need to reattach the CRT monitor temporarily until you have re configured the system preferably to 1920 x 1080 at 60 Hz which is a common display mode The display modes shown below have been optimized at the factory Table 2 3 Factory set display modes Timing Refresh rate Hz 640...

Page 24: ...There may be a slight delay before the image reappears ENERGY STAR Power Management Modes VESA Modes Horizontal Sync Vertical Sync Video Power Indicator Power Consumption Normal operation Active Active Active White 65 W maximum 24 W typical Active off mode Inactive Inactive Off Amber Less than 0 5 W Switch off Off Less than 0 3 W Energy Star Power Consumption PON 16 W ETEC 51 kWh Maximum power con...

Page 25: ...is to gently wipe the covers and the screen Remove grease or finger marks with a damp cloth and a little mild detergent Detaching the monitor base and stand Step 1 Place the monitor on a soft and flat surface Step 2 Press and hold the stand release button Step 3 Lift the stand up and away from the monitor Wall Mounting Optional Refer to the instructions that come with the base mounting kit To conv...

Page 26: ...00mm distance the type of VESA mounting screw is M4 x 10 mm VESA hole Step 5 Attach the LCD display to the wall and follow the instructions in the wall mounting kit For use only with UL Listed Wall Mount Bracket with minimum weight load 8kg Chapter 2 Adjusting and using your monitor 2 12 ...

Page 27: ...n Pixel pitch 0 2311mm 0 01 in Power input Supply voltage Max supply current 100 240V AC 1 5A Power consumption Note Power consumption figures are for the monitor and the power supply combined Note Typical power consumption is tested under OSD default setting Normal operation 65 W Max 24 W Typical Standby Suspend 0 5 W Off 0 3 W at 100VAC and 240VAC DP Interface DP Input signal VESA TMDS Panel Lin...

Page 28: ...y 48 Hz 75 Hz Native Resolution 1920 x 1080 at 60 Hz Temperature Operating 0 to 40 C 32 F to 104 F Storage 20 to 60 C 4 F to 140 F Shipping 20 to 60 C 4 F to 140 F Humidity Operating 10 to 80 non condensing Storage 5 to 95 non condensing Shipping 5 to 95 non condensing Chapter 3 Reference information 3 2 ...

Page 29: ...t another color setting from the OSD menu Adjusting your monitor image on page 2 3 The automatic image setup function was not performed Perform automatic image setup Adjusting your monitor image on page 2 3 The power indicator is not lit and there is no image The monitor s power switch is not switched on The power cord is loose or disconnected There is no power at the outlet Be sure the power cord...

Page 30: ...ized Your system DisplayProperties setting have not been optimized Adjust the resolution settings on your system to match the native resolution for this monitor 1920 x 1080 at 60 Hz Adjusting your monitor image on page 2 3 Perform automatic image setup If automatic image setup does not help perform manual image setup Selecting a supported display mode on page 2 6 When working in the native resolut...

Page 31: ...ck the Advanced Settings icon 8 Click the Monitor tab 9 Click the Properties button 10 Click the Driver tab 11 Click Update Driver then click Browse the computer to find the driver program 12 Select Pick from the list of device driver program on the computer 13 Click the Hard Disk button By clicking the Browse button browse and point to the following path X Monitor Drivers Windows 10 where X indic...

Page 32: ...e driver program 12 Select Pick from the list of device driver program on the computer 13 Click the Hard Disk button By clicking the Browse button browse and point to the following path X Monitor Drivers Windows 10 where X indicates the folder in which the downloaded driver is located such as a desktop 14 Select the lent27i 30 inf file and click the Open button Click the OK button 15 In the new wi...

Page 33: ...on monitor screens Service parts The following parts are for use by Lenovo service or Lenovo authorized dealers to support the customer warranty Parts are for service use only The table below shows information for model A22270FT0 T27i 30 63A4 MAR1 WW Table 3 3 List of service parts FRU Field Replaceable Unit Part number Description Machine Type Model MTM colour GEOGRAPHY 5D11H81830 T27i 30 27 inch...

Page 34: ...ustomer Support Center will be available until 90 days after the option has been withdrawn from marketing After that time the support is cancelled or made available for a fee at Lenovo s discretion Additional support is also available for a nominal fee Before contacting a Lenovo technical support representative please have the following information available option name and number proof of purchas...

Page 35: ... 0800 0000 850 Secondary 0800 0000 744 Arabic English El Salvador 800 6264 Spanish Estonia 372 66 0 800 Estonian Russian English Finland Warranty service and support 358 800 1 4260 Finnish France Warranty service and support hardware 0810 631 213 French Germany Warranty service and support 0800 500 4618 toll free German Greece Lenovo Business Partner Greek Guatemala Dial 999 9190 wait for operator...

Page 36: ...513 3939 Dutch New Zealand 0508 770 506 English Nicaragua 001 800 220 2282 Spanish Norway 8152 1550 Norwegian Panama Lenovo Customer Support Center 001 866 434 Toll Free Spanish Peru 0 800 50 866 OPCION 2 Spanish Philippines 1 800 8908 6454 GLOBE subscribers 1 800 1441 0719 PLDT subscribers Tagalog English Poland Laptops and tablets branded with logo Think 48 22 273 9777 ThinkStation and ThinkServ...

Page 37: ...34 662 787 3067 Standard Charges Apply Thai English Turkey 444 04 26 Turkish United Kingdom Standard warranty support 03705 500 900 local rate Standard warranty support 08705 500 900 English United States 1 800 426 7378 English Uruguay 000 411 005 6649 Spanish Venezuela 0 800 100 2011 Spanish Vietnam 120 11072 Toll Free 84 8 4458 1042 Standard Charges Apply Vietnamese English A 4 T27i 30 Flat Pane...

Page 38: ...the publication Lenovo may make improvements and or changes in the product s and or the program s described in this publication at any time without notice The products described in this document are not intended for use in implantation or other life support applications where malfunction may result in injury or death to persons The information contained in this document does not affect or change L...

Page 39: ...ernment In accordance with the Law for Promotion of Effective Utilization of Resources Lenovo Japan provides through its PC Collecting and Recycling Services for the collecting reuse and recycling of disused computers and monitors For details visit the Lenovo Web site at https www lenovo com jp ja services_warranty recycle pcrecycle Pursuant to the Law for Promotion of Effective Utilization of Res...

Page 40: ...sion Microsoft Windows and Windows NT are trademarks of the Microsoft group of companies Other company product or service names may be trademarks or service marks of others Power cords and power adapters Use only the power cords and power adapters supplied by the product manufacturer Do not use the AC power cord for other devices Appendix B Notices B 3 ...

Reviews: