Selecting a supported display mode
The display mode the monitor uses is controlled by the computer. Therefore, refer to your computer
documentation for details on how to change display modes.
The image size, position and shape might change when the display mode changes. This is normal and the image
can be readjusted using automatic image setup and the image controls.
Unlike CRT monitors, which require a high refresh rate to minimize flicker, LCD or Flat Panel technology is
inherently flicker-free.
Note:
If your system has previously been used with a CRT monitor and is currently configured to a display
mode outside the range of this monitor, you may need to re-attach the CRT monitor temporarily until you have
re-configured the system; preferably to 1366x768 at 60Hz, which is the Native Resolution Display mode.
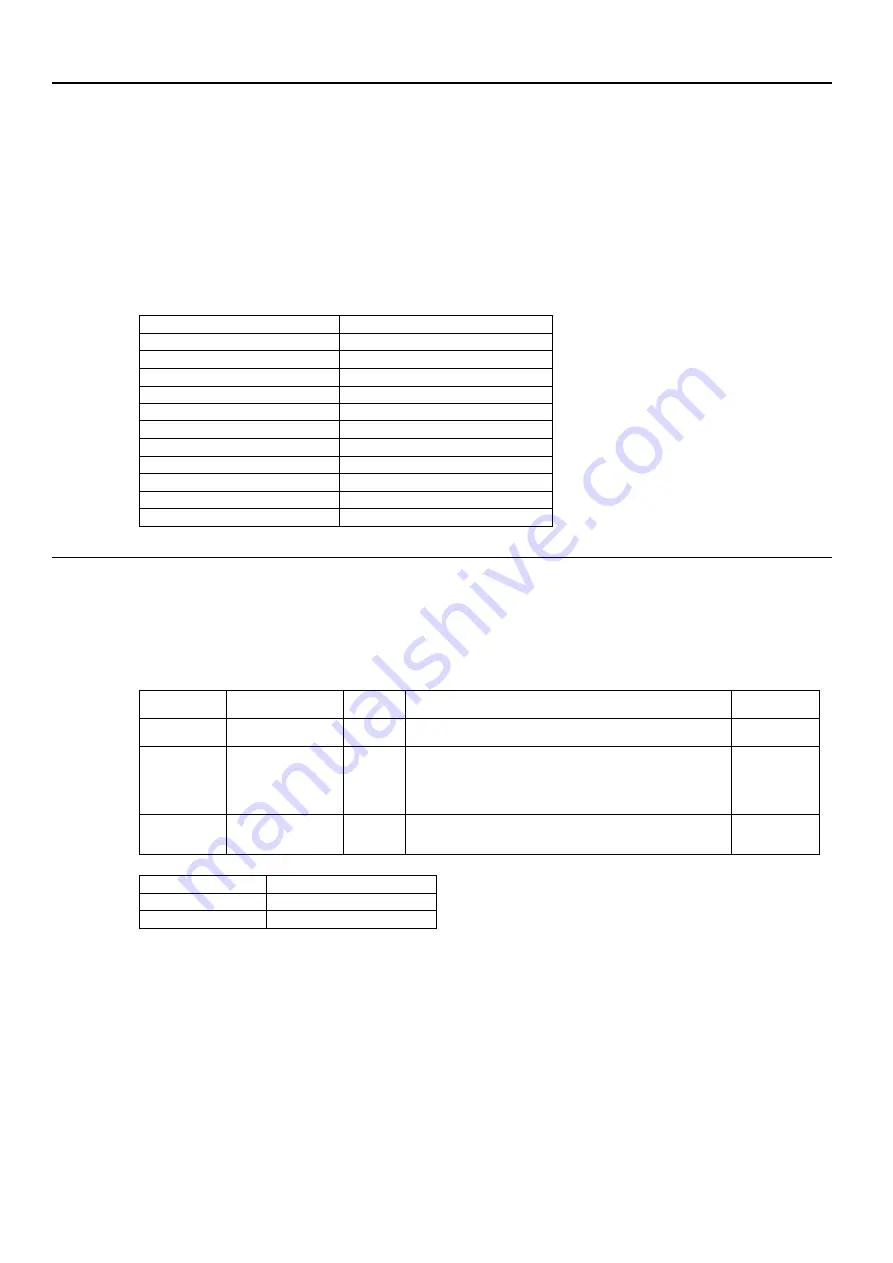
The display modes shown below have been optimized at the factory.
Table 2-3.Factory set display modes
Addressability
Refresh rate
PAL
50Hz
640x350
70Hz
640x480
60Hz,72Hz,75Hz
700x570
50Hz
720x400
70Hz
800x600
60Hz,72Hz,75Hz
832x624
75Hz
1024x768
60Hz,70Hz,75Hz
1152x864
75Hz
1280x1024
60Hz,70Hz,75Hz
1366x768
60Hz
Understanding power management
Power management is invoked when the computer recognizes that you have not using your mouse or keyboard for a
user-definable period. There are several states as described in the table below.
For optimal performance, switch off your monitor at the end of each working day, or whenever you expect to leave it
unused for long periods during the day.
Table2-4.Power indicator
State
Power Indicator Screen Restoring Operation
Compliance
On
Steady White
Normal
Standby/
Suspend
Steady amber
Blank
Press a key or move the mouse.There may be a slight
delay reappears.
Note: Standby also occurs if there is no image
output to the monitor.
ENERGY
STAR
Off
Off
Off
Press power key to switch on There may be a slight
delay before the image reappears.
ENERGY
STAR
Energy Star
Power consumption
P
on
10.02 W
E
TEC
31.57kWh
** Maximum power consumption with max luminance.
This document is informational only and reflects laboratory performance. Your product may perform differently,
depending on the software, components and peripherals you ordered and shall have no obligation to update such
information. Accordingly, the customer should not rely upon this information in making decisions about electrical
tolerances or otherwise. No warranty as to accuracy or completeness is expressed or implied.
Chapter 2 Adjusting and using your monitor 2-7
Summary of Contents for 61E0-KAR6-WW
Page 1: ...Lenovo D19 10 User Guide ...


