background image

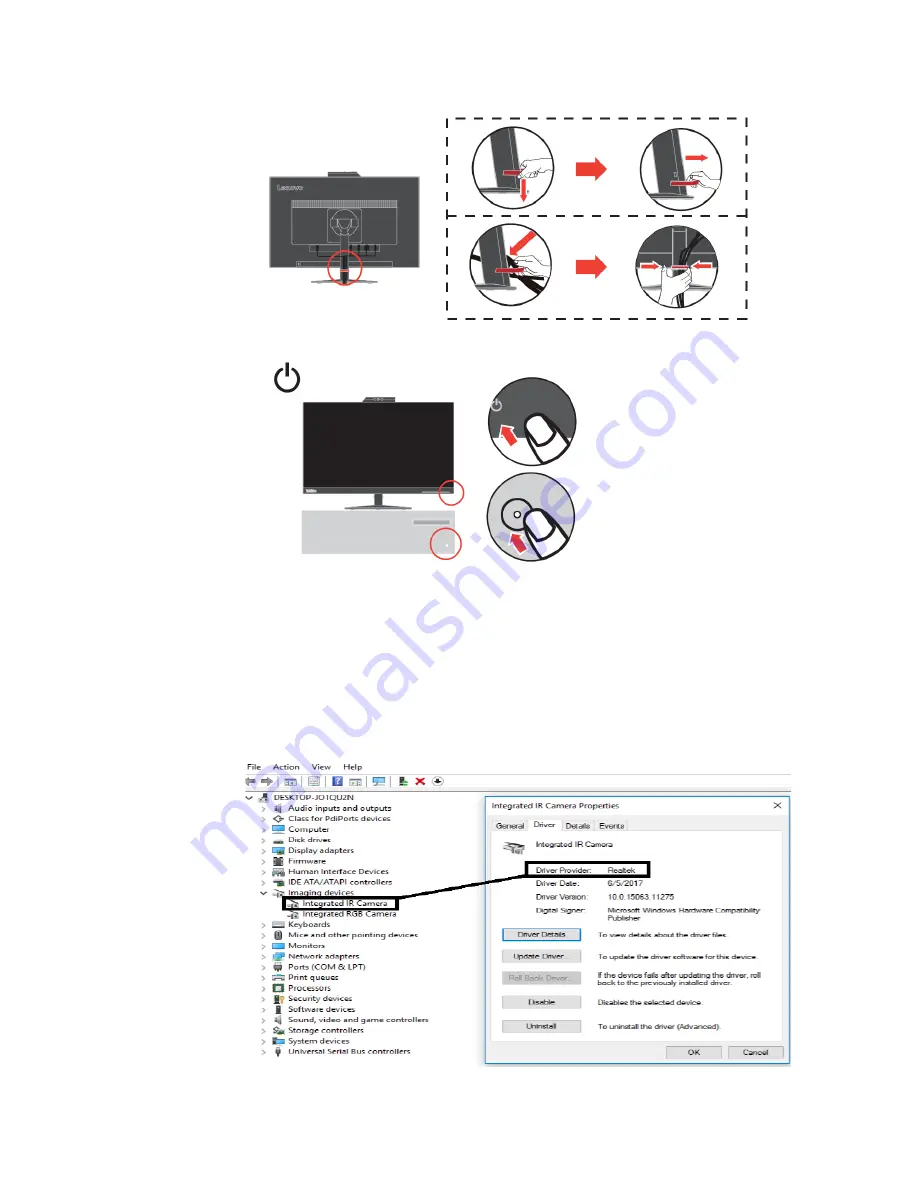
7. Assembled Line Cleaner as shown below.

8. Power on the monitor and the computer.

9. To install the monitor driver, you must download it from Lenovo website

(http://support.lenovo.com/docs/

T24v

_10) and follow the instructions on page 

3-5.

Windows Hello setup (Windows 10 Only) 

Note:

 To set up “Windows Hello”, do the following: 

1. Install the IR camera driver.

Note:

 To install the Camera driver, please see “Manually installing the IR camera driver in

Windows 10” on page 3-7. 

2. Confirm the driver has been installed correctly. (See the device manager and confirm the

Integrated IR Camera’s driver vender is “Realtek”. see as bellow.) 

1-8 

T24v

-10 Flat Panel Monitor User’s Guide


Summary of Contents for 61BC-MAR6-WW

Page 1: ...T24v 10 Flat Panel Monitor User s Guide Machine Type 61BC ...

Page 2: ...overnmental entities as commercial items as defined by 47 C F R 2 101 with limited and restricted rights to use reproduction and disclosure LIMITED AND RESTRICTED RIGHTS NOTICE IF products data computer software or services are delivered pursuant a General Services Administration GSA contract use reproduction or disclosure is subject to restrictions set forth in Contract No GS 35F 05925 Copyright ...

Page 3: ...nDisplay OSD controls 2 6 Selectingasupporteddisplaymode 2 9 Imagerotation 2 9 Audiodescription 2 10 Understandingpowermanagement 2 10 Caringforyourmonitor 2 10 Detachingthemonitorstand 2 11 WallMounting Optional 2 11 Chapter3 Referenceinformation 3 1 Monitorspecifications 3 1 Troubleshooting 3 3 Manualimagesetup 3 5 Manuallyinstallingthemonitordriver 3 5 ManuallyinstallingtheIRcameradriverinWindo...

Page 4: ...ety information General Safety guidelines For tips to help you use your computer safety go to http www lenovo com safety Before installing this product read the Safety Information Copyright Lenovo 2017 iii ...

Page 5: ...A for each device Install your monitor near a power outlet that you can easily reach Disconnect the monitor by grasping the plug firmly and pulling it from the outlet Never disconnect the monitor by pulling the cord Do not allow anything to rest on the power cord Do not walk on the cord While using VESA mount application the AC Inlet must face to down side Do not face any other position Maintenanc...

Page 6: ...ower Cord Analog signal Cable USB 3 0 Cable HDMI Cable Notice for use To setup your monitor please see the illustrations below Note Do not touch the monitor within the screen area The screen area is glass and can be damaged by rough handling or excessive pressure 1 Place your monitor with the screen face down on a soft flat surface 2 Align the stand assembly bracket to the monitor 3 Insert the bas...

Page 7: ...ypes of adjustments Tilt Please see the illustration below for an example of the tilt range Swivel With the built in pedestal you can tilt and swivel the monitor for the most comfortable viewing angle Height Adjustment After pressing the top of the monitor you can adjust the height of the monitor 1 2 T24v 10 Flat Panel Monitor User s Guide ...

Page 8: ...the monitor stops at 90 User controls Your monitor has controls on the front which are used to adjust the display For information on how to use these controls please see Adjusting your monitor image on page 2 6 Cable lock slot Your monitor is equipped with a cable lock slot located on the rear of your monitor Please follow the instructions that came with the cable lock to attach it Chapter 1 Getti...

Page 9: ...ion after setting up the Windows hello application Note 1 To set up windows hello please see Windows Hello setup Windows 10 Only on page 1 8 2 To install the Camera driver please see Manually installing the IR camera driver in Windows 10 on page 3 7 Slide the camera shutter open or close to enable disable the camera a Slide to open b Slide to close 1 4 T24v 10 Flat Panel Monitor User s Guide ...

Page 10: ...1 Use Volume control button to adjust volume Note To prevent possible hearing damage do not listen at high volume levels for long periods Warning for excessive sound pressure from earphones and headphones Excessive sound pressure from earphones and headphones can cause hearing loss Adjustment of the equalizer to maximum increases the earphones and headphones output voltage and therefore the sound ...

Page 11: ...ct the analog signal cable to the D SUB connector of the monitor and the other end on the back of the computer 3 Connect one end of the DP cable to the DP connector on the back of the computer and the other end to the DP connector on the monitor Lenovo recommends that customers who require to use the DisplayPort input on their monitor purchase the Lenovo DisplayPort to DisplayPort cable 0A36537 Fo...

Page 12: ...rmation go to the following www lenovo com support monitoraccessories 6 Plug the monitor power cord and the computer cord into grounded electrical outlets Note A certified power supply cord has to be used with this equipment The relevant national installation and or equipment regulations shall be considered A certified power supply cord not lighter than ordinary polyvinyl chloride flexible cord ac...

Page 13: ...e 3 5 Windows Hello setup Windows 10 Only Note To set up Windows Hello do the following 1 Install the IR camera driver Note To install the Camera driver please see Manually installing the IR camera driver in Windows 10 on page 3 7 2 Confirm the driver has been installed correctly See the device manager and confirm the Integrated IR Camera s driver vender is Realtek see as bellow 1 8 T24v 10 Flat P...

Page 14: ...lick Accounts choose Sign in options 4 Setup PIN number 5 Establish face recognition by clicking Set up Get started 6 Scanning your face information and enable face recognition to unlock your computer Chapter 1 Getting started 1 9 ...

Page 15: ...uable to us in developing products and services that are important to you as well as in developing better ways to communicate with you Register your option on the following Web site http www lenovo com register Lenovo will send you information and updates on your registered product unless you indicate on the Web site questionnaire that you do not want to receive further information 1 10 T24v 10 Fl...

Page 16: ...ing distance that is most comfortable for you Monitor height Position the monitor so your head and neck are in a comfortable and neutral vertical or upright position If your monitor does not have height adjustments you might have to place books or other sturdy objects under the base of the monitor to achieve the desired height A general guideline is to position the monitor such that the top of the...

Page 17: ...creen harder to see Generally lighting level should not exceed 750 lux and levels ranging from 300 to 500 lux are most appropriate for computer desk work Recommended lighting arrangement includes positioning work stations away from direct sunlight or using overhead lighting with baffles or louvers that reduces glare Working Habits Long exposures to computer screens may cause eye strain Symptoms in...

Page 18: ...osition Placing the monitor too far or too close may lead to eye strain Far viewing distance causes users to lean forward to see small texts which strain the eyes and torso Close viewing distance on the other hand strains the eye resulting from exerting more effort to focus and also causes the user to sit in awkward body posture i e tilting the head typing with outstretched arms etc Recommended vi...

Page 19: ...nitor flickers refer to repeated changes in monitor light intensity It is caused by several factors including but not limited to voltage fluctuations Reducing flicker minimizes eye strain and headaches ThinkVision monitors allow users to use high frequency display modes that can effectively reduce flicker Low Blue Light Concerns on blue light affecting eye health have risen over the years Blue lig...

Page 20: ...ight Accessibility information Lenovo is committed to providing greater access to information and technology to people with disabilities With assistive technologies users can access information in the way most appropriate to their disability Some of these technologies are already provided in your operating system others can be purchased through vendors or accessed at https lenovo ssbbartgroup com ...

Page 21: ...Screen Display OSD as shown below To use the controls 1 Press to open the main OSD menu 2 Use or to move among the icons Select an icon and press to access that function If there is a sub menu you can move between options using or then press to select that function Use or to make adjustments Press to save 3 Press to move backwards through the sub menus and exit from the OSD 4 Press and hold for 10...

Page 22: ...anual image setup on page 3 3 Clock Phase Analog Select Analog Signal Image Properties Input Signal DISPLAYPORT HDMI Select DP Signal Select HDMI Signal Adjusts intensity of red green and blue Preset mode Neutral sRGB Reddish Bluish Custom Red Increases or decreases Color the saturation of red in the Image Properties image Green Increases or decreases the saturation of green in the image Blue Incr...

Page 23: ... position of the OSD Options Factory Default Cancel Reset Resets monitor to the original factory settings Controls button and menu settings for accessibility preferences Options Accessibility Button repeat rate Select or to change Off Default Slow Menu time out Sets the length of time the OSD will remain active after the last time a button is pressed Options DP Select Select DP1 1 or DP1 2 DP1 1 D...

Page 24: ...800x600 56Hz 60Hz 72Hz 75Hz 832x624 75Hz 1024x768 60Hz 70Hz 75Hz 1152x864 75Hz 1280x1024 60Hz 70Hz 75Hz 1366x768 60Hz 1440x900 60Hz 1600x900 60Hz 75Hz 1680x1050 60Hz 1920x1080 60Hz Image rotation Before rotating the monitor you should set up your computer to rotate the image Rotating the image may require special rotation software or you may find that your computer is preloaded with video graphic ...

Page 25: ...long periods during the day Table2 4 Power indicator State Power Indicator Screen Restoring Operation Compliance On Steady green Normal Standby Suspend Steady amber Blank Press a key or move the mouse There may be a slight delay reappears Note Standby also occurs if there is no image output to the monitor ENERGY STAR Off Off Off Press power key to switch on There may be a slight delay before the i...

Page 26: ...on a non abrasive surface on stable flat table 2 Remove the stand 3 Attach the mounting bracket from the wall mounting kit to the monitor 4 Mount the monitor on the wall by following the instructions that come with the base mounting kit NOTE For use only with UL and GS Listed Wall Mount Bracket with minimum weight load bearing capacity of 6 00 kg In order to fulfil TCO Certification for this wall ...

Page 27: ...e time Normal 6 ms Extreme 4 ms Power input Supply voltage 100 240 VAC 60 50 Hz current 1 5A Power consumption Note Power consumption figures are for the monitor and the power supply combined Max Consumption 48W Typical Consumption 20W Standby Suspend 0 5W Off 0 3W Video input Analog Input signal Analog Horizontal addressability 1920 pixels max Vertical addressability 1080 lines max Clock frequenc...

Page 28: ...een noted ranges Native Resolution 1920 x 1080 at 60 Hz Temperature Operating 0 to 40 C 32 to 104 F Storage 20 to 60 C 4 to 140 F Shipping 20 to 60 C 4 to 140 F Humidity Operating 10 to 80 Storage 5 to 95 Shipping 5 to 95 Chapter 3 Reference information 3 2 ...

Page 29: ... on page 2 9 The image quality is unacceptable The video signal cable is not connected with the monitor or system completely Be sure the signal cable is firmly plugged into the system and monitor Connecting and turning on your monitor on page 1 6 The image quality is unacceptable The color settings may be incorrect Select another colour setting from the OSD menu Adjusting your monitor image on pag...

Page 30: ...ntal or vertical lines through the image Image setup has not been optimized Your system Display Properties setting have not been optimized Adjust the resolution settings on your system to match the native resolution for this monitor 1920 x 1080 at 60 Hz Adjusting your monitor image on page 2 6 Fuzzy lines in text or a blurry image Horizontal or vertical lines through the image Image setup has not ...

Page 31: ...es 2 Ensure that the monitor is connected correctly 3 Turn on the monitor and then turn on the computer Allow your computer to boot into Windows 7 operating system 4 From the Lenovo website http support lenovo com docs T24v_10 find the corresponding monitor driver and download it to a PC to which this monitor is connected such as a desktop 5 Open the Display Properties window by right clicking Sta...

Page 32: ... 6 Click the Change the display settings tab 7 Click the Advanced Settings button 8 Click the Monitor tab 9 Click the Properties button 10 Click the Driver tab 11 Click Update Driver then click Browse the computer to find the driver program 12 Select Let me pick from a list of device drivers on my computer 13 Click the Have Disk button By clicking the Browse button browse and point to the followin...

Page 33: ...nd then turn on the computer Allow your computer to boot into Windows 10 operating system 4 From the Lenovo website http support lenovo com docs T24v_10 find the corresponding IR camera driver and download it to a PC to which this monitor is connected such as a desktop 5 Double click the setup exe file in the folder where the downloaded camera driver is located 6 Follow the program s indication un...

Page 34: ... the Customer Support Centre For more information on contacting the Customer Support Centre please see Appendix A Service and Support on page A 1 Service parts The following parts are for use by Lenovo service or Lenovo authorized dealers to support the customer warranty Parts are for service use only The table below shows information for model 61BC MAR6 WW Table 3 3 List of service parts FRU Fiel...

Page 35: ...e option has been withdrawn from marketing Additional support offerings including step by step installation assistance are available for a nominal fee To assist the technical support representative have available as much of the following information as possible Option name Option number Proof of purchase Computer manufacturer model serial number and manual Exact wording of the error message if any...

Page 36: ...gary 36 13 825 716 English Hungarian India Primary 1800 419 4666 Tata Secondary 1800 3000 8465 Reliance Email commercialts lenovo com English and Hindi Indonesia 1 803 442 425 62 213 002 1090 Standard Charges Apply English Bahasa Indonesia Ireland Warranty service and support 01 881 1444 English Israel Givat Shmuel Service and Center 972 3 531 3900 Hebrew English Italy Warranty service and support...

Page 37: ...a Malaysia Slovakia ThinkStation and ThinkServer 421 2 4954 5555 Slovenia 386 1 2005 60 Slovenian Spain 34 917 147 833 Spanish Sri Lanka 9477 7357 123 Sumathi Information systems English Sweden Warranty service and support 077 117 1040 Swedish Switzerland Warranty service and support 0800 55 54 54 German French Italian Taiwan 0800 000 702 Mandarin Thailand 001 800 4415 734 662 787 3067 Standard Ch...

Page 38: ...s of the publication Lenovo may make improvements and or changes in the product s and or the program s described in this publication at any time without notice The products described in this document are not intended for use in implantation or other life support applications where malfunction may result in injury or death to persons The information contained in this document does not affect or cha...

Page 39: ...for Promotion of Effective Utilization of Resources Lenovo Japan provides through its PC Collecting and Recycling Services for the collecting reuse and recycling of disused computers and monitors For details visit the Lenovo Web site at www ibm com jp pc service recycle pcrecycle Pursuant to the Law for Promotion of Effective Utilization of Resources the collecting and recycling of home used compu...

Page 40: ...ed States other countries or both Lenovo The Lenovo logo ThinkCentre ThinkPad ThinkVision Microsoft Windows and Windows NT are trademarks of the Microsoft group of companies Other company product or service names may be trademarks or service marks of others Notices B 3 ...

Page 41: ...c Equipment EEE Lenovo and the Lenovo logo are trademarks of Lenovo in the United States other countries or both Ukraine RoHS India RoHS RoHS compliant as per E Waste Management Handling Rules 2011 Power cords and power adapters Use only the power cords and power adapters supplied by the product manufacturer Do not use the ac power cord for other devices B 4 T24v 10 Flat Panel Monitor User s Guide...

Reviews: