Page 30
TOP VIEW
Opening
1-5/8
(41)
SIDE VIEW
1-5/8
(41)
11-3/8
(289)
2 (51)
1-5/8
(41)
22-1/8
(562)
5/8
(16)
13-3/8 (340)
SUPPLY
AIR
OPENING
FIGURE 23
Inches
(mm)
23−1/4
(591)
DOWNFLOW COMBUSTIBLE BASE DIMENSIONS
20 (508)
D−Horizontal Right−Hand
Discharge Application
NOTE−For horizontal applications, a secondary drain pan is
recommended. Refer to local codes.
1− Before operating the unit, remove access panels and
the horizontal drip shield (−068 model) and the
corrugated padding between the blower and coil
assembly. Discard the corrugated padding and the
downflow drip shields from the foam pads on top of the
unit.
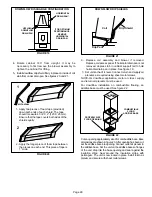
2− Install the horizontal shield on the front edge of the
horizontal drain pan as shown in figure 24.
3− No further adjustment is necessary. Set unit so it is
sloped toward the drain pan (1/4" [6mm]). See figure
24.
4− If hanging the unit, it must be supported along the entire
length of the cabinet. If using chain or strap, use a piece
of angle iron or sheet metal attached to the unit (either
above or below) so that the full length of the cabinet is
supported. Use securing screws no longer than 1/2"
(13mm) to avoid damage to coil or filter. See figure
25. Connect return and supply air plenums as
required using sheet metal screws.
NOTE−For horizontal applications in
high humidity
areas
, remove the downflow rail closest to the drain pan.
Removal of downflow rail will prevent sweating in high
humidity areas. To remove rail, remove screw from rail at
back of unit and at cabinet support rail. Remove downflow
rail then replace screws. Also, seal around the exiting
drain pipe, liquid and suction lines to prevent infiltration of
humid air.
FIGURE 24
RIGHT−HAND DISCHARGE CONFIGURATION
No Adjustment Is Necessary
HORIZONTAL DRIP
SHIELD (−068 MODELS)
UPFLOW / DOWN-
FLOW DRAIN PAN
HORIZONTAL
DRAIN PAN
DOWNFLOW
RAIL
FIGURE 25
HANGING HORIZONTAL UNIT
FRONT VIEW
END VIEW
ANGLE IRON
OR
SHEET METAL
Electrical Inlet
Clearance
4 in. (102 mm)
1/2" (13mm) Screws max.
CAUTION
Danger of equipment damage and personal injury.
Take care when removing coil assembly from unit
installed in right or left−hand applications. Coil
may tip into drain pan once clear of cabinet. Sup-
port coil when removing.

