background image

506318-03

Page 8 of 18

Issue 1946

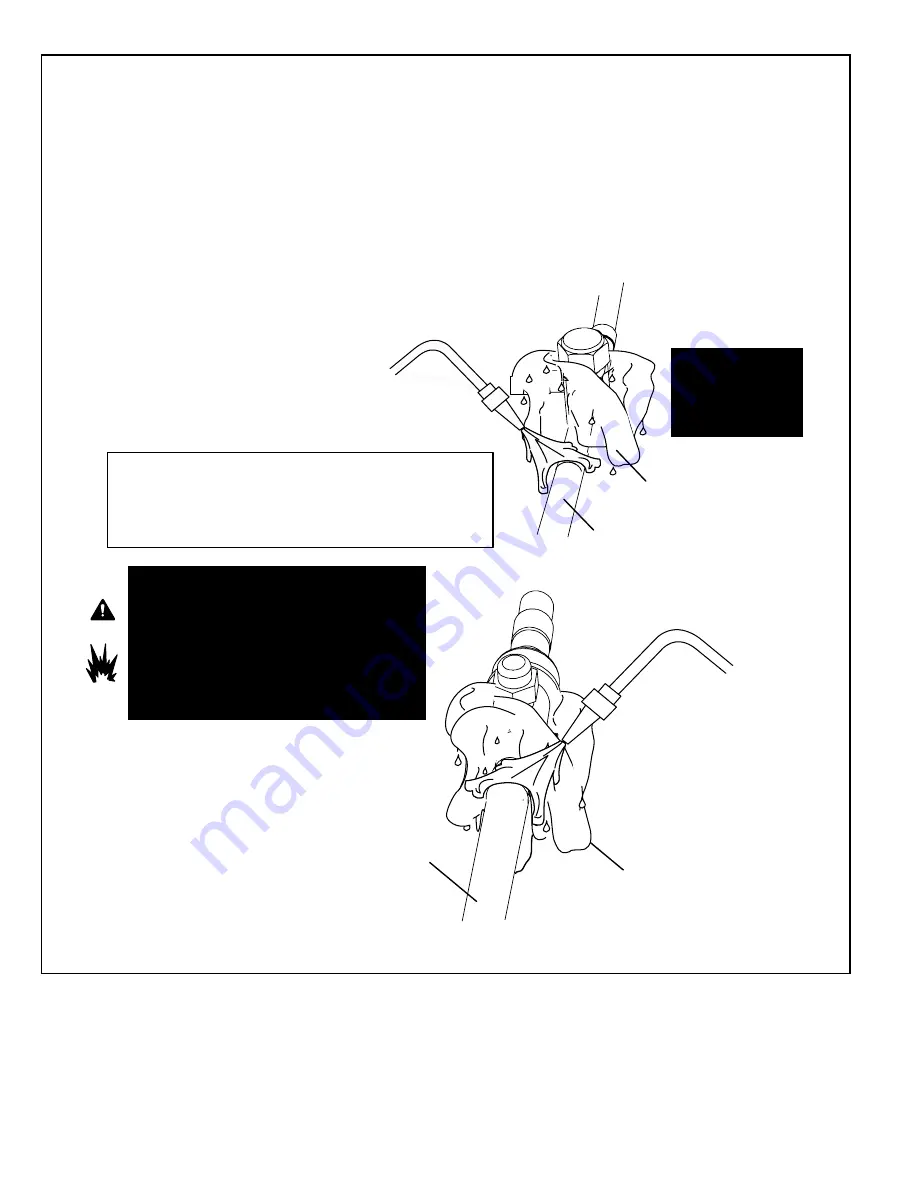
WHEN BRAZING LINE SET TO

SERVICE VALVES, POINT FLAME

AWAY FROM SERVICE VALVE.

LIQUID LINE SERVICE VALVE

LIQUID LINE

BRAZE LINE SET

Wrap both service valves with water-saturated cloths as illustrated here and as mentioned in step 4, before brazing to line set.

Cloths must remain water-saturated throughout the brazing and cool-down process.

WATER-SATURATED

CLOTH

IMPORTANT  — 

Allow  braze  joint  to  cool.  Apply

additional  water-saturated cloths to help cool brazed

joint.  Do  not  remove  water-saturated  cloths  until

piping  has  cooled.  Temperatures  above  250ºF  will

damage valve seals.

6

VAPOR LINE

WATER-SATURATED

CLOTH

VAPOR LINE

 SERVICE VALVE

After all connections have been brazed, disconnect manifold gauge set from service ports. Apply additional water-saturated cloths to both

services valves to cool piping. Once piping is cool, remove all water-saturated cloths.

WHEN BRAZING LINE SET TO

SERVICE VALVES, POINT FLAME

AWAY FROM SERVICE VALVE.

PREPARATION FOR NEXT STEP

7

WRAP SERVICE VALVES

To help protect service valve seals during brazing, wrap water-saturated cloths around service valve bodies and copper tube stubs. Use

additional water-saturated cloths underneath the valve body to protect the base paint.

4

FLOW NITROGEN

Flow regulated nitrogen (at 1 to 2 psig) through the refrigeration gauge set into the valve stem port connection on the liquid service valve and

out of the vapor valve stem port. See steps 

3A, 3B 

and 

3C

 on manifold gauge set connections.

5

WARNING

FIRE, PERSONAL INJURY, OR PROPERTY DAMAGE

may result if you do not wrap a water-saturated cloth around

both liquid and suction line service valve bodies and copper

tube  stub  while  brazing  the  line  set!  The  braze,  when

complete, must be quenched with water to absorb any

residual heat.

Do not open service valves until refrigerant lines and

indoor coil have been leak-tested and evacuated. Refer

to Leak Test and Evacuation section of this manual.

WARNING

While protecting the 

service valve seals with 

water-saturated cloths, 

ensure that water does 

NOT enter the system.

Summary of Contents for 4HP14

Page 1: ...alified personnel and do not supersede any national or local codes in any way The installation must comply with all provincial state and local codes as well as the National Electrical Code U S or Cana...

Page 2: ...nstalled on a solid foundation This foundation should extend a minimum of 2 inches beyond the sides of the outdoor section To reduce the possibility of noise transmission the foundation slab should NO...

Page 3: ...l or other barrier Table 2 Clearances 30 around Control Box 24 6 NOTE See Table 2 for specific minimum clearance guidelines Figure 2 DO LOCATE THE UNIT With proper clearances on sides and top of unit...

Page 4: ...8 042 3 8 3 8 7 8 7 8 048 3 8 3 8 7 8 7 8 060 3 8 3 8 7 8 1 1 8 Field supplied 7 8 x 1 1 8 connector required on both ends of vapor tubing Table 3 Recommended Liquid Vapor Tube Diameters in Be extra c...

Page 5: ...UNIT VAPOR LINE SERVICE VALVE VAPOR LIQUID 1 A B C D A Cylinder with clean R 410A positioned to deliver liquid refrigerant to the vapor service valve B Refrigerant gauge set low side to the liquid lin...

Page 6: ...il Shown Sensing bulb insulation is required if mounted external to the coil casing sensing bulb installation for bulb positioning STUB END TEFLON RING LIQUID LINE ASSEMBLY WITH BRASS NUT DISTRIBUTOR...

Page 7: ...ound Do not crimp end of the line Remove service cap and core from both the vapor and liquid line service ports 1 2 LIQUID LINE SERVICE VALVE SERVICE PORT CORE SERVICE PORT CAP SERVICE PORT CORE SERVI...

Page 8: ...ES POINT FLAME AWAY FROM SERVICE VALVE PREPARATION FOR NEXT STEP 7 WRAP SERVICE VALVES To help protect service valve seals during brazing wrap water saturated cloths around service valve bodies and co...

Page 9: ...of the manifold gauge set in order to pressurize the line set and the indoor unit E After a few minutes open one of the service valve ports and verify that the refrigerant added to the system earlier...

Page 10: ...id refrigerant Open the manifold gauge valve 1 to 2 psig in order to release the vacuum in the line set and indoor unit G Perform the following Close manifold gauge valves Shut off HFC 410A cylinder R...

Page 11: ...nch with a hex head extension to back the stem out counterclockwise as far as it will go Use a 3 16 hex head extension for liquid line service valves and a 5 16 extension for suction line service valv...

Page 12: ...the low voltage field wiring 2 Ground unit at unit disconnect switch or to an earth ground To facilitate conduit a hole is in the bottom of the control box Connect conduit to the control box using a...

Page 13: ...or varying lengths of line set refer to Table 4 for refrigerant charge adjustment A blank space is provided on the unit rating plate to list the actual field charge Table 4 Refrigerant Charge Adjustme...

Page 14: ...for 90 seconds following the start up of the compressor during test mode High Pressure Switch HI PS When the high pressure switch trips the defrost board will cycle off the compressor and the strike c...

Page 15: ...ition at power up the control will ignore the test pins When the jumper is placed across the TEST pins for 2 seconds the control will enter the defrost mode If the jumper is removed before an addition...

Page 16: ...ent fins may affect unit operation SHARP OBJECT HAZARD Condenser coils have sharp edges Wear adequate body protection on body extremities e g gloves FAILURE TO FOLLOW THIS WARNING COULD RESULT IN BODI...

Page 17: ...he defrost cycle In case of extended power outage If the outdoor temperature is below 50 F and power to your outdoor unit has been interrupted for one hour or longer observe the following when restori...

Page 18: ...506318 03 Page 18 of 18 Issue 1946 Figure 8 14 15 SEER Wiring Diagram...

Reviews: