background image

7

8

9

HDMI

SCART

VGA

R

L

VIDEO

RF(75    )

S-VIDEO

    PC 
AUDIO

,

,

,

,

ASPECT:

 select the picture display ratio:16:9/4:3/zoom.

Remote control functions

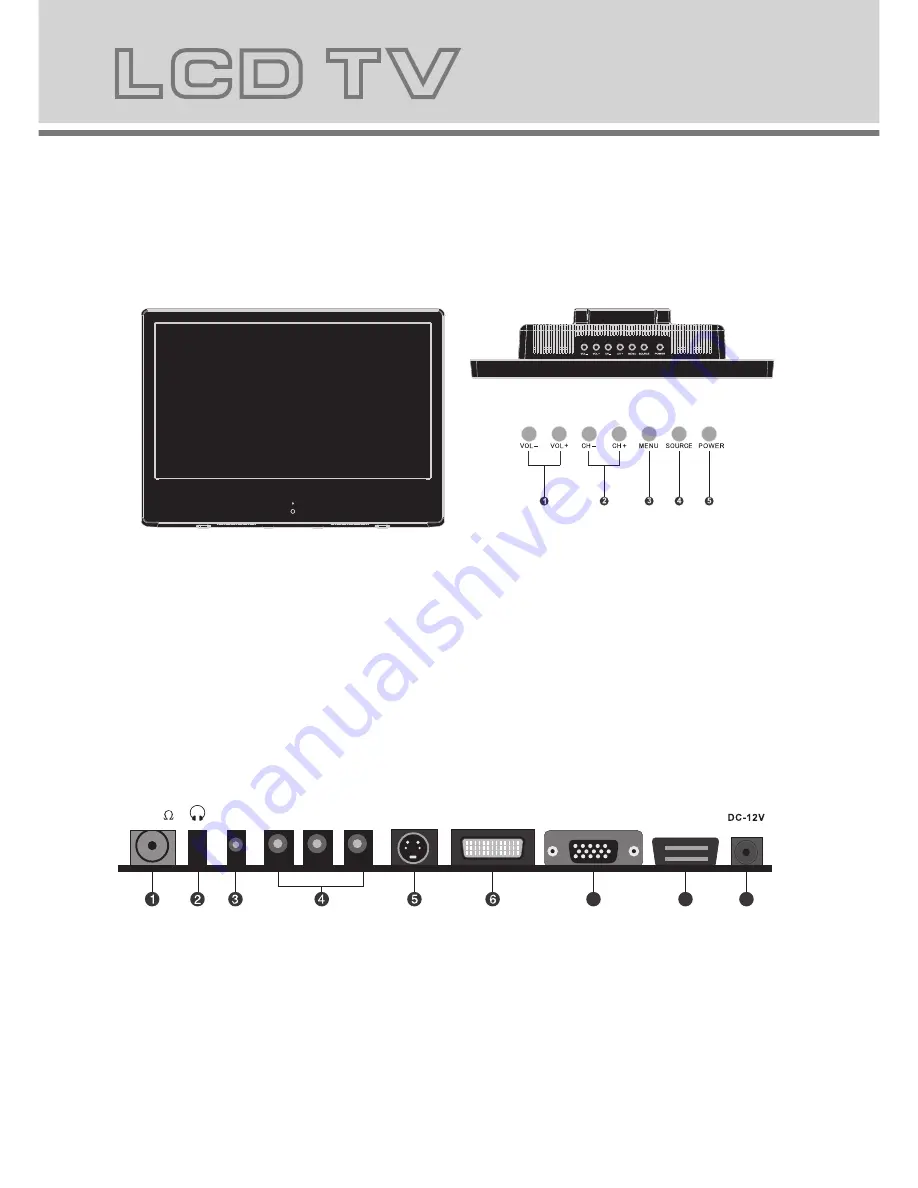
LCD TV panel overview

TV Control Panel

TV Terminal connections

6

7

1. Antenna input (75 Ohm VHF/UHF).
2. Headphone output.
3. PC audio input .
4. AV input .
5. S-VIDEO input .
6. SCART input/output terminal .
7. VGA input .
8. 

High definition multi media interface

9. DC 12V power input

1.Volume adjusting.
2.Channel selecting.
3.Main menu display and confirm.
4.Selecting exterior signal input.
5.On/off button.

Summary of Contents for TFT-1527

Page 1: ...For more information and support please visit www lenco eu ...

Page 2: ...USER MANUAL BENUTZERHANDBUCH GEBRUIKSAANWIJZING TFT 1527 For more information and support please visit www lenco eu ...

Page 3: ...please check whether all the accessories are present Before connecting parts and power please carefully read the user manual and always keep these instructions handy and close by your LCD TV OSD basic adjustment 9 Connecting to external devices 8 LCD TV panel overview 7 Remote control functions 6 Remote control manual 5 Warnings and Accessories 4 Safety precaution 3 2 ...

Page 4: ...chnician for inspection and if necessary repair Turn off and disconnect the power cable before cleaning or storing this product Ensure this product does not get wet or splashed Only use the A C power adapter supplied with your product or a replacement recommended by a authorised technician DON T s Do not place naked flames such as lighted candles on or near the product Do not place objects filled ...

Page 5: ...le distances around the product for sufficient ventilation Ventilation should not be impeded by covering ventilation openings with items such as newspapers table cloths curtains and the like Make sure the LCD TV stand is adjusted to a stable position Damage caused by using this product in an unstable position or by failure to follow any other warning or precaution contained within this user manual...

Page 6: ...Remote control manual If there is light around the TV the remote control may fail orwork abnormally If long time not touse the remote please remove the battery 5 AUDIO ASPECT Aspect button ...

Page 7: ... ASPECT select the picture display ratio 16 9 4 3 zoom Remote control functions 6 ...

Page 8: ...7 1 Antenna input 75 Ohm VHF UHF 2 Headphone output 3 PC audio input 4 AVinput 5 S VIDEO input 6 SCART input output terminal 7 VGA input 8 High definition multi media interface 9 DC 12V power input 1 Volume adjusting 2 Channel selecting 3 Main menu display and confirm 4 Selecting exterior signal input 5 On off button ...

Page 9: ...O VGA VGA PC HDMI SCART DVD HDMI HDMI Notes 1 VIDEO L R S VIDEO use a common Audio in 2 VIDEO L R of DVD is corresponding to VIDEO L R of LCD TV 3 SCARTto SCART from a DVD 4 PC to VGA using PC AUDIO 5 VIDEO L R from a DVD 6 HDMI from a DVD Connecting to external devices 8 HDMI SCART VGA R L VIDEO RF 75 S VIDEO PC AUDIO AUDIO ...

Page 10: ...ss the button to select the scale mode such as 9 Press the Menu button to return to upper menu 10 Press the Exit button to exit the OSD menu 16 9 4 3 ZOOM 1 Press the MENU button to enter the OSD menu Then press button to select the Sound menu 2 Press the button to enter the Sound menu Then press button to select Sound Mode and press the button to select the sound mode such as Normal News Movie Us...

Page 11: ... the channel number Then press button to select Swap and press to swap 7 Press button to select Sound SYS and press the button to select the sound system such as BG I DK L LL 8 Press the Menu button to return to upper menu 9 Press the Exit button to exit the OSD menu On B G Auto Tune Manual Tune Skip Fine Tune Channel Swap Sound SYS CH Channel MENU 1 1 Channel 1 Channel 2 Swap Exit Move Select MEN...

Page 12: ...elect Clock and press the button to enter clock adjustment menu to adjust clock 3 Press the button to select Phase and press the button to enter Phase adjustment menu to adjust phase 4 Press the button to select H Position and press the button to enter H Position adjustment menu to adjust horizontal position 5 Press the button to select V Position and press the button to enter V Position adjustmen...

Page 13: ...of the page again Or button on the remote control can be used to display the content of previous or next page Number button on the remote control can be used to get to a certain page Press the red green yellow cyan button on the remote control the page of relevant color displayed on the lower part of the screen will be displayed SIZE press it once to enlarge the content on the upper part of the pa...

Page 14: ...s the sleep timer set Check the power control settings Power interrupted No broadcast on station tuned with auto activated Picture appears slowly after switching on This is normal the image is muted during the product startup process Please contact your service center if the picture has not appeared after five minutes No or poor color or poor picture Adjust the color in menu option Keep a sufficie...

Page 15: ... your screen for a while Wet a soft cloth in a mixture of lukewarm water and a little fabric softener or dish washing detergent Wring the cloth until it s almost dry and then used it to wipe the s creen 2 Make sure the excess water is off the screen and then let it air dry before you turn on your TV To remove dirt or dust wipe the cabinet with a soft dry lint free cloth Please be sure not to use a...

Page 16: ... NTSC PAL SECAM NTSC PAL SECAM S Video Input Composite Video input Antenna RF Audio Output Maximum Audio Output Input Connections TV Input 1 RF 75 Ohm VGA Input 1 15 pin D Sub AV Input L R Audio Input For AV S Video 1 Composite Yellow RCA 1 White RCA Red RCA PC Audio in Stereo Mini Phono Jack Input 3 5mm VGA Resolutions Supported 640x480 60Hz 75Hz 800x600 60Hz 75Hz 1024x768 60Hz 75Hz Power 2 x 3W ...

Reviews: