6
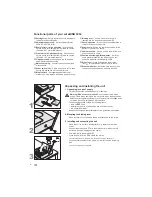
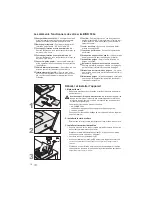
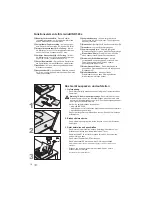
Functional parts of your wireBIND 500e
ÿ
Binding lever
– Used to close the wire comb
inserted into the wire closer mechanism
.
ÿ
Punching button
– Press to punch sheets placed in
the front or rear punching slots.
ÿ
Paper scale
– Shows the comb size needed for the
amount of sheets to be bound.
ÿ
Comb size scale
– Can be used to read off the size
of an unused wire comb.
ÿ
Continuous closing width adjuster
– Set to the
comb diameter used. By fine adjusting, you can
achieve a perfectly closed binding comb.
ÿ
Wire closer
– When pulling down the binding
lever
, this mechanism closes the wire comb.
ÿ
Wire comb holder
– Holds the open wire comb so
that the punched sheets can be easily inserted.
ÿ
Cuttings tray
– Empty regularly to avoid damage to
the motor and punching dies.
ÿ
Adjustable paper stop
– Set to the paper format
used: A5, A4 or US letter.
ÿ
Rear slot for 3:1-pitch punching
– Place sheets
here to punch for binding with 3:1-pitch wire combs
(34 holes, 8,47 mm hole distance).
ÿ
Front slot for 2:1-pitch punching
– Place sheets
here to punch for binding with 2:1-pitch wire combs
(23 holes, 12.7 mm hole distance).
ÿ
Lid/paper stand
– When opened, the lid acts as a
paper stand to ease punching.
ÿ
Mains cable/plug
– Connect to a properly-earthed
mains socket.
ÿ
Power switch (I/O)
– Switch unit on and off. To save
energy, always switch off the unit after use.
ÿ
Blow-out fuse
– Safeguard against electrical
malfunction. Only replace with same type and rating.
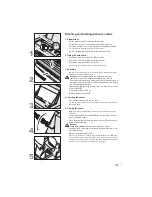
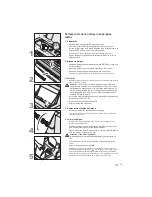
Unpacking and installing the unit
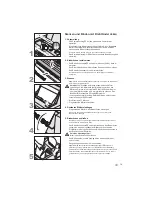
1. Unpacking / scope of supply
Carefully unpack the unit and inspect it for damage.
Warning! Risk of electrical shock.
Do not connect to the mains
supply if there is any damage to the unit (loose parts, broken chassis,
defective or wrong mains cable etc.) or if the local mains voltage does
not match the rating indicated on the type plate.
The packaging should contain the following items:
– the wireBIND 500e,
– a starter set (choice of wire combs and front/rear covers),
– this operation manual.
Keep the packaging material at least until the guarantee has expired.
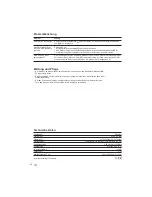
2. Mounting the binding lever
Place the lever onto the axis as shown and fasten it with the screw.
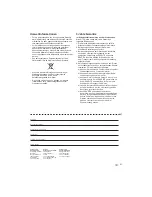
3. Installing and connecting the unit
Place the unit on a stable, level surface (e. g. table) near a mains
outlet.
Connect the mains cable
with the mains outlet in a way to avoid
accidents (such as tripping over the cable).
Fold back the lid (paper stand)
.
Press the power switch
to switch the unit on.
The punching dies were coated with protecting oil during manufacture.
Punch several sheets of scrap paper in order to clean the punching
dies.
The unit is now ready for operation.
•
•
•
•
•
•
•
•
•
1
2
3
Summary of Contents for wireBIND 500e
Page 3: ...wireBIND 500e ...
Page 9: ...10 Notes ...
Page 15: ...16 Notes ...
Page 21: ...22 Notizen ...
Page 27: ...28 Appunti ...
Page 33: ...34 Anotaciones ...
Page 39: ...40 Apontamentos ...
Page 45: ...46 Notities ...
Page 51: ...52 Noter ...
Page 57: ...58 Notater ...
Page 63: ...64 Anteckningar ...
Page 66: ... LEITZ 2006 www esselte com www leitz com ...
Page 70: ...70 Merkintöjä ...
Page 76: ...76 Märkused ...
Page 82: ...82 Piez mes ...
Page 88: ...88 Pastabos ...
Page 94: ...94 Uwagi ...
Page 100: ...100 ...
Page 106: ...106 Poznámky ...
Page 112: ...112 Poznámky ...
Page 118: ...118 Jegyzetek ...
Page 124: ...124 Notlar ...


