background image


Contents


Important Safety Instructions 

Accessories 

System Connections 

View of Main Unit 

Power supply Preparation 

Use of the Mount Accessories 

Troubleshooting 

Specifications 

…………………………………..……..…..1 

……………………………….……….…....5 

……………………………….………..…...7 

………………………………..…………....9 

……………………………….…….….…10 

…………………………….…….….…….11 

……………………………….……….…..12 

…………………………….……………...14 

Summary of Contents for Mojo Mini

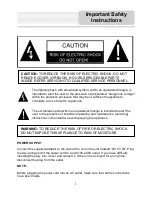
Page 1: ...HOCK DO NOT REMOVE COVER OR BACK NO USE SERVICEABLE PARTS INSIDE REFER SERVICING TO QUALIFIED SERVICE PERSONNEL The lightning flash with arrowhead symbol within an equilateral triangle is intended to...

Page 2: ...heat registers stoves or other apparatus including amplifiers that produce heat 9 Do not defeat the safety purpose of the polarized or grounding type plug A polarized plug has two blades with one wid...

Page 3: ...osures or road conditions traffic congestion weather conditions or other factors that may affect safety or timing while driving Use the unit only as a navigational aid Do not attempt to use the unit f...

Page 4: ...ouraged to try to correct the interference by one or more of the following measures Reorient or relocate the receiving antenna Increase the separation between the equipment and receiver Connect the eq...

Page 5: ...ns not expressly approved by the grantee of this device could void the user s authority to operate the device The images in this manual are for reference only and they may appear different from the ac...

Page 6: ...our GPS unit ITEM NAME QTY Car Adaptor 1 Mounting Bracket 1 Mounting Cradle 1 Stylus 1 USB Cable 1 User s Manual 1 NOTE Accessories and their parts numbers are subject to modification without prior no...

Page 7: ...7 Contents Important Safety Instructions Accessories System Connections View of Main Unit Power supply Preparation Use of the Mount Accessories Troubleshooting Specifications 1 5 7 9 10 11 12 14...

Page 8: ...ess for a longer time to enter or exit the standby mode 4 ON OFF Switch Used to switch power on or off 5 Card Slot Insert the SD card into the slot 6 Earphone Jack Connect earphone for private listeni...

Page 9: ...ke sure the area with built in GPS Antenna of the unit is not obstructed by something such as heat insulation paper and has a clear view of the sky And you d better to position the unit with its GPS a...

Page 10: ...o the unit as shown below To remove the card gently press the card in with your fingernail The card unlocks and protrudes slightly You can now remove the card Connecting to Earphones Connect the earph...

Page 11: ...ttery Your portable GPS device comes with a built in rechargeable battery Charge the battery fully before initial use Charging time is normally about 3 hours A fully charged battery delivers about 2 h...

Page 12: ...irection to mount the unit to the mount cradle To remove the unit push the tap at the top of the mount cradle in arrow 1 opposite direction 3 Lift the suction cup lever and then press the suction cup...

Page 13: ...eable battery is weak Use the adaptor to supply power or charge the battery Unit will not activate after pressing and holding the stand by button when connected to the adaptor for charging The unit ha...

Page 14: ...wing of the unit is too great Avoid great swing of the unit System software of the unit fails to function after a change Turn the unit on again Other possibilities Static or other external interferenc...

Page 15: ...th your Local Authority or retailer for recycling advice Waste Electrical and Electronic Equipment Directive TFT screen size 4 3 inches Frequency Response 20Hz 20kHz Audio Signal to noise Rate 65dB Au...

Reviews: