3
SET TIME AND DATE MENU
Within the
SET TIME AND DATE
menu you will enter the correct
time, date and Daylight Savings Time (DST) start and end days.
The unit is shipped with the correct DST start and end dates
already programmed.
To exit
SET TIME AND DATE
menu, press the ↓ button to highlight
PREVIOUS
menu. Press the
center
button to select and return to
the
SETUP
menu.
LOCATION MENU
Within the
LOCATION
menu you will be required to enter the local
longitude/latitude coordinates and time zone. If you do not know
this information, we have included a list of the major US cities on
page 5. You can also find latitude and longitude lookup tools on
the internet. One example is www.latlong.net.
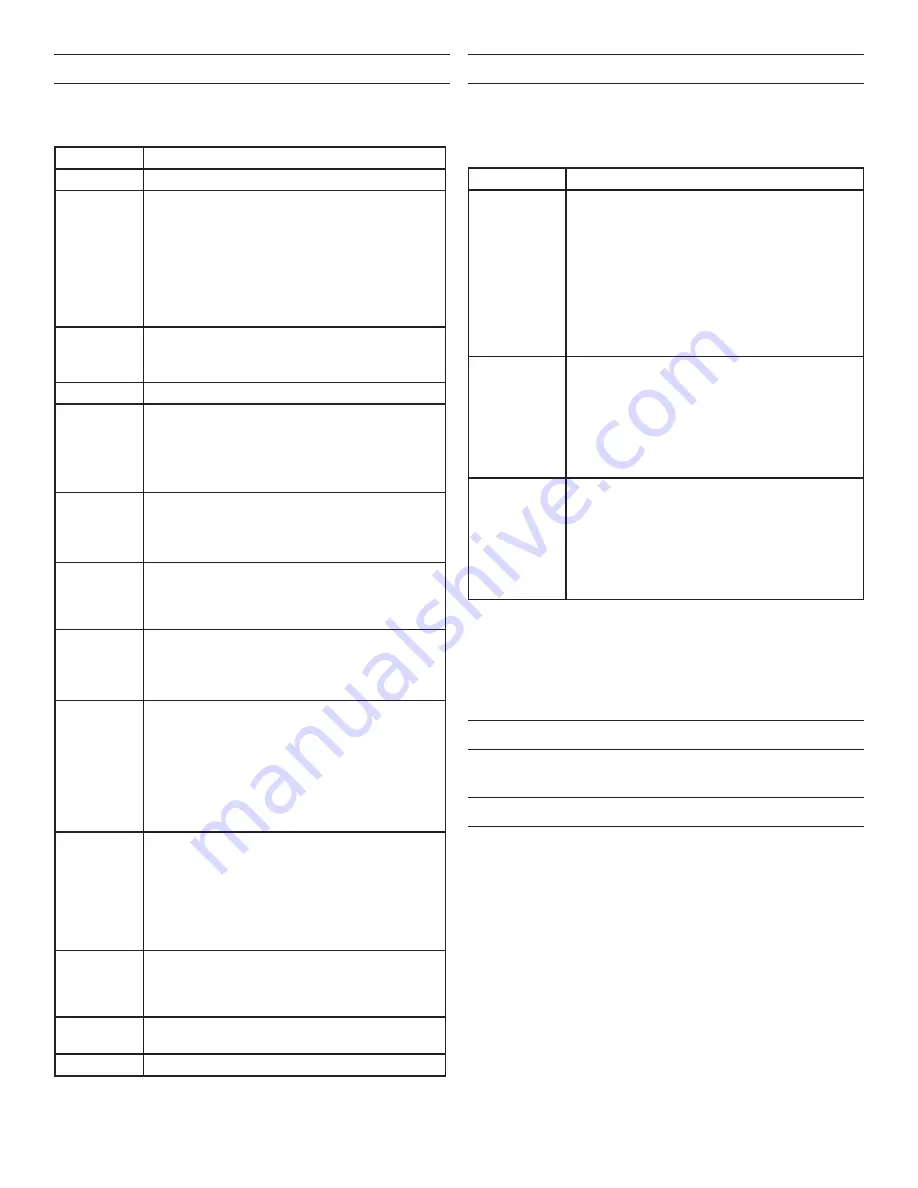
Setting
Steps
TIME ZONE
1. From the
SETUP
menu highlight
LOCATION
and press the
center
button.
TIME ZONE
should be highlighted.
2. Press the
center
button to select the time
zone.
3. Press the
↓
button to decrease the time
zone or the
↑
button to increase the time
zone.
4. Press the
center
button to save time zone
setting.
LONGITUDE
1. Press the
↓
button to highlight
LONGITUDE
.
2. Press the
center
button to select the
longitude
3. Press the
↓
button to decrease the longitude
or the
↑
button to longitude the time zone.
4. Press the
center
button to save longitude
setting.
LATITUDE
1. Press the
↓
button to highlight
LATITUDE
.
2. Press the
center
button to select the
latitude.
3. Press the
↓
button to decrease the latitude
or the
↑
button to latitude the time zone.
4. Press the
center
button to save latitude
setting.
To exit the
LOCATION
menu, press the ↓ button to highlight
PREVIOUS MENU
. Press the
center
button to select and return to
the
SETUP
menu. Once the location information is entered, return
to the
MAIN PAGE
and press the left button. This will display the
sunrise and sunset times. Use this as a check to validate that the
location information has been entered in correctly.
COVER PLATES
Wattstopper RT wall switches fit behind industry standard
decorator style switch cover plates.
TROUBLESHOOTING
Lighted switch is
OFF
, no load response to
ON/OFF
button press:
• Make certain that the circuit breaker is on and functioning.
Lighted switch is
ON
, no load response to
ON/OFF
button press:
• Check the light bulb and/or motor switch on the fan
mechanism.
NOTE:
If load does not respond properly after following
troubleshooting, turn OFF power to the circuit then check
wire connections or call technical support.
Setting
Steps
TIME
Hour
1. From the
SETUP
menu highlight
SET TIME
AND DATE
and press the
center
button.
TIME
should be highlighted.
2. Press the
center
button to highlight hour.
3.
Press the ↓ button to decrease the hour or
the ↑ button to increase the hour.
4. Press the
center
button to save hour setting
and move highlighted cursor to minute.
Minute
1.
Press the ↓ button to decrease the minute or
the ↑ button to increase the minute.
2. Press the
center
button to save time setting.
DATE
1. Press the
↓
button to highlight
DATE
.
Month
1. Press the
center
button to highlight month.
2. Press the
↓
button to decrease the month or
the
↑
button to increase the month.
3. Press the
center
button to save month
setting and move highlighted cursor to day.
Day
1. Press the
↓
button to decrease the day or the
↑
button to increase the day.
2. Press the
center
button to save day setting
and move highlighted cursor to year.
Year
1. Press the
↓
button to decrease the year or
the
↑
button to increase the year.
2. Press the
center
button to save year setting.
DST
(DAYLIGHT
SAVINGS
TIME)
Factory Default Setting:
DST ENABLED
(The
unit will automatically adjust for Daylight Savings
Time).
Press the
↓
button to highlight
DST
DST
When
enabled,
DST appears
in the upper
right corner
of the MAIN
PAGE.
1. Press the
center
button to highlight
ENABLED
.
2. Press the
↑
button to switch between
ENABLED
and
DISABLED
.
3. Press the
center
button to save
DST
setting.
Start - Week
(Input week
when DST
starts)
1.
Press the ↓ button to highlight
START
. Press
the
center
button to highlight 1st.
2.
Press the ↓ button to decrease the week of
the month or the ↑ button to increase the
week of the month.
3. Press the
center
button to save the week
and move highlighted cursor to the month.
Start –
Month (Input
month when
DST starts)
1.
Press the ↓ button to decrease the start month
or the ↑ button to increase the start month.
2. Press the
center
button to save month.
End – Week 1.
Press the ↓ to highlight End.
2. Follow same steps for Start – Week.
End – Month Follow same steps for Start - Month.


