


1
1
2
3
HD4657M3
HD4657M4
HC4657M3
HC4657M4
HS4657M3
HS4657M4
573912
573913
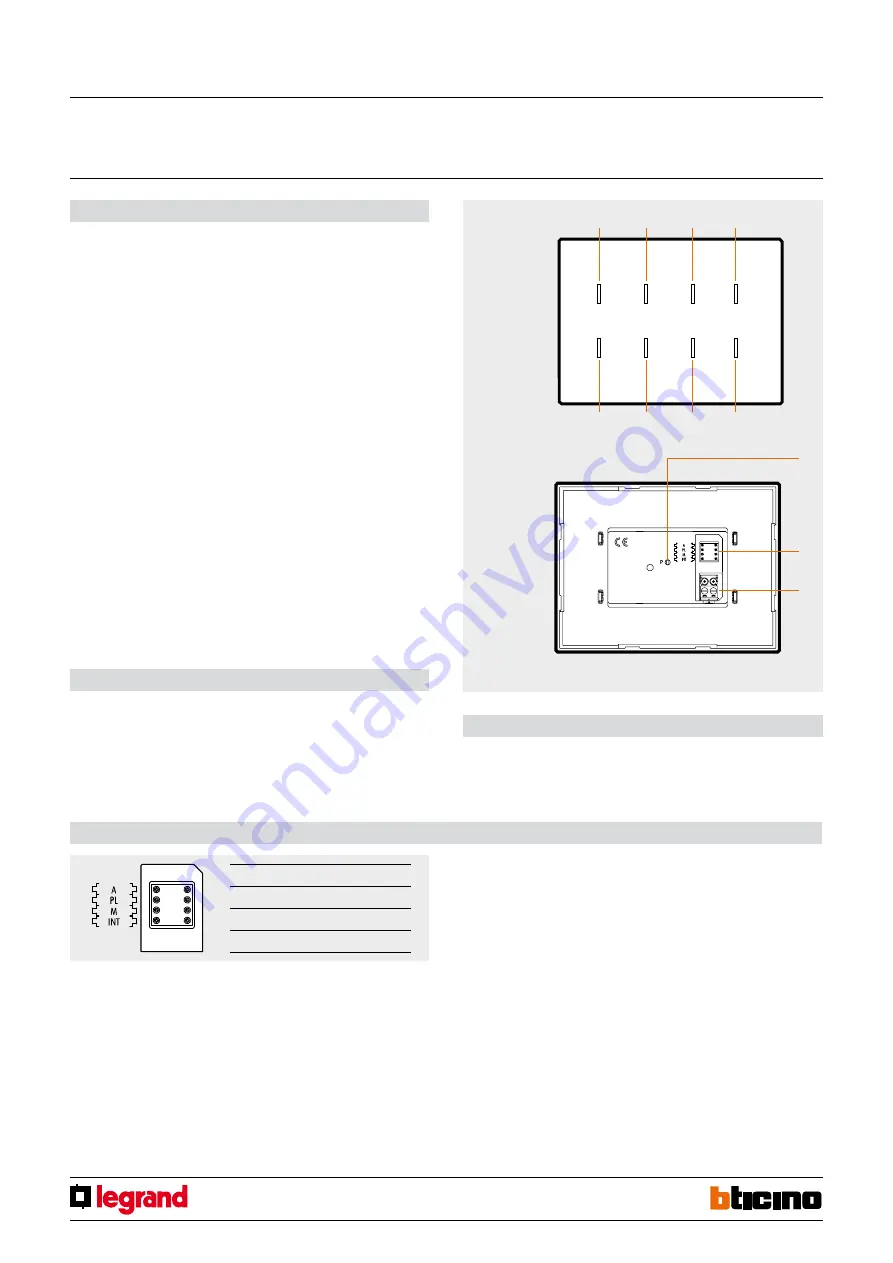
front view
rear view
Technical data
Power supply via SCS BUS:
27 Vdc
Operating power supply with SCS BUS:
18 – 27 Vdc
Maximum current draw HD/HC/HS4657M3:
20 mA
Maximum current draw HD/HC/HS4657M4:
25 mA
Maximum current draw 573912/13:
35 mA
Operating temperature:
0–40°C
Description
The touch control is a device in which conventional buttons are replaced by capacitive
sensors. The device can then carry out some typical functions of a SCS control when you
simply touch its surface. It is available in flush-mounted versions with 3 or 4 modules,
with respectively 6 and 8 buttons. Each zone corresponding to a button is marked in
the centre by a light-blue LED. When the user brings a finger near to it, the brightness
increases significantly and remains bright until the finger is moved away. YOU can
change the level of brightness of the LEDs with the adjustment button. The control can
operate in four different modes: self-learning, scenarios, rocker, CEN.
-
The self-learning mode
(cyclic or non-cyclic) allows you to pair each button with
most of the typical controls of automation, sound and video door entry systems (stair
lights, door openers, floor calls, lock and camera cycling), as well as the auxiliary
controls. Available only with the physical configuration. With MYHOME_Suite virtual
configuration you can associate each button with a specific function.
-
Scenario mode:
allows you to recall, program and delete 6 or 8 scenarios of a scenario
module.
-
Rocker mode:
enables piloting 3 or 4 consecutive lighting points or roller shutters (or
rooms or groups).
-
Scenario programmer mode
: allows you to use the control with the scenario
programmer MH200N.
To enable cleaning the device you can temporarily disable the sensitive areas by pressing
two end zones diagonally. The LEDs will start flashing in sequence and normal operation
will be returned after 10 seconds have elapsed without any further pressing.
Legend
1. Button for programming and setting LED brightness
2. Configurator socket
3. BUS
Touch control
MQ00110-f-EN
07/06/2014
The device can be configured in two ways:
- PHYSICAL CONFIGURATION, inserting the configurators in position.
- Configuration via MYHOME_Suite software package, downloadable from
www.homesystems-legrandgroup.com; this mode has the advantage of offering many
more options than the physical configuration.
For a list of the procedures and their meanings, please refer to the instructions in
this sheet and to the "Function Descriptions" help section in the
MYHOME_Suite software package.
Configuration
List of Functions
The device performs the following functions:
1. LIGHT SWITCH
2. AUTOMATION CONTROL
3. DEVICE LOCKING/UNLOCKING
4. SCENARIO MODULE CONTROL
5. PROGRAMMED SCENARIO ACTIVATION
6. PLUS PROGRAMMED SCENARIO ACTIVATION
7. VIDEO DOOR ENTRY FUNCTIONS
8. SOUND SYSTEM CONTROL
A
room
PL
lighting point
M
mode
SET
LED display mode
Button 1
Button 2
Button 3
Button 4
Button 5
Button 6
Button 7
Button 8


