


54
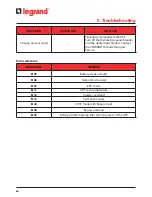
4.2
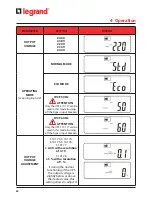
Operating modes
UPS OPERATING MODE
LEDs/DISPLAY INDICATION
BUZZER
NORMAL MODE
on-line, double conversion
LEDs: steady
,
DISPLAY:
No sound
STORED ENERGY MODE
The loads are supplied through the
batteries connected to the UPS
LEDs: fixe
DISPLAY:
Beep every second
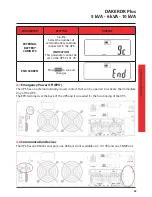
BYPASS MODE
The loads are supplied directly from
the mains. The UPS does not protect
the loads.
The UPS is in bypass mode when it is
in standby, after a generic alarm or a
prolonged overload in normal mode.
LEDs: steady
DISPLAY:
No sound (with the
UPS in standby)
Beep every two
seconds (after a
prolonged over-
load or another
generic alarm)
ECO MODE
The loads are supplied directly from
the mains through the automatic
bypass circuit inside the UPS. The
output voltage and frequency are
the same as the mains.
LEDs: steady
DISPLAY:
No sound
CVCF 50/60
The UPS maintains constant the
output voltage and the output fre-
quency to 50 Hz or 60 Hz according
to the setting
WARNING
Only the UPS 3 101 77 can be used
in this mode (turning off the bypass
input breaker)
LEDs: steady
DISPLAY:
No sound
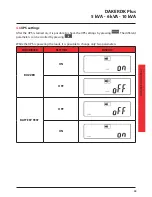
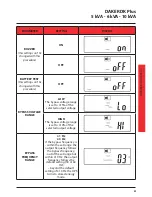
See also paragraph 4.6 to set the operating mode.
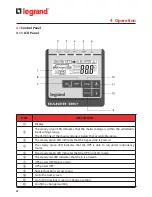
4 Operation
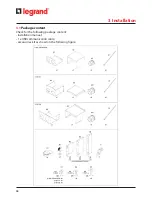
Summary of Contents for DAKER DK Plus 3 101 73
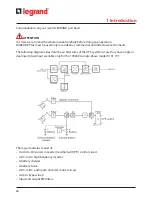
Page 10: ...10 3 2 2 Onduleur armoire batteries option 3 Installation Phase 1 Phase 2 ...
Page 12: ...12 3 Installation Phase 5 Phase 6 ...
Page 38: ...38 ...
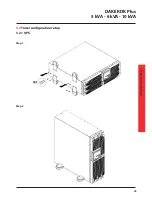
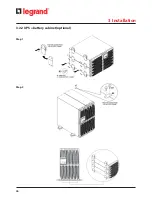
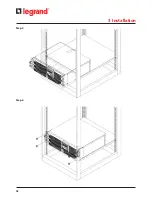
Page 46: ...46 3 2 2 UPS battery cabinet optional 3 Installation Step 1 Step 2 ...
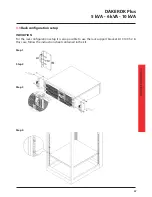
Page 48: ...48 3 Installation Step 5 Step 6 ...
Page 74: ...74 ...
Page 82: ...82 3 2 2 UPS armadio batterie opzionale Fase 1 Fase 2 3 Installazione ...
Page 84: ...84 Fase 5 Fase 6 3 Installazione ...
Page 110: ...110 ...
Page 118: ...118 118 3 2 2 USV Batterieschrank Optional 3 Installation Schritt 1 Schritt 2 ...
Page 120: ...120 3 Installation Schritt 5 Schritt 6 ...
Page 146: ...146 ...
Page 154: ...154 154 3 2 2 SAI armario de la batería opcional 3 Instalación Paso 1 Paso 2 ...
Page 156: ...156 3 Instalación Paso 5 Paso 6 ...
Page 182: ...182 ...
Page 190: ...190 190 3 2 2 ИБП батарейный модуль опциональный 3 Монтаж Шаг 1 Шаг 2 ...
Page 192: ...192 3 Монтаж Шаг 5 Шаг 6 ...
Page 218: ...218 Notes ...
Page 219: ...219 Manuel d installation ...


