background image

27 

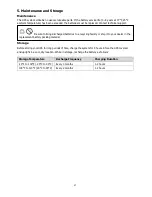
5. Maintenance and Storage 

Maintenance   

The UPS system contains no user-serviceable parts. If the battery service life (3~5 years at 77°F, 25°C 

ambient temperature) has been exceeded, the batteries must be replaced. Contact technical support. 


Storage   

Before storing your UPS for long periods of time, charge the system for 5 hours. Store the UPS covered 
and upright in a cool, dry location. While in storage, recharge the battery as follows: 
 

Storage Temperature 

Recharge Frequency 

Charging Duration 

-13°F to 104°F (-25°C to 40°C)  Every 3 months 

1-2 hours 

104°F to 113°F (40°C to 45°C) 

Every 2 months 

1-2 hours 


Be sure to bring discharged batteries to a recycling facility or ship it to your dealer in the 

replacement battery packing material. 


Summary of Contents for 1.1KVA

Page 1: ...Line Interactive Sinewave UPS 1 1KVA 1 5KVA 2KVA 3KVA Models Uninterruptible Power Supply System User Manual I 00886 Rev A ...

Page 2: ...Panel 10 Operating Principle 11 Installing The UPS 11 Setting Up the UPS 13 Battery Replacement 15 Replacement Battery Assembly 16 2 Operations 18 Button Operations 18 LCD Panel 19 Audible Alarms 20 LCD Panel Index 21 Operating Mode Descriptions 21 UPS Settings 22 Fault Reference Codes 25 Warning Indicators 25 4 Troubleshooting 26 5 Maintenance and Storage 27 Maintenance 27 Storage 27 6 Specificat...

Page 3: ... or devices to the UPS output sockets or terminal that would over load the UPS Place cables in such a way that no one can step on or trip over them Do not connect domestic appliances such as hair dryers to UPS output sockets Connect the UPS system only to a grounded shockproof outlet which must be easily accessible and close to the UPS system Use only a VDE tested CE marked or UL marked for 100 11...

Page 4: ...intenance disconnect the batteries and verify that no current is present and no hazardous voltage exists on the terminals of the high capability capacitor such as BUS capacitors Only persons are adequately familiar with batteries and with the required precautionary measures may replace batteries and supervise operations Unauthorized persons must be kept well away from the batteries Risk of electri...

Page 5: ... the instruction manual may cause harmful interference to radio communications Operation of this equipment in a residential area is likely to cause harmful interference in which case the user will be required to correct the interference at his own expense Changes or modifications not expressly approved by the party responsible for compliance could void the user s authority to operate the equipment...

Page 6: ... et des périphériques connectés ne dépasse pas 3 5 mA Température nominale Les unités sont considérées acceptables pour une utilisation dans un environnement ambiant maximal de 40 C 104 F Pour les équipements enfichables La prise de courant doit être installée près de l équipement et doit être facilement accessible L unité est lourde Le levage de l unité nécessite un minimum de deux personnes Fonc...

Page 7: ...ique et un courant de court circuit élevé Veuillez prendre les mesures de précaution suivantes et toutes les autres mesures nécessaires lorsque vous travaillez avec des batteries Retirez les montres bagues ou autres objets métalliques Utilisez des outils avec des poignées isolées Portez des gants et des bottes en caoutchouc Ne posez pas d outils ou de pièces métalliques sur les batteries Débranche...

Page 8: ... n est pas installé et utilisé conformément au manuel d instructions peut causer des interférences nuisibles aux communications radio L utilisation de cet équipement dans une zone résidentielle est susceptible de provoquer des interférences nuisibles auquel cas l utilisateur devra corriger les interférences à ses propres frais Les changements ou modifications non expressément approuvés par la part...

Page 9: ... 1 5 2 or 3KVA UPS Unit User Manual USB Cable 2x UPS Mounting Brackets and Screws 4x Foot NOTE Rail Slider is provided For more information refer to the 2U Rackmount Rail Slider instruction sheet I 00888 pdf Before installation inspect all supplied components and hardware to ensure nothing was damaged during transportation If you notice any damaged or missing parts do not turn on the unit and noti...

Page 10: ...ble Outlets Connect to non critical loads 2 Output Receptacles Connect to critical loads 3 AC Input 4 Network Fax Modem Surge Protection 5 EPO Emergency Power Off Function Connector 6 USB Communication Port 7 RS 232 Communication Port 8 SNMP Intelligent Slot 9 External Battery Connector ...

Page 11: ...tep 1 Remove the front panel Step 2 Connect the AC input and re connect the battery wires Step 3 Put the front panel back on the unit This UPS can be either placed on a surface or mounted in a 19 rack chassis Rackmount Installation CAUTION Do not use the mounting brackets to lift the unit Use the mounting brackets only for securing the unit to the rack ATTENTION N utilisez pas les supports de mont...

Page 12: ...to a 19 rack Step 1 Step 2 Tower Installation Step 1 Step 2 Step 3 NOTE When using feet for tower installations of the UPS or battery pack ensure a 2 76 70mm distance from the edge of the unit to the feet as follows 2 76 70mm 2 76 70mm M4 Screw Tower Stand ...

Page 13: ...S Placement Your UPS is equipped with a fan for cooling Therefore place the UPS in a well ventilated area It s required to maintain minimum clearance of 4 100mm in the front of the UPS and 12 300mm at the back and two sides of the UPS for heat dissipation and easy maintenance UPS Input Connection CAUTION Plug the UPS into a two pole three wire grounded receptacle only Avoid using extension cords A...

Page 14: ...er off function By default the UPS is delivered from the factory with a metal plate connecting Pin 1 and Pin2 which disables the EPO function To activate the EPO function loosen the two screws and remove metal plate from the EPO port NOTE The EPO function s logic is set up via LCD settings For more information see Program 16 in UPS Settings on page 22 Optional Expandable Battery Connection Connect...

Page 15: ... and only service person can replace the batteries CAUTION Consider all warnings cautions and notes before replacing batteries ATTENTION Tenez compte de tous les avertissements mises en garde et remarques avant de remplacer les piles NOTE After disconnecting the battery your connected equipment is not protected from power outages Step 1 Remove the front panel Step 2 Disconnect the battery wires St...

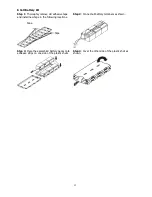
Page 16: ...l battery terminals as shown Step 3 Place the connected battery packs onto adhesive strips on one side of the plastic shells Step 4 Cover the other side of the plastic shell as shown 4 Cell Battery Kit Step 1 Thoroughly remove old adhesive tape and install new tape in the following locations Step 2 Connect all battery terminals as shown Step 3 Place the assembled battery packs on adhesive strips o...

Page 17: ...tape and install new tape in the following locations Step 2 Connect all battery terminals as shown Step 3 Place the assembled battery packs onto adhesive strips on one side of the plastic shells Step 4 Cover the other side of the plastic shell as shown Tape Tape ...

Page 18: ... to turn off the UPS Confirm selection key Press this button to confirm your selection while in the UPS settings mode Switch LCD message Press this button to change the LCD message from input voltage input frequency battery voltage battery capacity ambient temperature output voltage output frequency load current and load percent choices Settings mode When the UPS is off press and hold this button ...

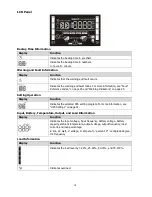
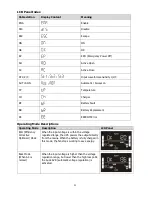
Page 19: ...rs on page 25 Setting Operation Display Function Indicates the selected UPS setting program For more information see UPS Settings on page 22 Input Battery Temperature Output and Load Information Display Function Indicates the input voltage input frequency battery voltage battery capacity ambient temperature output voltage output frequency load current and load percentage k kilo W watt V voltage A ...

Page 20: ...tes the ECO efficiency corrective optimizer mode is enabled Indicates the UPS is working in boost mode Indicates the UPS is working in buck mode Indicates the battery charger is working Indicates the UPS alarm is disabled Battery Information Display Function Indicates the Battery level by 0 24 25 49 50 74 and 75 100 Indicates low battery Audible Alarms Reason Sound Battery Mode Sounding every 10 s...

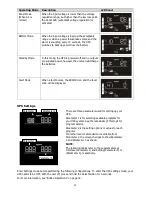
Page 21: ... EEPROM Error Operating Mode Descriptions Operating Mode Description LCD Panel ECO Efficiency Corrective Optimizer Mode When the input voltage is within the voltage regulated range the UPS powers the output directly from the mains When the battery is fully charged in this mode the fan stops working to save energy Buck Mode When AC is normal When the input voltage is higher than the voltage regulat...

Page 22: ...de will be displayed UPS Settings There are three parameters used for setting up your UPS Parameter 1 is for selecting available programs for your UPS system See the remainder of this topic for program details Parameter 2 is the setting options or values for each program If another level of attenuation is available from Parameter 2 the screen changes to show Parameter 2 and Parameter 3 as shown NO...

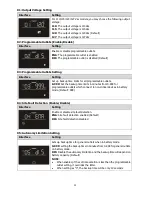
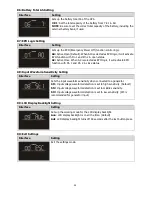
Page 23: ...backup time limits in minutes from 0 999 for programmable outlets which connect to non critical devices in battery mode Default 999 04 Site Fault Detection Enable Disable Interface Setting Enable or disable site fault detection ENA Site fault detection enabled Default DIS Site fault detection disabled 05 Autonomy Limitation Setting Interface Setting Sets up backup time for general outlets when in ...

Page 24: ...c it will activate EPO function with Pin 1 and Pin 2 in close status 08 Input Waveform Sensitivity Setting Interface Setting Sets the input waveform sensitivity when connected to a generator St1 Input voltage waveform detection is set to high sensitivity Default St2 Input voltage waveform detection is set to middle sensitivity St3 Input voltage waveform detection is set to low sensitivity St3 is r...

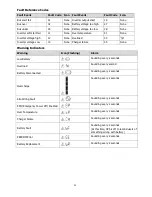
Page 25: ...45 None Warning Indicators Warning Icon Flashing Alarm Low Battery Sounding every 2 seconds Overload Sounding every second Battery Disconnected Sounding every 2 seconds Overcharge Sounding every 2 seconds Site Wiring Fault Sounding every 2 seconds EPO Emergency Power Off Enabled Sounding every 2 seconds Over Temperature Sounding every 2 seconds Charger Failure Sounding every 2 seconds Battery Faul...

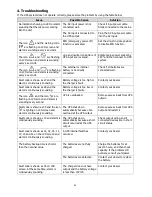
Page 26: ...ault code is shown as 28 and the alarm is continuously sounding Battery voltage is too low or the charger is faulty Contact your dealer The icon and the icon are flashing on LCD screen and alarm is sounding every second UPS is overloaded Remove excess loads from UPS output Fault code is shown as 43 and the icon is lighting on LCD screen and alarm is continuously sounding The UPS shut down automati...

Page 27: ...our UPS for long periods of time charge the system for 5 hours Store the UPS covered and upright in a cool dry location While in storage recharge the battery as follows Storage Temperature Recharge Frequency Charging Duration 13 F to 104 F 25 C to 40 C Every 3 months 1 2 hours 104 F to 113 F 40 C to 45 C Every 2 months 1 2 hours Be sure to bring discharged batteries to a recycling facility or ship...

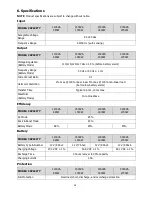
Page 28: ...max 100 linear load 5 max 100 non linear load before low battery alarm Transfer Time Typical 2 6 ms 10ms max Waveform Battery Mode Pure Sine Wave Efficiency MODEL CAPACITY 1100VA 990W 1500VA 1350W 2000VA 1800W 3000VA 2700W AC Mode 95 Buck Boost Mode 93 Battery Mode 88 90 90 Battery MODEL CAPACITY 1100VA 990W 1500VA 1350W 2000VA 1800W 3000VA 2700W Battery Type Number 12 V 9 Ahx2 12 V 7 Ahx4 12 V 9 ...

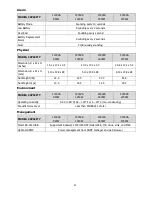
Page 29: ... 20 0 x 17 2 x 3 4 24 8 x 17 2 x 3 4 Dimension D x W x H mm 410 x 438 x 88 510 x 438 x 88 630 x 438 x 88 Net Weight lbs 29 5 42 9 47 3 64 5 Net Weight kgs 13 4 19 5 21 5 29 3 Environment MODEL CAPACITY 1100VA 990W 1500VA 1350W 2000VA 1800W 3000VA 2700W Operating Humidity 0 90 RH 32 104 F or 0 40 C non condensing Acoustic Noise Level Less than 45dBA 1 Meter Management MODEL CAPACITY 1100VA 990W 150...

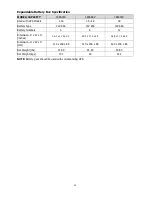
Page 30: ...ery Type 12V 9Ah 12V 9Ah 12V 9Ah Battery Numbers 4 8 12 Dimension D x W x H inches 16 1 x 17 2 x 3 5 20 1 x 17 2 x 3 5 24 8 x 17 2 x 3 5 Dimension D x W x H mm 410 x 438 x 88 510 x 438 x 88 630 x 438 x 88 Net Weight lbs 37 69 63 93 90 83 Net Weight kgs 17 1 29 41 2 NOTE Battery pack should be used with corresponding UPS ...

Reviews: