9
8
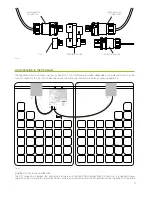
The LEAF M500-S microinverter is equipped with polarized MC4 connectors for connection to the photovoltaic panels: be,
anyway, careful not to reverse the polarity at this stage.
After connecting the photovoltaic module, the production of electric energy by the LEAF M500-S microinverter will begin only
once the AC line will be connected too.
See p.12, Connecting the AC distribution network (Grid)
Strictly adhere to the connection sequence of LEAF M500-S microinverter, so to prevent parts accessible to the
operator from becoming live.
Before connecting the AC wiring of the photovoltaic system to the grid, local regulation conformity of electrical
systems must be checked carefully.
The AC cable must be connected to the distribution network through the protective equipment defined by local
regulations.
WARNING: If exposed to sunlight, the solar modules will always exhibit DC voltage at their electrical terminals.
Carefully avoid contact between the cables and the surface of the roof: when necessary, arrange the cable along the
frame, securing it carefully by means of cable ties.
Strictly adhere to the connection sequence of LEAF M500-S microinverter, so to prevent parts accessible to the
operator from becoming live.
The system must be operated only once all the connections have been arranged. Never turn on the systems while
partially connected, this to avoid the risk of dangerous voltages in parts accessible to the operator.
4. MOUNTING THE LEAF MICROINVERTER M500-S
4.1 Fixing LEAF Microinverter M500-S
Ensure the AC wiring of the PV is disconnected from the grid.
All the parts of the plant must be kept dry before and during installation and connection.
The maximum number of LEAF M500-S microinverters that can be installed on a single AC circuit branch depends
on the maximum output current of each inverter and on the maximum permissible current of that branch.
4.2 Connecting the AC BUS
The connection of the LEAF M500-S microinverters to the photovoltaic system must be performed carefully respecting the
following sequence of operations:
• Connecting the AC bus of the PV system at all the LEAF M500-S microinverters
• Connecting all the LEAF M500-S microinverters to their respective panel or to the pair of solar panels associated with it
• Connecting the AC bus of the PV system to the grid
Make sure the bolts used are noticeable on the backsheet of the module, even in conditions of snow load on the module.
Secure the inverter to the mounting structure.
The assembly methods may vary.
The AC connector of the microinverter has to be connected to the main electrical network by means of a 3-poles wire, with a
yellow-green grounding conductor of section equal to the others’ and never below 1.5 mm2.
The AC bus of the photovoltaic system can be realized with any number of radial derivations, up to the maximum number of
inverters provided: all the AC leads, from the various derivations, must be brought together near the point where the plant is
connected to the AC network distribution using an appropriate junction box.
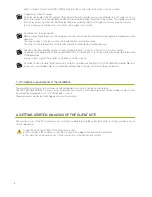
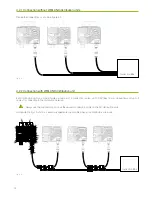
Depending on the needs, there are different types of connection:
1. Without use of the distribution unit
2. With Use of the Distribution Unit
Fig. 4.1
The removal of one or more LEAF M500-S microinverter does not compromise the functionality and the efficiency of the
remaining part of the system
In order to facilitate monitoring and consequent support, the installer must provide the map of the installation as described in
Appendix (pag.14), reporting the serial numbers of micro-inverter used.
After installing the frame on which the solar panels are placed and after preparing the duct of the AC line, microinverters can be
fixed in the desired locations as described in chapter 4.


