


8
A STEELFORT PRODUCT
Immediately clean all traces of fuel which may have
dripped on the machine or the ground and do not
start the engine until the petrol fumes have dissipat-
ed.
2. RULES FOR SAFE OPERATION
WARNING
Read the “Rules for Safe Operation “with care and
follow the instructions in the manual to operate the
unit safely.
Read and be thorough with the basic controls and
functions of the unit. It is important that you know
how to stop and to shut off the engine, and to unhook
a harnessed unit quickly.
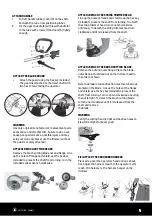
Do not allow anyone without proper instruction or
training to operate the unit. All operators of the unit
should wear appropriate foot, leg, eye, face and
hearing protection. Do not rely on the debris shield on
the unit to protect your eyes from thrown objects.
Keep the area clear of bystanders, children and pets.
Never allow children to operate or play with the unit.
Do not allow anyone to enter the operating DANGER
ZONE with you. The danger zone is an area 15 meters
in radius (about 16 paces) or 50 feet.
Insist that persons in the RISK ZONE beyond the
danger zone wear eye protection from thrown
objects. If the unit must be used where there are
unprotected people, operate at a low throttle speed to
reduce the risk of thrown objects.
Move the stop switch to “stop” position when the
engine idles, insure its reliable before cutting. Only
may continue to operate the unit when stop switch is
in good condition.
Routines for checking that the cutting attachment
stops turning when the engine idles.
WARNING
In addition to head, eye, face and ear protection,
please wear appropriate footwear to protect your
feet and to improve footing on slippery surfaces. Do
not wear open-toed footwear, or go bare foot or bare
legged.
3. PREPARING FOR OPERATION
IMPORTANT
Failure to follow proper fuel mix instructions may
cause damage to the engine.
When preparing fuel mixture, mix only the amount
needed for the job you intend to do. Do not use fuel
that has been stored longer than two months. Fuel
mixture stored longer than this will cause hard start-
ing and poor performance. If fuel mix has been stored
longer than this time, it should be removed and filled
with a fresh mixture.
WARNING
•
Never fill the fuel tank to the brim. (Under 3/4
of the tank)
•
Never add fuel to the tank in a closed non-ven-
tilated area.
•
Do not add fuel to this unit close to an open fire
or sparks.
•
Be sure to wipe spilled fuel before attempting
to start the engine
•
Do not attempt to refuel a hot engine.
CHECK POINTS BEFORE OPERATION
•
Check for loose bolts, nuts and fittings.
•
Check the air filter for dirt. Clean before
operation.
•
Check to be sure that protector is securely in
place.
•
Check that fuel isn’t leaking.
•
Check to be sure the line is fixed and ready to
operate.
STARTING THE TRIMMER
Once the machine has been set up properly and
inspected, cold start the engine as follows.
WARNING
The switch will always remain in the ‘ON’ position. To
stop the unit press it to ‘OFF’ and hold until it is no
longer running, release and it will return to the ‘On’
1.
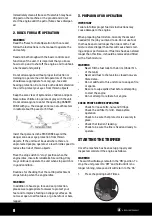
Press the priming bulb 7 times.
11
STARTING PROCEDURES
Do not start the unit until it has been completely assembled.
Before starting the unit, always check the oil.
1. Inspect the device before use
DANGER OF INJURY!
Do not operate the device if you find any faults. If a part has become damaged or
defective, make sure to replace it before you use the device again.
Check the safe condition of the device:
t$IFDLUIFE
evice for leaks.
t$IFDLUIFE
evice for visual defects.
t$IFDLUI
at all parts of the device have been securely fitted.
t$IFDLUI
at all safety components are in proper working condition.
DANGER OF INJURY!
Before starting work, always check the ground and remove all objects which could be
thrown by the device.
Once the machine has been set up properly and inspected,
cold start
the engine as follows:
1. Press the priming bulb 10 times.
2. Move the choke lever to the START position.
3. Hold the machine firmly on the ground with one hand. Pull the starting cord 3-5 times until you hear
the engine start to turn over. Move choke lever to the RUN position.
Attention: The switch will always remain in the ‘ON’ position. To stop the unit press it to ‘OFF’
and hold until it is no longer running, release and it will return to the ‘On’