31
MAINTENANCE
Installing a New Saw Chain
In the case of a new chain, the tensioning force decreases after some time. Therefore you must
re-tension the chain after the first 5 cuts and at longer intervals after this.
Maintaining the Guide Bar
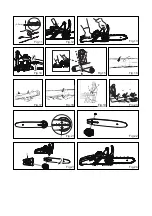
(See Figs. 21-24)
■ Switch off the saw and remove the battery pack.
■ Remove the chain cover. Remove the guide bar and saw chain assembly from the support bolt.
■ Carefully remove the saw chain from the guide bar.
■ Check the guide bar for wear. Remove burrs and straighten the guide surfaces with a flat file.
■ Clean the oil port, in order to guarantee automatic oiling of the saw chain. The guide bar must
be flipped over every 8-10 working hours in order to guarantee even wear. Flipping over the
guide bar requires you to move the tensioning plate to the other side of the bar.
To flip over the guide bar:
■ Locate the fixing screw (
①
) connecting the guide bar and the tensioning plate on the other side
of the guide bar (Fig. 21).
■ Release the fixing screw with a Phillips screwdriver to separate the tensioning plate from the
guide bar (Fig. 22).
■ Keep the tensioning plate in the same position and reverse the guide bar. Re-tighten the fixing
screw to secure the tensioning plate to the guide bar (Fig. 23).
NOTE:
The round lug (
②
) of the tensioning plate must point towards the drive sprocket.
■ Assemble the guide bar, the saw chain and the chain cover referring to Assembling the Guide
Bar and the Saw Chain section (Fig. 24).
■ Tension the saw chain referring to Assembling the Tensioning the Saw Chain section on page
24-25.
Never attach a new chain to a worn drive sprocket or place onto a damaged or worn guide bar.
The chain could spring back or break, potentially leading to serious injury.
WARNING
Use cut-protection gloves when handling the saw chain or the guide bar.
WARNING

