background image

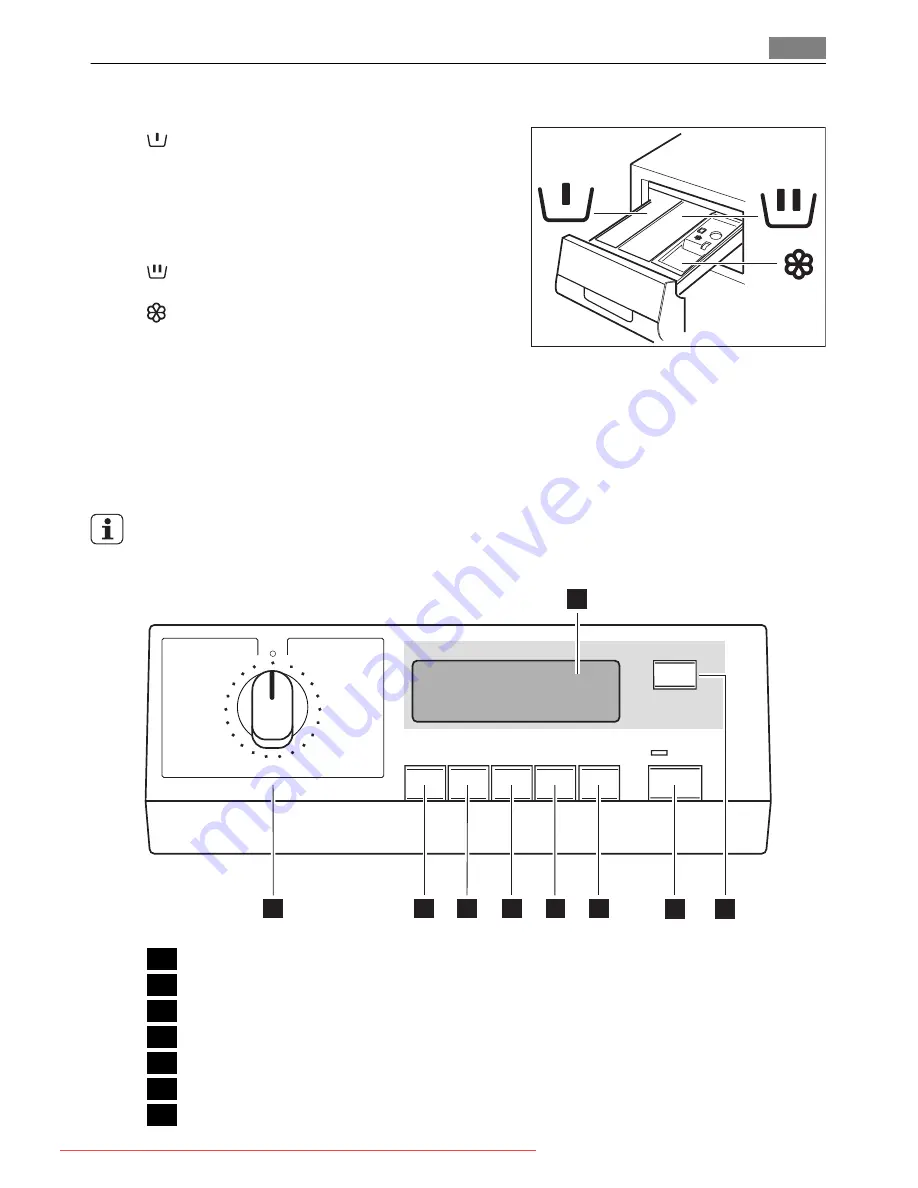
Detergent dispenser drawer

 Compartment for prewash phase or stain re-

mover.

The prewash detergent is added at the beginning

of the wash programme.

The stain remover is added during the 

STAIN-Ac

-

tion phase

 in the main wash.

 Compartment for powder or liquid detergent

used for 

main wash

.

 Compartment for 

liquid additives

 (fabric soft-

ener, starch).

Follow the product manufacturer’s recommendations on quantities to use and do not ex-

ceed the 

«MAX»

 mark in the detergent dispenser drawer. Any fabric softener or starching

additives must be poured into the compartment before starting the wash programme.

CONTROL PANEL

Below is a picture of the control panel. It shows the programme selector dial as well as the

buttons and the display. These are presented by relevant numbers on the following pages.

1

2

3

4

5

6

7

8

9

1

Programme selector dial

2

TEMPERATURE button (

ТЕМП

.

)

3

SPIN reduction button (

ОТЖИМ


)

4

OPTION button (

ФУНКЦИЯ

)

5

OK button (

OK

)

6

TIME SAVING button (

ВРЕМЯ


)

7

START/PAUSE button (

СТАРТ

/

ПАУЗА

)

Control panel

7

Downloaded From WashingMachine-Manual.com Manuals

Summary of Contents for LS 84840

Page 1: ...LAVAMAT LS 84840 EN WASHING MACHINE USER MANUAL Downloaded From WashingMachine Manual com Manuals ...

Page 2: ...ading to get the very best from it ACCESSORIES AND CONSUMABLES In the AEG webshop you ll find everything you need to keep all your AEG appliances looking spotless and working perfectly Along with a wide range of accessories designed and built to the high quality standards you would expect from specialist cookware to cutlery baskets from bottle holders to delicate laundry bags Visit the webshop at ...

Page 3: ... Technical data 31 Consumption values 32 Installation 36 Electrical connection 37 Environment concerns The following symbols are used in this user manual Important information concerning your personal safety and information on how to avoid damaging the appliance General information and tips Environmental information Subject to change without notice Contents 3 Downloaded From WashingMachine Manual ...

Page 4: ...nd children do not climb into the drum To avoid this please check into the drum before using Any objects such as coins safety pins nails screws stones or any other hard sharp ma terial can cause extensive damage and must not be placed into the machine Only use the advised quantities of fabric softener and detergent Damage to the fabric can ensue if you over fill Refer to the manufacturer s recomme...

Page 5: ... fastened Avoid washing frayed or torn articles and treat stains such as paint ink rust and grass before washing Underwired bras must NOT be machine washed Garments which have been in contact with volatile petroleum products should not be machine washed If volatile cleaning fluids are used care should be taken to ensure that the fluid is removed from the garment before placing in the machine Never...

Page 6: ...e the possibility of closing the door rotate the button anticlockwise until the groove is ver tical PRODUCT DESCRIPTION Your new appliance meets all modern requirements for effective treatment of laundry with low water energy and detergent consumption The ECO VALVE system allows total use of detergent and reduces water consumption so saving energy 1 6 5 4 3 2 1 Detergent dispenser drawer 2 Control...

Page 7: ... ceed the MAX mark in the detergent dispenser drawer Any fabric softener or starching additives must be poured into the compartment before starting the wash programme CONTROL PANEL Below is a picture of the control panel It shows the programme selector dial as well as the buttons and the display These are presented by relevant numbers on the following pages 1 2 3 4 5 6 7 8 9 1 Programme selector d...

Page 8: ...the estima ted end of cycle 9 7 are displayed in hours and minutes for example 1 40 The duration is calculated automatically on the basis of the maximum recommended load for each type of fabric After the programme has started the time remaining is updated every minute Programme progress display After having pressed the button 7 the display shows the running phase of the washing program 9 9 On the ...

Page 9: ...the language that you prefer When the appliance is switched on again all the messagges in the display will appear in this language If the display is not showing any language screen the appliance has already been switched on once In such case if you would change the language setting press at the same time the buttons 2 and 3 for 6 seconds to activate the menu language By pressing the button 4 you c...

Page 10: ...ce Setting the contrast The contrast setting CONTRAST allows you to modify the optical characteristic of the display By pressing the button 4 you can increase or decrease the contrast You can choose between different levels from 0 to 9 0 min 9 max Press button 5 to confirm your choice Setting the acoustic signal The machine is provided with an acoustic device which sounds in the following cases at...

Page 11: ... 1 Pull out the dispenser drawer until it stops Measure out the amount of de tergent required pour it into the main wash compartment and if you wish to carry out the prewash phase or to perform the stain function pour the de tergent or the stain remover into the compartment marked 2 If required pour fabric softener into the compartment marked the amount used must not exceed the MAX mark in the dra...

Page 12: ...s for each washing programme can be checked in the paragraph Washing programmes The symbol of cold wash corresponds to Select the spin speed Night Cycle or Rinse Hold option button 3 When the required programme has been selected your appliance automatically proposes the maximum spin speed provided for that programme Press this button repeatedly to change the spin speed if you want your laundry to ...

Page 13: ... programmes for delicate fabrics the water is only drained The relevant symbol will appear on the display This option is recommended for heavily soiled laundry STAIN Select this option to treat heavily soiled or stained laundry with stain remover extended main wash with time optimized stain action phase The relevant symbol will appear on the display This option is not available with a temperature ...

Page 14: ...ce Set this option before pressing the button 7 and after having selected the required programme wash This function remains able also when the appliance is not working Setting Child lock option press the button 4 to activate the options menu press the button 4 to locate the CHILD LOCK option press the button 5 to enable this option The corresponding symbol appears on the dis play The display says ...

Page 15: ...lay time by pressing the button 8 the display shows the delay value and the relevant symbol 9 5 The estimated end of the programme time is displayed in 9 7 Press the button 7 the machine starts its countdown displayed in 9 8 The programme will start after the selected delay has expired You can cancel the delay time at any moment before you press the button 7 Cancelling the delayed start set the ap...

Page 16: ...isplay and the acoustic signal sounds for some minutes If the RINSE HOLD or NIGHT CYCLE option has been selected the pilot light of the button 7 goes off the display says that the door is locked and the RINSE HOLD option has been se lected the door is blocked to indicate that the water must be emptied out Before you empty out the water the drum continues to run at regular intervals until the water...

Page 17: ...or hygiene and select the option Stain SPIN REDUCTION RINSE HOLD PREWASH STAIN 40 60 MIX 40 Main wash Rinses Long spin Max load 6 kg Maximum spin speed at 1400 rpm White and coloured cotton This programme can be used for laundry which should be washed at 40 C or 60 C separately The maximum load capacity can be put into the drum in order to save energy and water The same good washing result will be...

Page 18: ...his way ironing is easier Furthermore the machine will perform addi tional rinses SPIN REDUCTION RINSE HOLD PREWASH EXTRA RINSE DELICATES 40 Cold Main wash Rinses Short spin Max load kg 1 5 Reduced load kg 1 5 Maximum spin speed at 1200 rpm Delicate fabrics acrylics viscose polyester SPIN REDUCTION NIGHT CYCLE RINSE HOLD STAIN PREWASH EXTRA RINSE TIME 2 DELICATE RINSES Rinses Short spin Max load 1...

Page 19: ...eed by pressing the relevant button to adapt it to the fabrics to be spun SPIN REDUCTION WOOL PLUS 40 Cold Main wash Rinses Short spin Max load 2 kg Maximum spin speed at 1200 rpm Washing programme for machine washable wool as well as for hand washable woollens and delicate fab rics Note A single or bulky item may cause imbalance If the appliance doesn t perform the final spin phase add more items...

Page 20: ...fast coloured cottons and mixed fabrics SPIN REDUCTION RINSE HOLD EXTRA RINSE ECONOMY 60 40 Main wash Rinses Long spin Max load 6 kg Maximum spin speed at 1400 rpm White and fast coloured cotton This programme can be selected for slightly or nor mally soiled cotton items The temperature will de crease and the washing time will be extended This al lows to obtain a good washing efficiency so saving ...

Page 21: ...e fingertips and a cotton cloth Rust oxalic acid dissolved in hot water or a rust removing product used cold Be careful with rust stains which are not recent since the cellulose structure will already have been damaged and the fabric tends to hole Mould stains treat with bleach rinse well whites and fast coloureds only Grass soap lightly and treat with bleach whites and fast coloureds only Ball po...

Page 22: ...rers instructions on quantities to use Use less detergent if you are washing a small load the laundry is lightly soiled large amounts of foam form during washing Degrees of water hardness Water hardness is classified in so called degrees of hardness Information on hardness of the water in your area can be obtained from the relevant water supply company or from your local authority If the water har...

Page 23: ...nt dispenser drawer by pulling it firmly 2 Remove the conditioner insert from the middle compartment 3 Clean all parts with water 4 Put the conditioner insert in as far as it will go so that it is firmly in place 5 Clean all parts of the washing machine especially the nozzles in the top of the washing in chamber with a brush 6 Insert the detergent dispenser drawer in the guide rails and push it in...

Page 24: ...afety pins coins etc blocking the pump a problem with water draining is detected see chapter What to do if for more de tails WARNING Before opening the pump door switch the appliance off remove the mains plug from the socket Proceed as follows 1 Unplug the appliance 2 If necessary wait until the water has cooled down 3 Open the pump door 4 Pull flap forward to remove 5 Place a container close to t...

Page 25: ...he cap back on the emergency emptying hose and place the latter back in its seat 11 Replace the filter into the pump by in serting it correctly into the special guides Screw the pump cover firmly by turning it clockwise 12 Refit the flap and close the pump door WARNING When the appliance is in use and depending on the programme selected there can be hot water in the pump Never remove the pump cove...

Page 26: ...s 1 Turn off the water tap 2 Unscrew the hose from the tap 3 Clean the filter in the hose with a stiff brush 4 Screw the hose back onto the tap Make sure the connection is tight 5 Unscrew the hose from the machine Keep a towel nearby because some wa ter may flow 6 Clean the filter in the valve with a stiff brush or with the piece of cloth 7 Screw the hose back to the machine and make sure the conn...

Page 27: ... the cap on again By doing this any water remaining in the machine is removed avoiding ice forming and consequently damage to the appliance When you use the machine again make sure that the ambient temperature is above 0 C Every time you drain the water through the emergency emptying hose you must pour 2 litres of water into the main wash compartment of the detergent drawer and then run the drain ...

Page 28: ...s not been pressed Please turn the selector dial and press the button 7 again The delay start has been selected If the laundry is to be washed immediately cancel the delay start The Child safety lock has been activated Deactivate this device The machine does not fill The water tap is closed Cannot fill water Please check that the tap is open and then press button START PAUSE Open the water tap The...

Page 29: ...sed Reduce the detergent quantity or use anoth er one Check whether there are any leaks from one of the inlet hose fittings It is not always easy to see this as the water runs down the hose check to see if it is damp Check the water inlet hose connection The drain or the inlet hose is damaged Replace it with a new one The cap on the filter has not been replaced or the filter has not been properly ...

Page 30: ...p pen several times before the unbalance disap pears and normal spinning can resume If after some minutes the laundry is still not evenly distributed in the drum the machine will not spin The laundry load is perhaps to little add more items redistribute the load manually and then select the spinning programme The machine makes an unusual noise The machine is fitted with a type of motor which makes...

Page 31: ...ater supply 1 Cold water Maximum Load Cotton 6 kg Spin Speed Maximum 1400 rpm 1 Connect the water inlet hose to a water tap with a 3 4 thread CONSUMPTION VALUES Programme Energy consumption KWh Water consumption litres Programme duration Hours Minutes White Cottons 95 1 95 62 For the duration of the programmes please refer to the display on the control panel Cottons 60 1 15 58 Cotton ECO 60 1 1 02...

Page 32: ...t be removed before using the appliance You are advised to keep all transit devices so that they can be refitted if the machine ever has to be transported again 1 After removing all the packaging care fully lay machine on it s back to remove the polystyrene base from the bottom 2 Remove the power supply cable and the draining and inlet hose from the hose holders on the rear of the appliance 32 Ins...

Page 33: ...iance 4 Slide out the relevant plastic spacers 5 Fill the smaller upper hole and the two large ones with the corresponding plas tic plug caps supplied in the bag con taining the instruction booklet Installation 33 Downloaded From WashingMachine Manual com Manuals ...

Page 34: ...ater inlet hose and the drain hose must not be kinked Please ensure that when the appliance is installed it is easily accessible for the engineer in the event of a breakdown Carefully level by screwing the adjustable feet in or out Never place cardboard wood or similar materials under the machine to compensate for any unevenness in the floor Water inlet An inlet hose is supplied and can be found i...

Page 35: ...ressure required for safe operation of the appliance in the chapter Technical Data Water stop device The inlet hose is provided with a water stop de vice which protects against damage caused by water leaks in the hose which could develop due to natural ageing of the hose This fault is shown by a red sector in the window A Should this oc cur turn the water tap off and refer to your Serv ice Centre ...

Page 36: ...ximum of 4 metres An additional drain hose and joining piece is available from your local Service Centre ELECTRICAL CONNECTION Information on the electrical connection is given on the rating plate on the inner edge of the appliance door Check that your domestic electrical installation can take the maximum load required also taking into account any other appliances in use WARNING Connect the machin...

Page 37: ... disposal service or the shop where you purchased the product Packaging materials The materials marked with the symbol are recyclable PE polyethylene PS polystyrene PP polypropylene This means that they can be recycled by disposing of them properly in appropriate collec tion containers Ecological hints To save water energy and to help protect the environment we recommend that you follow these tips...

Page 38: ...38 Downloaded From WashingMachine Manual com Manuals ...

Page 39: ...39 Downloaded From WashingMachine Manual com Manuals ...

Page 40: ...www aeg com shop 132957921 A 202011 Downloaded From WashingMachine Manual com Manuals ...

Reviews: