background image

6

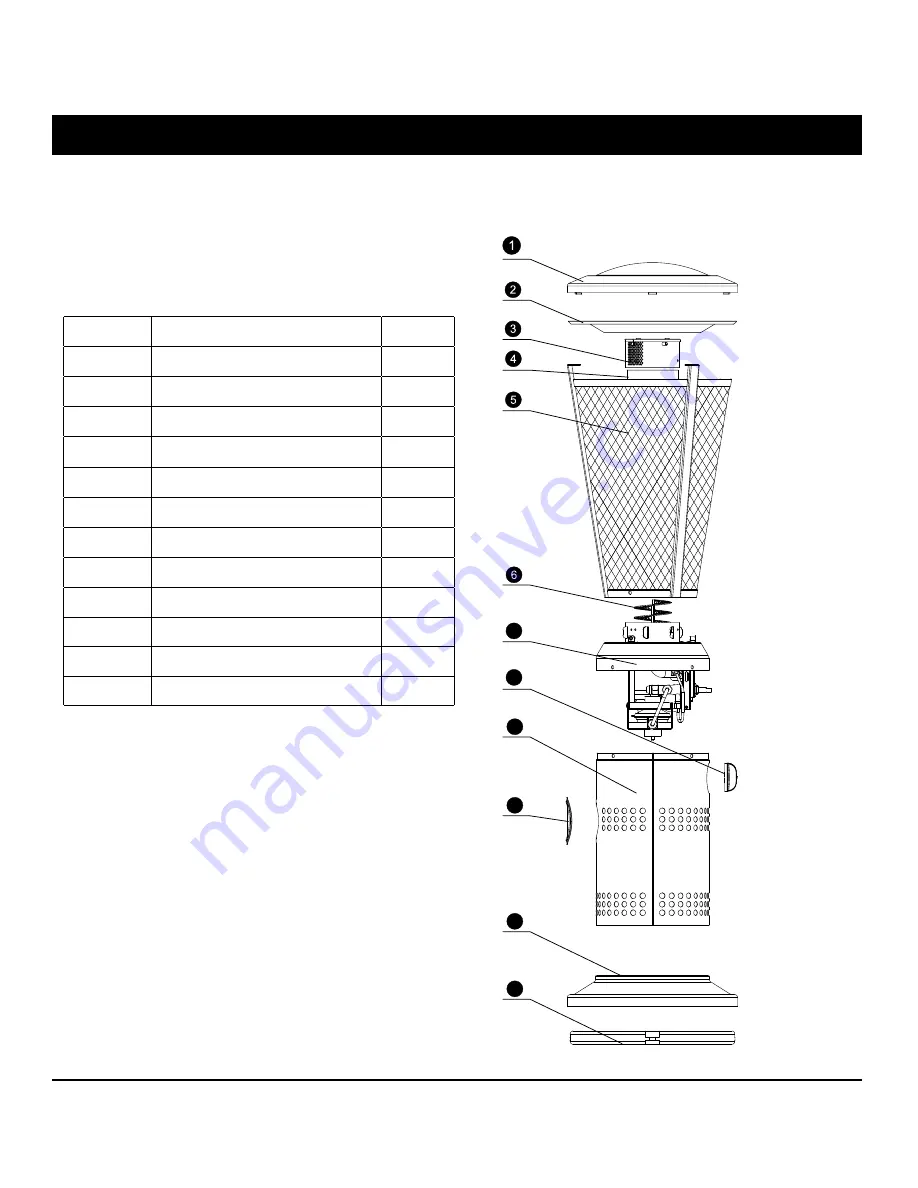
PARTS LIST

Part #  

Description

Qty

Chimney

1

Heat reflector

1

Emitter screen

Pyrex glass tube

1

Safety guard

1

Spiral emitter

1

Burning system 

1

Control knob

9
10
11
12


Panel assembly

Access door
Base 
Weight block

1
1
1
1

7

8

9

10

11

12

Summary of Contents for EMBER Mini

Page 1: ...For sales inquiries contact Sylvane at 1 800 934 9194 If you have service questions contact Lava Heat at 1 888 779 5282 ...

Page 2: ...t connected for use shall not be stored in the vicinity of this or any other appliance DANGER WARNING WARNING For Outdoor Use Only CAUTION Installer Leave the manual instructions to the user for future use Consumer Please keep this manual Note The appliance must be placed on table of which the best suitable height is 35 for future reference Read the instructions before use This appliance must be i...

Page 3: ...or maintenance can cause property damage injury or death Read the installation operating and maintenance instructions thoroughly before installing or servicing this equipment PRECAUTIONS SPECIFICATION Certification CSA Rated Heat Input Fuel Gas Supply Manifold Pressure Injector Size diameter 10000BTU hr LP 16 4oz LP Gas cylinder 11 0 W C 0 95mm Safety Features Flame failure device anti tilt switch...

Page 4: ...on and repair should be done by a qualified service person The heater should be inspected before use and at least annually by a qualified service person More frequent cleaning may be required as necessary It is imperative that control compartment burners and circulating air passageways of the heater be kept clean Keeping the appliance area clear and free from combustible materials gasoline and oth...

Page 5: ... not is use Storage of an appliance indoors is permissible only if the cylinder is disconnected and removed from the appliance A cylinder must be stored outdoors in a well ventilated area out of the reach of children A disconnected cylinder must have dust caps tightly installed and must not be stored in a build ing garage or any other enclosed area Do not store a spare LP gas cylinder under or nea...

Page 6: ...AD THE FOLLOWING SAFETY RULES PREPARATION Before beginning assembly of product make sure all parts are present If any part is missing or damaged do not attempt to assemble the product Contact customer service for replacement parts Perform a leak test with a soapy solution 1 To check gas connections 2 After connecting a new cylinder 3 Upon re assembly after disassembly ...

Page 7: ...on Qty 1 Chimney 1 2 Heat reflector 1 3 Emitter screen 1 4 Pyrex glass tube 1 5 Safety guard 1 6 Spiral emitter 1 7 Burning system 1 8 Control knob 1 9 10 11 12 Panel assembly Access door Base Weight block 1 1 1 1 7 8 9 10 11 12 ...

Page 8: ...BLY 7 Step 1 Step 1 Tilt the heater insert the cylinder from the bottom of base align the nozzle of the cylinder with the regulator and turn counter clockwise to tighten Put the heater uprightly on the table ...

Page 9: ... 2 Spoon several drops or use squirt bottle of the solution onto the tube regulator cylinder connections 3 Inspect the connections and look for bubbles 4 If no bubble appears the connection is safe 5 If bubble appears there is leak loosen and re tighten this connection If still leak please call customer service 1 866 814 0585 Disconnected cylinder when storage or transportation 1 Turn the knob to ...

Page 10: ...re attempting to light heater If after 1 minute you are unable to light burner wait 5 minutes and allow flammable vapors to dissipate before attempting to light heater 1 Turn the control knob to OFF position 2 Tilt the heater 3 Turn counter clockwise to connect cylinder with regulator inlet Put the heater uprightly on the table This product is equipped with ODS Oxygen Deprivation System Your heate...

Page 11: ...ould not be operated again until the unit is serviced and or repaired 4 Push in gas control knob and turn counter clockwise to IGNITE then to PILOT position this will light the pilot If needed keep depressing and turning control knob counter clockwise until the pilot lights You will hear 1 clicking noise 5 Once the pilot is lit keep the control knob depressed for approx 30 seconds Then release the...

Page 12: ...elight pilot 3 Repeat steps beginning with step 4 of the lighting instruction above Shut down instructions 1 Push in and turn control knob clockwise to OFF position 2 Tilt the heater Turn clockwise to disconnect cylinder from regulator when heater is not in use Put the heater uprightly on the table Note After use some discoloration of the emitter grid is normal The Event of Gas Leakage 1 Turn the ...

Page 13: ... for the heating of outdoor patios decks spas pools and open working areas Always make sure that adequate fresh air ventilation is provided Follow the spacing tolerances shown in Figure 1 at all times This heater must be placed on level firm ground Never operate in an explosive atmosphere Keep away from areas where gasoline or other flammable liquids or vapors are stored or used Figure 1 12 10 10 ...

Page 14: ...eplaced Keep the appliance area free and clean from combustible materials gasoline or other flammable vapors an liquids not obstructing the flow of combustion and ventilation air keeping the ventilation opening s of the cylinder enclosure free and clear from debris Visually check buner flames At least once a year the unit should be inspected for the presence of spiders spider webs or other insects...

Page 15: ... to help prevent build up in air passages STORAGE Between uses During periods of extended inactivity or when transporting Turn the control knob to OFF position Disconnect the cylinder from the regulator by turning clockwise and move to a secure well ventilated location outdoors DO NOT store in a location that will exceed 125 degrees F Store heater upright in an area sheltered from direct contact w...

Page 16: ...ot will not stay on Debris around pilot Clean dirty area Tighten connection Thermocouple Contact customer service Gas leak in line Check connections Lack of fuel pressure Fuel tank is near empty Pressure is low Fuel tank is near empty Control valve not ON Turn valve to ON Thermocouple broken Contact customer service Contact customer service Pilot light assembly bent or not in correct location Burn...

Page 17: ......

Page 18: ...For sales inquiries contact Sylvane at 1 800 934 9194 If you have service questions contact Lava Heat at 1 888 779 5282 ...

Reviews: