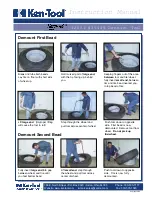
background image


MOUNT TIRES 


Pull  up  the  bead  up  of  the  rim.  Pull  down  the 

mounting head closed to rim.


Turn the table until the bead press down closed 

to rim flange


Using  a  bead  roller  and  mounting  block  press 

down the tire flap under the rim flange.


Turn the table until the tire flap is under the rim 

flange


Finally,  pull  out  the  mounting  head  and  DAS 

ARM. Fill up the air into tire, then remove the tire 
from tire changer.


Phenomena


Switch level is not flexible


Analysis


1) Disconnected with compressed air


2) Air hose is folded or broken


3) Valve is broken


Solution


1) Connect with the compressor according to the manual


2) Inspect the air hose

 replace the broken hose and joint


3) Please contact with the department of after sale


10   TROUBLE SHOOTING AND MAINTENANCE 


Summary of Contents for TWC-412NIC

Page 1: ...ation of the machine such as safety warning and precautions assembly operating main tenance and parts list as sembly diagrams Keep your invoice with this manual for future reference Manufacturer shall...

Page 2: ...x77x100cm Shipping Weight 220kg 230kg Voltage 0 9 1 1 of nominal voltage Frequency 0 98 1 02 of nominal frequency Ambient Temperature 5 40 C Operation Humidity 30 95 Installation altitude NOT exceed 1...

Page 3: ...r Pedal 2 Jaw clamp Pedal 3 Reverse Pedal 4 Turntable 5 Jaw 6 Mounting head 7 Hexagonal shaft 8 Swing arm 9 Locking handle 10 Column 11 FRL 12 Shovel 13 Rubber wheel support 14 STL 1 2 3 4 5 6 8 10 11...

Page 4: ...4 1 Optional Upgrade Accessories...

Page 5: ...ker 3 Connect the inflation gun if it is to be installed to its connector 4 Connect the tire changer to a compressed air network Suggested working pressure is 8 bar using the connector which is on the...

Page 6: ...ion against the bumper pads and excessive wear on pivots Deflate the tire completely to prolong the life of your machine 1 Deflate the tire completely by removing the valve core from the valve stem fi...

Page 7: ...the top of the vertical slide to move the demount head into contact with the rim edge Push the locking handle back and lock the slide into place figure 7 Figure 7 Position Mount Demount Tool 8 The mo...

Page 8: ...r bead lift Figure 10 Insert Bead Lifting Tool 11 Push the bead lifting tool down towards the wheel to lift the tire bead up and over the knob portion of the demount head Hold the tool and bead in thi...

Page 9: ...without checking both tire and wheel for damage and to be certain the sizes match Do not let untrained persons operate tire changer and keep bystanders out of service area Forcing the tire onto the r...

Page 10: ...tube type tires mount lower bead first move swing arm out install tube and then mount upper bead 9 Inflation Tire inflation is performed in three steps BEAD SEAL BEAD SEAT and INFLATION These steps ar...

Page 11: ...nd debris to be blown into the air with enough force to injure operator and or bystander Do not use the bead sealing control position to inflate a tire S This unit is equipped with a pressure limiter...

Page 12: ...ating will usually require at least 7 PSI in the tire 40 PSI is the maximum safe pressure at this stage regardless of tire operating pressure Most European import cars and many aftermarket alloy wheel...

Page 13: ...SAFETY REGULATIONS The operator must be a well trained professional personnel This device could only function when work together with our tire changer We won t responsible for any unauthorized modifi...

Page 14: ...The following steps show how to install the DAS ARM 1 Disconnect the tire changer from the electric power source and the compressed air circuit 2 See Fig 3 and 4 for pulling the mounting seat 1 and 2...

Page 15: ...NTROL VALVE Controlling the control valve level could attain the rise or decline of the tool holding arms TRIAL OPERATIONS The DAS ARM must connect with air compressor and 8 bar air pressure is desira...

Page 16: ...epress the corresponding pedal to close or open the jaws for the clamping of the rim 9 2 DEMOUNTING THE TIRE 1 Firstly break and loosen the beads if it is necessary Loosen the locking nut to lower the...

Page 17: ...g block and closed to mount ing head Press down the bead Using a Tire lever take the tire flap top over the mounting head Turn the table clockwise to demount a bead Finally using the tire lever take t...

Page 18: ...nder the rim flange Finally pull out the mounting head and DAS ARM Fill up the air into tire then remove the tire from tire changer Phenomena Switch level is not flexible Analysis 1 Disconnected with...

Reviews: