background image

                X-431  HTT  Professional  Automotive  Diagnosis  Handset 

2 Preparations


2.1 Charging X-431 HTT   

There are two charging methods available for X-431 HTT: 

Via Power adaptor: 

1.  Insert one end of the included USB cable into the power adaptor. 

2.  Connect the other end into the charging port of X-431 HTT. 

3.  Plug the adaptor into AC outlet. 

Via Personal computer: 

1.  Insert one end of the included USB cable into the USB port of PC. 

2.  Connect the other end into the charging port of X-431 HTT. 

If    appears on the screen, it indicates it is being charged. If the logo changes 
into 

,  it indicates  that  the  battery  is  fully  charged.  Unplug  the  power  adaptor 

from X-431 HTT. 

2.2 

Using your battery 

  If  the  battery  remains  unused  for  a  long  period  of  time  or  the  battery  is 

completely discharged, it is normal that the tool will not power on while being 
charged. Please charge it for a period of 5 minutes and then turn it on. 

  Please use the included power adaptor to charge your tool. No responsibility 

can be assumed for any damage or loss caused as a result of using power 
adaptors other than the one supplied. 

  While X-431 HTT has low battery, a beep will sound. If it is very low, X-431 

HTT will be switched off automatically. 

2.3 

Power on/off 

2.3.1 Power on 

Press [POWER] to turn the tool on. 

Note:  If  it  is the  first  time  you  have  used  this  tool  or  the  tool  remains  idle  for  a  long 
period of time, the tool could fail to turn on. Please charge the tool for a minimum of 5 
minutes and attempt to turn on again.


2.3.2 Power off 

Press [POWER] for 3 seconds, an option menu will pop up on the screen. Tap 

Summary of Contents for X-431 HTT

Page 1: ...X 431 HTT Professional Automotive Diagnosis Handset i Version V1 00 001 Revised date Oct 12 2017...

Page 2: ...oved Products by LAUNCH Trademark Information LAUNCH is a registered trademark of LAUNCH TECH CO LTD LAUNCH in China and other countries All other LAUNCH trademarks service marks domain names logos an...

Page 3: ...ealer Never place X 431 HTT into apparatus with strong electromagnetic field Keep X 431 HTT far away from magnetic devices because its radiations can damage the screen and erase the data stored on X 4...

Page 4: ...e vehicle DLC Data Link Connector is clear and secure Automotive batteries contain sulfuric acid that is harmful to skin In operation direct contact with the automotive batteries should be avoided Kee...

Page 5: ...DIESEL CONFIGURATION 7 2 PREPARATIONS 9 2 1 CHARGING X 431 HTT 9 2 2 USING YOUR BATTERY 9 2 3 POWER ON OFF 9 2 3 1 Power on 9 2 3 2 Power off 9 2 4 TIPS ON FINGER OPERATIONS 10 2 5 SCREEN LAYOUT 10 2...

Page 6: ...GER VEHICLES GASOLINE DIESEL CONFIGURATION 46 7 1 OIL RESET SERVICE 46 7 2 ELECTRONIC PARKING BRAKE RESET 47 7 3 STEERING ANGLE CALIBRATION 47 7 4 ABS BLEEDING 47 7 5 TIRE PRESSURE MONITOR SYSTEM RESE...

Page 7: ...s Handset vii 8 4 FIRMWARE FIX 52 8 5 DIAGNOSTIC FEEDBACK 52 8 6 PROFILE 52 8 7 CHANGE PASSWORD 53 8 8 SETTINGS 53 8 8 1 Units of measurement 53 8 8 2 Print information 53 8 8 3 Launch printer connect...

Page 8: ......
Page 9: ...camera and 5 display screen with a resolution of 1280 720 pixels 1 2 Features 1 Diagnose VINscan quick test and manual diagnosis are available Diagnosis functions include Read DTCs Clear DTCs Read Dat...

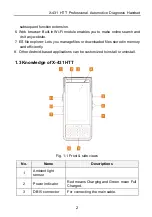
Page 10: ...ES file explorer Lets you manage files or downloaded files stored in memory card efficiently 8 Other Android based applications can be customized to install or uninstall 1 3 Knowledge of X 431 HTT Fig...

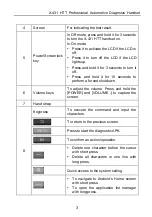
Page 11: ...old it for 10 seconds to perform a forced shutdown 6 Volume keys To adjust the volume Press and hold the POWER and VOLUME to capture the screen 7 Hand strap 8 Keypress To execute the command and input...

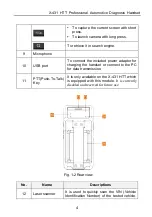
Page 12: ...onnect the included power adaptor for charging the handset or connect to the PC for data transmission 11 PTT Push To Talk Key It is only available on the X 431 HTT which is equipped with this module I...

Page 13: ...ly disabled and reserved for future use 1 4 Technical Parameters Operating System Android 7 0 CPU 8 core processor ROM 16GB RAM 2GB Screen 5 inch capacitive touch screen with a resolution of 1280 720...

Page 14: ...y power to non 16pin adaptor cable via vehicle s cigarette lighter receptacle 1 5 Battery clamps cable Optional To supply power to non 16pin adaptor cable via vehicle s battery 1 6 Power adaptor To ch...

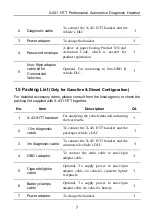
Page 15: ...m the local agency or check the packing list supplied with X 431 HTT together No Item Description Qt 1 X 431 HTT handset For analyzing the vehicle data and indicating the test results 1 2 1 5m diagnos...

Page 16: ...andset 8 8 Password envelope A piece of paper bearing Product S N and Activation Code which is needed for product registration 1 9 Non 16pin adaptor cable kit for Passenger Commercial Vehicles Optiona...

Page 17: ...tery remains unused for a long period of time or the battery is completely discharged it is normal that the tool will not power on while being charged Please charge it for a period of 5 minutes and th...

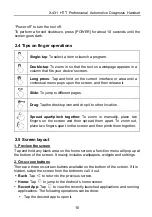
Page 18: ...ead apart pinch together To zoom in manually place two fingers on the screen and then spread them apart To zoom out place two fingers apart on the screen and then pinch them together 2 5 Screen layout...

Page 19: ...Display Brightness level 2 Drag the slider to adjust it 2 8 Set standby time If no activities are made within the defined standby period the screen will be locked automatically and the system enters...

Page 20: ...ngs WLAN 2 Tap or slide the Wi Fi switch to ON X 431 HTT starts searching for all available wireless LANs 3 Choose the desired Wi Fi access point network If the network you chose is open you can conne...

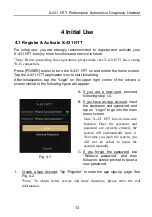
Page 21: ...the screen a screen similar to the following figure will appear Fig 4 1 A If you are a new user proceed following step 1 5 B If you have an app account input the username and password and tap on Logi...

Page 22: ...Submit to go to Step 2 2 Fill in Workshop Information Enter the workshop information and then tap Submit to advance to the next step Fig 4 3 Notes The workshop information that you set here will be sy...

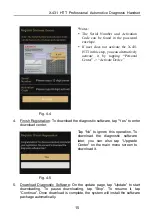
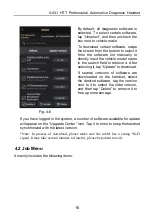
Page 23: ...ice 4 Finish Registration To download the diagnostic software tap Yes to enter download center Fig 4 5 Tap No to ignore this operation To download the diagnostic software later you can also tap Upgrad...

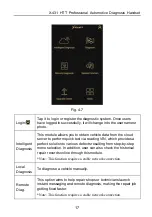
Page 24: ...ate to download If several versions of software are downloaded on the handset select the desired software tap the version next to it to select the older version and then tap Delete to remove it to fre...

Page 25: ...ia reading VIN which provides a perfect solution to various defects resulting from step by step menu selection In addition user can also check the historical repair records online through this module...

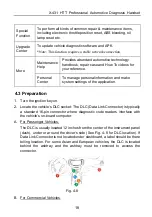
Page 26: ...make system settings of the application 4 3 Preparation 1 Turn the ignition key on 2 Locate the vehicle s DLC socket The DLC Data Link Connector is typically a standard 16 pin connector where diagnost...

Page 27: ...in adaptor cable is required a For non OBDII Passenger Vehicles proceed as follows 1 Select the non 16pin adaptor cable corresponding to the tested vehicle 2 Plug one end of the main cable into the DB...

Page 28: ...lows 1 Select the non 16pin adaptor cable corresponding to the tested vehicle 2 Plug the non 16pin end of the adaptor cable into the DLC socket and the other end to the main cable 3 Connect the other...

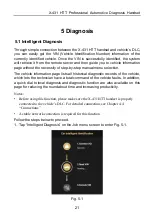
Page 29: ...selection The vehicle information page lists all historical diagnostic records of the vehicle which lets the technician have a total command of the vehicle faults In addition a quick dial to local di...

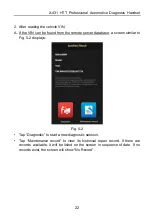
Page 30: ...m the remote server database a screen similar to Fig 5 2 displays Fig 5 2 Tap Diagnostic to start a new diagnostic session Tap Maintenance record to view its historical repair record If there are reco...

Page 31: ...uence of date On screen Buttons Quick access To perform other functions tap Quick access to directly go to the function selection screen Choose the desired one to start a new diagnostic session Tap ce...

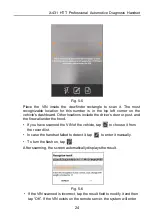
Page 32: ...e the driver s door or post and the firewall under the hood If you have scanned the VIN of the vehicle tap to choose it from the record list In case the handset failed to detect it tap to enter it man...

Page 33: ...al Diagnosis main menu screen 5 2 Local Diagnosis Tap Diagnose to enter the vehicle selection page Fig 5 7 Notes 1 Input the vehicle model name in the search bar directly to retrieve it or swipe the s...

Page 34: ...ns If you have scanned the VIN of the vehicle tap to choose it from the record list In case the handset failed to recognize it tap to enter it manually To turn the flash on tap Place the VIN inside th...

Page 35: ...17 characters VIN characters may be capital letters A through Z and numbers 1 through 0 however the letters I O and Q are never used in order to avoid mistakes of misreading No signs or spaces are al...

Page 36: ...vehicle and generate a detailed report about vehicle health Tap Health Report the system start scanning the ECUs Once the scanning is complete a screen similar to the following appears Fig 5 13 On scr...

Page 37: ...the selected DTC online 5 2 1 2 Clear DTC This function lets you clear the existing diagnostic trouble codes in health report Tap Clear DTC a confirmation dialog box appears Tap Yes to clear all the...

Page 38: ...est function selection page Fig 5 16 5 2 3 1 Version Information This function is used to read the version information of system mode vehicle VIN software and ECU 5 2 3 2 Read Fault Code This function...

Page 39: ...me the DTC is set Help Highlight certain DTC item and tap it to view the help information of the selected DTC 5 2 3 3 Clear Fault Memory After reading the retrieved codes from the vehicle and certain...

Page 40: ...5 19 Notes If the value of the data stream item is out of the range of the standard reference value it will display in red If it complies with the reference value it displays in gold normal mode If m...

Page 41: ...orts Help Highlight certain item and tap it to view the help information Graph displays the parameters in waveform graphs Fig 5 20 Notes Tap the Value tab to switch to the text view mode Swipe the scr...

Page 42: ...time when an operation is successfully executed Completed displays 5 3 How to view diagnostic history Generally once a vehicle diagnosis is performed X 431 HTT will record the every details of diagnos...

Page 43: ...ot will appear on the upper right corner of the tab B Contact tab Tap to add friends or enter the friend list C Remote diagnosis with Web client diagnostic device Tap to enter and choose whether to en...

Page 44: ...golo users Once the result matches the keyword a screen similar to the following will appear Fig 6 2 Tap Add a dialog box pops up Fig 6 3 Tap CONFIRM to send your request Once the partner receives th...

Page 45: ...can be launched between two diagnostic tools that have the same product configurations After adding your friend tap to enter the friend list page Tap the logo before the friend name to view details S...

Page 46: ...pen camera to take pictures 6 4 Launch Remote Diagnosis Device To Device The X 431 HTT handset is allowed to launch remote diagnosis with other diagnostic tools including but not limited to the X 431...

Page 47: ...s and then tap Confirm to send Request control remote device Request to control the partner s device remotely to help him diagnose the vehicle Notes Remote diagnosis has the same diagnostic steps as m...

Page 48: ...remote device Wait for partner s confirmation Start connecting after request confirmed Start Diagnosis Generate diagnostic report Invite remote diagnostic assistant If you need support just use this o...

Page 49: ...s manual diagnosis In process of remote diagnosis tap the button to send voice message Once you received the report from the partner tap View Report to view details All diagnostic reports are saved un...

Page 50: ...ote Diagnosis Device To PC Except that the remote diagnosis can be done between different Launch s diagnostic tools that come loaded with the module user also can ask for remote control from PC client...

Page 51: ...nostic device to ON so that the partner can find and connect to this device while using the PC 2 Notify the partner of the PC client website http remote x431 com cn When the partner accesses the link...

Page 52: ...nosis Handset 44 Fig 6 11 3 Tell the partner to input his own official technician account and password and then tap Login to navigate to the following figure Fig 6 12 4 Tell the partner to check the b...

Page 53: ...cess of remote diagnosis please note the following things 1 You are not suggested to execute any actions 2 The partner is not allowed to save any diagnostic reports or records on your handset The oper...

Page 54: ...ation Electronic Throttle Position Reset Gearbox Matching AFS Adaptive Front lighting System Reset Sunroof Initialization Suspension Calibration 7 1 Oil Reset Service This function allows you to perfo...

Page 55: ...g angle position sensor replacing steering mechanical parts such as steering gearbox steering column end tie rod steering knuckle performing four wheel alignment or recovering car body you must reset...

Page 56: ...orrect ignition key or other device is present Most new vehicles have an immobilizer as standard equipment An important advantage of this system is that it doesn t require the car owner to activate it...

Page 57: ...owing cases a Main battery is replaced Battery matching must be performed to clear original low battery information and prevent the related control module from detecting false information If the relat...

Page 58: ...problem In this case this function needs to be done so that the gearbox can automatically compensate according to the driving conditions so as to achieve more comfortable and better shift quality 7 1...

Page 59: ...iew the diagnostic report generated in process of vehicle diagnosis Additionally delete share operations are also supported Tap My Report there are total 2 options available Fig 8 1 If user records th...

Page 60: ...8 3 Activate connector It is used to activate your X 431 HTT Fig 8 2 Input the Serial Number and Activation Code and then tap Activate to activate it For details on how to obtain Serial Number and Act...

Page 61: ...ilable 8 8 2 Print information This option lets you define your print information It mainly includes Workshop Address Telephone Fax and License Plate After inputting tap on Save to save it 8 8 3 Launc...

Page 62: ...Connect the printer Tap Scan to select the desired printer hotspot named with X 431PRINTER XXXX XXXX stands for 4 characters and then tap Connect to enter Step 2 Fig 8 4 Step 2 Join the Wi Fi printer...

Page 63: ...the printer are on the same LAN B If you have configured the Wi Fi printer to the LAN 2 Tap Connect to Printer a If the local network remains as it is tap Test Print directly to test the printing b If...

Page 64: ...p the unnecessary applications Steps Settings Apps Running Tap the desired application and then tap Stop Check all installed applications remove the unnecessary applications Steps Settings Apps Downlo...

Page 65: ...X 431 HTT Professional Automotive Diagnosis Handset 57 manually Since the diagnostic reports are saved and sorted by date please make sure the system date and time is properly configured on this tool...

Page 66: ...LAUNCH has any authority to bind LAUNCH to any affirmation representation or warranty concerning LAUNCH automotive meters except as stated herein Disclaimer The above warranty is in lieu of any other...

Page 67: ...X 431 HTT Professional Automotive Diagnosis Handset 59 Banxuegang Bantian Longgang Shenzhen Guangdong P R China 518129 Launch website http www cnlaunch com http www x431 com http www dbscar com...

Reviews: