14
•
Enrolling Faces
Enrolling Employee Faces
At the clock tap the ENROLL button and enter the Admin PIN then tap
OK.
•
The Employee selection screen will display.
•
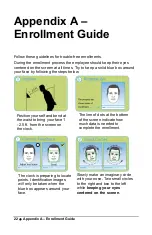
With the employee standing so their face is in the middle of the 2
cameras with 9 to 25 inches between the face and the clock, tap
on their name.
•
The image collecting screen will display, start the face
recognition enrollment.
•
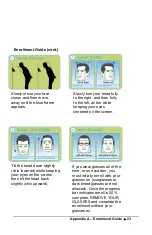
Perform small head circles to the right and then small head
circles to the left.
•
Move the face closer to the clock and then move the face back.
•
Turn the head to the right and then to the left.
•
Raise the head up slightly and then lower the head down slightly.
•
Continue moving face as described above.
•
The progress bar at the bottom of screen will display the process
of the imaging.
•
When the face is enrolled the clock will display,
“Face Scan
Saved”.
•
Uncheck the “Sync to All Clocks” option if you want the
employees face enrollment kept on this clock and not sent to
other clocks in your PayClock Online system.
•
Choose to enroll another employee or if you are finished with
enrollments choose Enrollment Complete.
•
The clock is ready to starting accepting punches for the enrolled
employees.
Note: See Appendix A for additional details in the Enrollment Guide.
Summary of Contents for CT SERIES
Page 1: ...CT Series Terminal User s Guide Model CT74...
Page 4: ......
Page 33: ...Appendix D Bell Relay Connections 29...
Page 34: ...30 Appendix D Bell Relay Connections...
Page 41: ......
Page 42: ......
Page 43: ......
Page 44: ...USG0104...


