

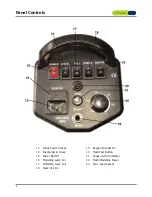


With all panel switches in the down position (off), connect the mains by
pushing the mains lead plug firmly into the panel mains socket. Push the
Power
switch up to the on position; the
Ready
indicator will light showing
that the unit is ready to flash.
Press the flash
Test
button (see page 10) to fire the flash (if the power
switch does not illuminate when switched on, the unit's fuse may be blown
- see fuse replacement instructions).
8
If modelling light is required, switch up the
Model
switch to turn the lamp
on (if a lamp has not been fitted, switch off the unit and fit a suitable lamp
- see lamp fitting instructions).
When the unit is flashed, the lamp will extinguish briefly to indicate that
the unit has flashed - this function is useful when multiple flash units are
used. With this function, the photographer can easily check from the
camera position that all units have flashed.
When the
Full
switch is switched up, the modelling lamp function changes
- the lamp will stay on when the unit is fired and the lamp will also always
be at full power, irrespective of the position of the power control knob.
If it is required to fire the unit automatically from another flash, switch the
Remote
switch up to the on position. With this function turned on,
multiple units will flash at the same time; sync. connecting cables are
therefore not required between units. For optimum operation of the Slave
Cells, refer to Slave Cell operating instructions.
If sound indication of firing is required, switch the
Beeper
switch on. A
brief, repeated sound is made after the unit has fired while the unit is
recharging. The sound stops at the point of Ready indication. In this way
it is possible to hear the time at which one or more units are ready to flash
again.
Panel Controls - 1
Summary of Contents for lumen 8
Page 1: ...User Manual...