background image

Manual: RTI Nano Rainbow Series

page 12 / 25

Final statement

Laserworld products are tested and product packaging is inspected before leaving our

warehouse.

Users must to follow the local safety regulations and warnings within this manual and adhere

to any regulations within its place of use. Damages through inappropriate use will void any

liability or warranty of our products.

Due to continual product developments, please check for the latest update of this product

manual at www.laserworld.com. If you do have any further questions, then please contact

your dealer/place of purchase or use our contact section on our website.

For service issues, please contact your dealer/place of purchase and ensure only genuine

Laserworld spare parts are used in any service repairs.

Errors and Omissions excepted and products are subject to change.

Laserworld (Switzerland) AG 


Kreuzlingerstrasse 5

8574 Lengwil-Oberhofen 

SWITZERLAND 


Registered office:

8574 Lengwil-Oberhofen / Switzerland

Company number: CH-440.3.020.548-6

Commercial Registry Kanton Thurgau

CEO: Martin Werner

VAT no. (Switzerland): 683 180

UID (Switzerland): CHE-113.954.889

VAT no. (Germany): DE 258030001

WEEE-Reg.-No. (Germany): DE 90759352

www.laserworld.com

[email protected]

representative according to EMVG:

Cleantech Europe GmbH

Managing Director: Thomas Schulze

Fürkhofstr. 5

81927 München / GERMANY

Summary of Contents for Rainbow RTI-Nano Series

Page 1: ...TI Nano Rainbow Series Please spend a few minutes to read this manual fully before operating this laser Bitte lesen Sie diese Bedienungsanleitung sorgf ltig vor Inbetriebnahme dieses Showlasersystems...

Page 2: ...us entstehende Sch den Die in dieser Bedienungsanleitung genann ten Marken und Produktnamen sind Waren zeichen oder eingetrageneWarenzeichen der jeweiligen Titelhalter Legal notice Thank you for purch...

Page 3: ...inary warning notices 3 Steps for setup safety instructions 4 Safety instructions for work on the device 5 Service notes 6 Warnings and other notices on the device 7 Device connections 8 Operation 9 R...

Page 4: ...d be necessary 6 The power supply should be easily acces sible 7 When installing the laser mount it with a minimum distance of 15 cm from walls and objects 8 For safe setup e g on walls or ceilings pl...

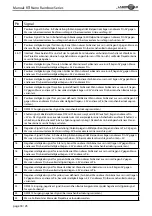
Page 5: ...ser power and wavelength of the laser 5 Service notes Moisture and heat can reduce lifetime of the laser system dramatically and expires any warranty claim Quick on off switching of this device will r...

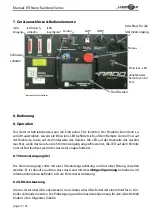
Page 6: ...on Avoid exposure to beam Laser class 4 Caution of radiation if cover is removed Don t look into the beam 7 Device connections connection for power supply ILDA in detachable remote control pad ILDA ou...

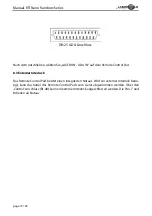
Page 7: ...pply is connected to an overload and a ground fault earth leakage protection Make sure to use correct voltage see information at the end of this ma nual 8 2 ILDA control To control your device connect...

Page 8: ...ing on the version OR DMX512 IN positive signal Showeditor and Phoenix interfaces 11 DMX512 OUT positive signal depending on the version 13 Shutter Difference of 5V 14 x axis scanner negative signal D...

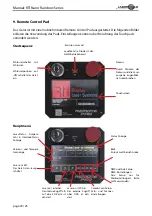
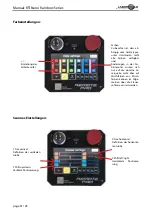
Page 9: ...Touchscreen Key switch with key Insert key and turn it to on to start the device Laser on off Device is enabled disabled Version and tempera ture display Laser status amperage interlock status displa...

Page 10: ...ice you can t change the itensity of the yellow color The intensity change only applies per single laser source and does not change mixed colors Please use your software to change mixed color in tensi...

Page 11: ...n adequate cooling fans have to be cleaned periodically To clean the fan and air vents 1 Disconnect the data and power cables and allow the device to cool for at least 5 minutes 2 Remove dust and dirt...

Page 12: ...e of purchase or use our contact section on our website For service issues please contact your dealer place of purchase and ensure only genuine Laserworld spare parts are used in any service repairs E...

Page 13: ...hinweise 3 Schritte zur Inbetriebnahme Sicherheitshinweise 4 Sicherheitshinweise f r Arbeiten am Ger t 5 Pflege und Wartungshinweise 6 Warnhinweise und Spezifikationen am Ger t 7 Ger teanschl sse 8 Be...

Page 14: ...ZB m ssen immer eingehalten werden 5 In bestimmten L ndern kann zus tzlich eine Abnahme durch ein technisches berwachungsinstitut erforderlich sein 6 Die Stromversorgung zug nglich halten 7 Halten Sie...

Page 15: ...Laser berhitzen 4 Sicherheitshinweise f r Arbeiten am Ger t 1 Service und Reparaturarbeiten sollten ausschlie lich von qualifi ziertem Fachpersonal durchgef hrt werden 2 Vor Arbeiten am Ger t alle ref...

Page 16: ...enutzt wird Trennen Sie hierzu das Netzteil von der Stromversorgung Auch wenn die Diode nicht leuchtet Sie ist in Betrieb solange das Ger t angeschaltet ist Bei Fehlfunktionen k nnen Sie in den FAQ un...

Page 17: ...sowie auf der Vorderseite des Ger tes Die LED auf der R ckseite des Ger tes leuchtet wenn das Ger t an die Stromversorgung angeschlossen ist die LED auf dem Remote Control Pad leuchtet wenn der das G...

Page 18: ...Best ckungsva rianten 11 DMX512 Ausgang positives Signal bei manchen Best ckungsvarianten 13 Shuttersignal Sobald der Minilumax DAC mit Strom versorgt wird LED leuchtet liegen an diesem Pin 5V an Das...

Page 19: ...Remote Control Pad 8 3 Externer Interlock Das Remote Control Pad besitzt einen integrierten Notaus Wird ein externer Interlock ben tigt kann das Kabel des Remote Control Pads vom Ger t abgenommen wer...

Page 20: ...t die Diode ist das Ger t betriebsbereit Touchscreen Schl sselschalter mit Schl ssel Schl sselposition auf ON schaltet das Ger t ein Laser on off Das Ger t ist an ausge schaltet Versions und Tempera t...

Page 21: ...Farben verf gbar sind nderungen in der Far bintensit t wirken sich nur auf die einzelne La serquelle nicht aber auf Mischfarben aus Misch farben k nnen im Allge meinen ber die Steuer software variiert...

Page 22: ...sollten die L fter von Zeit zu Zeit gereinigt werden F r die Reinigung der L fter ist zu beachten 1 S mtliche Kabel und Stromverbindungen vom Ger t trennen und dieses f r mindestens 5 Minuten abk hlen...

Page 23: ...tnis setzen Bitte kontaktieren Sie f r Fragen Ihren H ndler F r Servicefragen wenden Sie sich bitte an Ihren H ndler oder aber an Laserworld Verwenden Sie auschlie lich Laserworld Ersatzteile nderunge...

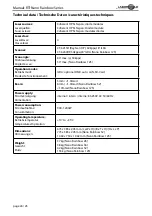
Page 24: ...nbow 125 Operation modes Betriebsmodi Modes de fonctionnement ILDA optional DMX auto LAN SD Card Beam 5mm 1 0mrad 6mm 1 0mrad Nano Rainbow 52 1 0mrad Nano Rainbow 125 Power supply Stromversorgung Alim...

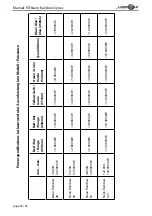
Page 25: ...28 26 000 30 500mW 2 800mW 4 000mW 5 000mW 8 000mW 7 800mW Nano Rainbow 36 33 700 37 500mW 2 800mW 4 000mW 6 000mW 10 000mW 5 000mW 7 800mW Nano Rainbow 52 48 500 54 000mW 5 600mW 4 000mW 6 000mW 20...

Reviews: