


4.
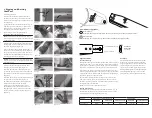
Fasten the head of the jib to the swivel
using the clevis pin and split ring. (Tape up
the shackle, pins and split ring to prevent
snagging or damage to other sails and lines
during sailing.) (fi gure 32)
5.
Hoist jib by pulling the white halyard out
of aft face of the mast, then hook the jib
halyard purchase system onto jib Halyard
wire. (Ensure hook is facing aft to prevent it
engaging in mast track groove.) (fi gure 33)
6.
Tension the jib halyard purchase system
until the jib luff wire is taught. (fi gure 34)
7.
Cleat and tidy away both rope ends in the
halyard pocket positioned on the top of the
gennaker sock.
Note:
If a loose gauge is used to measure the rig tension
do NOT exceed 24 units or 150 kg - measured on the shroud
0.75 meters above the vernier adjuster.
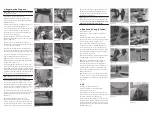
8.
Find the center of the jib sheet and pass it
through the clew of the jib, then pull the two
trailing ends of the sheet through the loop you
have created to lock them in place as shown.
(fi gure 36)
9.
Pass one jib sheet to either side of the
mast before threading them through their
respective port and starboard jib fairleads/
cleats. (fi gure 37)
Tip
– Best practice is to tie the sheet ends
together in the middle of the boat to prevent
tangling and prevent sheets from falling over-
board. (fi gure 38a) (fi gure 38b)
10.
Furl the jib by pulling the furling line.
Th
e furling line/cleat can be found on the
starboard side of the foredeck, just in front
of the jib sheet track/cleat. (fi gure 39)
11. If the trapeze option is fi tted:
Now that
the rig tension has been applied, the lower
shrouds can be tuned. Th
ey should be adjusted
until both wires are equal, JUST in tension, but
not pulling the mast aft, then tied off . (fi gure
40)
fi gure 36
fi gure 37
fi gure 33
fi gure 38b
fi gure 35
fi gure 40
fi gure 32
fi gure 38a
fi gure 34
fi gure 39
fi gure 42
fi gure 44
fi gure 41
fi gure 43
fi gure 45
fi gure 46
fi gure 48
fi gure 47
fi gure 49
7. Gennaker
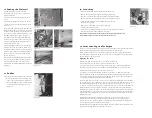
1.
Ensure the end of the gennaker halyard
taken from the base of the mast is free of knots
and tangles.
2.
Take the gennaker halyard from the base
of the mast and pass forward, under the gen-
naker sock and round the gennaker pole out-
haul block. (Th
e gennaker pole outhaul block is
attached to the rope led from the pole as shown
in the picture.) (fi gure 41)
3.
Th
read the halyard aft and through
the gennaker halyard cleat/fairlead at the
aft edge of the foredeck on the starboard side.
(fi gure 42)
4.
Pass the halyard across the boat and through
the pulley block at the aft end of the gennaker
sock. (fi gure 43)
5.
Tie the end of the halyard to something
such as a batten or tiller extension and
carefully pass the end of the halyard up the
sock until you can grasp it from the front end
of the gennaker sock opening. (fi gure 44)
6.
Th
is is known as the downhaul end of the
gennaker halyard and should be temporarily
tied around the jib tack bar while the batten/
extension is removed from the gennaker sock.
(fi gure 45)
7. Note:
Th
e up-haul end of the gennaker
halyard is tied at the base of the forestay from a
previous rigging exercise. (fi gure 46)
8.
Unfold the gennaker, identify the tack patch
(written on the sail) and securely fasten the
tack line to the tack patch using a bow-line.
(Th
e tack line comes out of the front of the
gennaker pole.)
Note:
Please check there is also a double
half hitch stopper knot in the tack-line and
gennaker halyard approximately 100mm prior
to the bowline you have tied.
9.
Identify the head patch (written on the sail),
untie the gennaker halyard (up-haul) from the
base of the forestay and tie it to the head patch
using a bowline. (fi gure 47)
10.
Untie the gennaker halyard (down-haul)
from the jib tack bar:
a. Pass through the lower downhaul patch
ring on the port side of the sail. (fi gure 48)
b. Secure to the upper downhaul patch using
a
bowline.
(fi gure 49)


