background image

NAVC-L07


      USER MANUAL


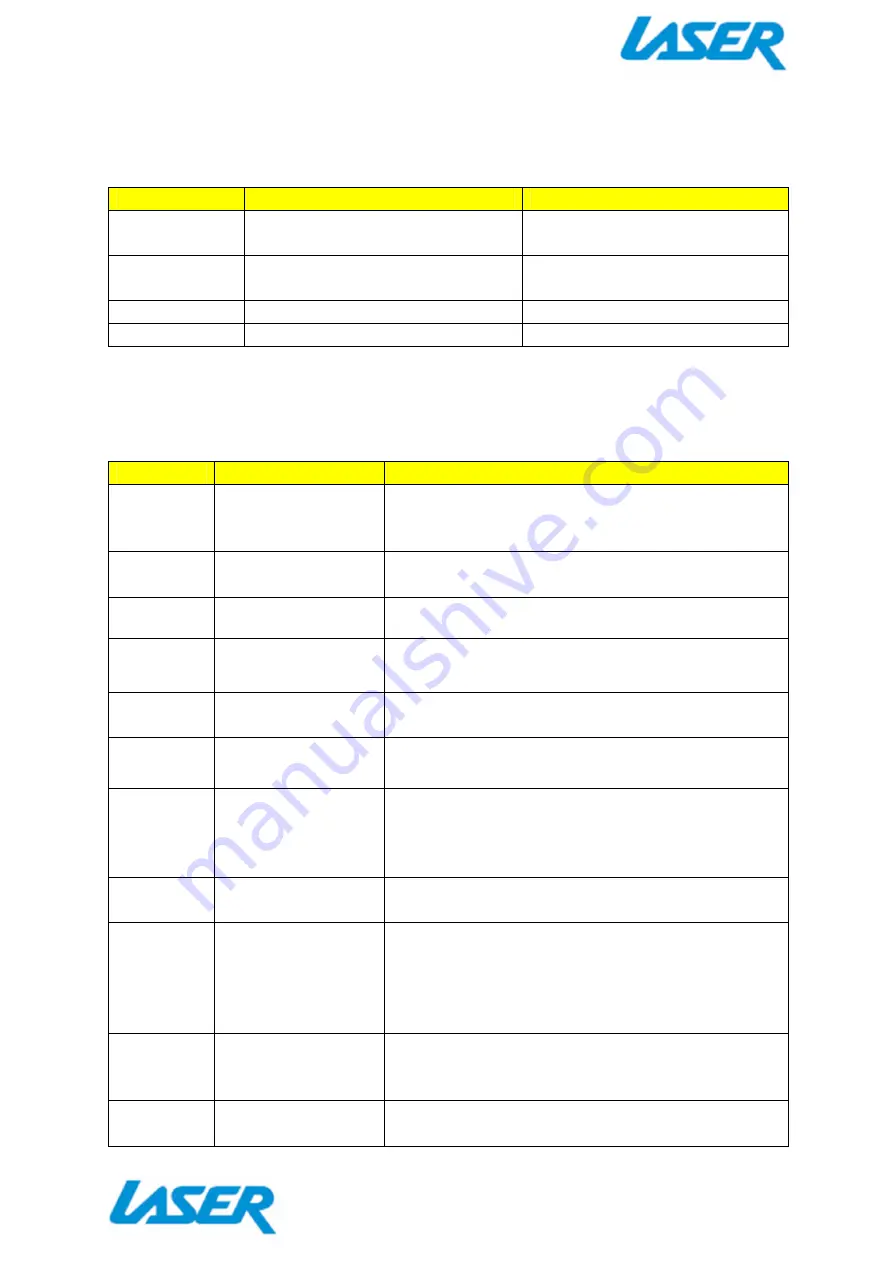
Playback 

Available Options: 
 

Play 

Options 

Action 

Delete 

[Select] Single, All 

Choose to delete the current 
image or all images. 

Protect 

[Select] Lock One, All or Unlock 
One or All 

Protect videos or picture so they 
cannot be deleted.  

Thumbnail 

[Select] Execute, Cancel 

Select image thumbnail view. 

Volume 

[Select] 0 thru to 7 

Select between volumes 0 to 8. 

Setup (Hardware) 


Available Options: 
Note: The Setup options are accessible through any mode.  

Setup 

Options 

Action 

Format 

 Select [Cancel / 
Execute] 

Select “Execute” to format the Micro SD card. 
Warning: formatting the card will erase all of the 
content on the card. 

Sound 
Effect 

Select [On / Off] 

Turn function and button noises ON or OFF when 
pressed.  

Language 

Select [English] 

Choose a language for the onscreen menu display. 

Auto Off 

Select [1, 3, 5 mins 
or OFF] 

Used to adjust the time to automatically power off 

FW Version 

[Display] Firmware 
Version 

Display the Firmware Version 

System 
Reset 

Select [Execute, 
Cancel] 

Select OK to return the device settings back to the 
original factory settings. 

Light 
Frequency 

Select [50 or 60Hz] 

For older television sets or monitors which cannot 
auto select the refresh rate frequency, select 50Hz 
(generally not applicable for newer TVs in 
Australia/New Zealand). 

TV Output 

Select [NTSC or PAL] 

For older television sets without refresh rate 
selection. PAL is typically selected for Australia. 

Date Input 

(Scroll through 
values and adjust) 

Use this option to set the date and time on the 
device.  Should the device not be used for a long 
period of time and should the battery run 
completely flat, then the date/time will need to be 
re-set. 

USB 

Select [PC Cam or 
Disk Drive mode] 

Change the function of your crash camera to 
become a PC Camera (Webcam) or an external 
storage device. 

Backlight 

Select [15, 30 or 60 
sec OFF or OPEN] 

Select a time for the LCD to automatically turn off. 
Typically used for night time driving.  

Summary of Contents for NAVC-L07

Page 1: ...USER MANUAL 1 Please read carefully before use It is recommended to use a Class 4 4Mb s write speed Micro SDHC card for optimal performance Some Extreme Speed class 10 UHS 2 cards may not function co...

Page 2: ...manuals for future reference Use this product only in the manner described Only use a water dampened soft cloth to clean the surface of this product The following will damage this product any liquid...

Page 3: ...tion Mount Fitting 10 Micro SD Card Slot 3 Power Button 11 LED Indicator Light 4 Reset Button 12 Camera 5 Menu Button 13 Speaker Note For button sounds only 6 OK Button 14 Suction Mount 7 Micro USB Po...

Page 4: ...ly when the car s ignition is turned on or off If the NAVC L07 does not turn off immediately it means the device is completing the file save process before turning off usually only a few seconds If th...

Page 5: ...button to enter and confirm and the MENU button to toggle across to the SETUP menu Press the MENU button a last time to exit the SETTINGS options and to return to the main screen In the event of an i...

Page 6: ...the NAVC L07 will begin recording when it senses movement For example if the NAVC L07 is left on the camera will begin recording if the image is disrupted like a person walking by Audio Record Select...

Page 7: ...tically power off FW Version Display Firmware Version Display the Firmware Version System Reset Select Execute Cancel Select OK to return the device settings back to the original factory settings Ligh...

Page 8: ...Depending on the size of the Micro SDHC card and the speed rating of the card there may be as much as a 3 second pause time whilst old files are overwritten with the newer files This pause time will...

Page 9: ...r the passenger carpet or under the dashboard 7 12v DC plug is connected to the car s 12v cigarette socket Once the wiring and installation of the NAVC L07 have been completed please check the followi...

Page 10: ...indscreen and surface area of the suction cup are clean In wet or very hot weather the suction cup mount may need to be reapplied Can t see the device in my computer Check the USB cable connection to...

Page 11: ...chase They will assess the nature of the fault and refund or replace the product as per their store refund or warranty policy Step 2b If your place of purchase cannot be contacted then you can contact...

Reviews: