background image


WiPort™ User Guide 


12 

3

3

:

:


C

C

o

o

n

n

f

f

i

i

g

g

u

u

r

r

a

a

t

t

i

i

o

o

n

n


U

U

s

s

i

i

n

n

g

g


D

D

e

e

v

v

i

i

c

c

e

e

I

I

n

n

s

s

t

t

a

a

l

l

l

l

e

e

r

r


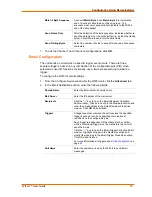
This chapter covers the steps for getting the WiPort device server online and 
working.   

Accessing WiPort using DeviceInstaller 

Note: 

Make note of the MAC address.  It is needed to locate the WiPort 

using DeviceInstaller.  For more information on the hardware address, see 

Hardware Address

 on page 

10

Follow the instructions on the product CD to install and run DeviceInstaller. 

1. Click 

Start

Æ

Programs 

Æ

 Lantronix

Æ

DeviceInstaller

Æ

DeviceInstaller.

 If the 

PC has more than one network adapter, a message displays requesting the 
selection of a network adapter. Select an adapter and click 

OK

.


2. Click 

the 

Search

 icon and select the WiPort unit from the list of Lantronix device 

servers on the local network. 

3.  Highlight the WiPort device in the list and click 

Settings

.  The Configure Device 

window for the WiPort unit displays. 

4.  To store configuration changes, click 

OK

.  To store and apply modifications, click 

Apply

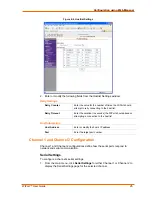
Server Configuration 

Note:

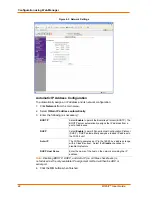
 The IP address is assigned via DHCP (on DHCP-enabled networks).  

Assign a static IP address only if necessary. 

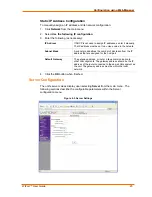
To manually assign an IP Address: 

1. Click 

the 

Assign IP

 icon 

2.  If prompted, enter the hardware address (on the product label) and click 

Next

.  

3. Select 

Assign a specific IP address

 and click 

Next

4. Enter 

the 

IP address

. The 

Subnet mask

 displays automatically based on the IP 

address; if desired, change it. On a local network, you can leave the 

Default 

gateway

 blank (all zeros). Click 

Next

5. Click 

the 

Assign

 pushbutton and wait several seconds until a confirmation 

message displays. Click 

Finish

6.  Select the device from the main window list and select 

Ping

 from the 

Tools


menu. The Ping Device dialog box shows the IP address of the selected unit. 

7. Click 

the 

Ping

 button. The results display in the Status window. Click the 

Clear 

Status

 button to clear the window so you can ping the device again.  

Summary of Contents for WP2002000-01

Page 1: ...WiPort User Guide Part Number 900 332 Revision C October 2004...

Page 2: ...ered trademark of The Open Group Windows 95 Windows 98 Windows 2000 Windows NT and Windows XP are trademarks of Microsoft Corp Netscape is a trademark of Netscape Communications Corporation Contacts L...

Page 3: ...vide reasonable protection against harmful interference in a residential installation This equipment generates uses and can radiate radio frequency energy and if not installed and used in accordance w...

Page 4: ..._____________________________________ 13 Host List Configuration__________________________________________________ 14 OEM Pin Configuration _________________________________________________ 14 Channel...

Page 5: ...nal Type ________________________________________________________52 Channel Port Password _____________________________________________________52 Email Configuration __________________________________...

Page 6: ...______ 61 Exit Configuration Mode_________________________________________________ 61 6 Configurable Pins 62 Defaults Settings ___________________________________________________________ 62 Features _...

Page 7: ...eb Manager Details configuration using the Web Manager to set parameters such as port and server properties Configuration via Serial Mode or Telnet Port Provides instructions for accessing Setup Mode...

Page 8: ...basics to get the WiPort up and running WiPort Integration Guide Provides information about the WiPort hardware and integrating the WiPort into another product DeviceInstaller User Guide Provides ins...

Page 9: ...user interface by employing common and familiar tools the WiPort serves applets to a Web browser resulting in interactive Web pages This customization of HTML Web pages and configuration screens tail...

Page 10: ...Port using a Graphical User Interface GUI on a PC attached to a network See 3 Configuration Using DeviceInstaller Web Manager Through a web interface configure the WiPort and its settings using the Wi...

Page 11: ...commonly uses port number 23 A port number is similar to an extension on a phone system The unit s serial channel port can be associated with a specific TCP UDP port number Port number 9999 is reserv...

Page 12: ...Settings The Configure Device window for the WiPort unit displays 4 To store configuration changes click OK To store and apply modifications click Apply Server Configuration Note The IP address is ass...

Page 13: ...network in which the WiPort unit resides Ad Hoc Network Creation Select Enable when using a client such as a wireless card to associate to a network Ad Hoc Network Name Enter the network name for the...

Page 14: ...the WiPort should abandon attempting connection to the host list 3 Click the next to the Host List field to open the HostListEntry Collection Editor Window The list of host list IP addresses display i...

Page 15: ...ing pull down menu options as necessary Baud Rate The unit and attached serial device such as a modem must agree on a speed or baud rate to use for the serial connection Valid baud rates are 300 600 1...

Page 16: ...when transmitted between computers The default is None UDP Datagram Mode Datagram Mode When the UDP option is in effect the unit never attempts to initiate a TCP connection because it uses UDP datagr...

Page 17: ...the attached serial device It accepts AT style modem commands and handles the modem signals accordingly For more information on Modem Emulation Mode see Modem Mode on page 47 Selecting Without Echo t...

Page 18: ...lear the buffer when the network connection to or from the device is dropped On Active Connection Clear the buffer with a new connection initiated from the device to the network On Passive Connection...

Page 19: ...t s email settings 1 From the Configure Device window for the WiPort unit click the Advanced tab 2 In the Email Notification section enter the following fields Domain Name Enter the Email server s dom...

Page 20: ...address It is needed to locate the WiPort using DeviceInstaller For more information on the hardware address see Hardware Address on page 10 Follow the instructions on the product CD to install and r...

Page 21: ...nager if it is connected to the network by entering its IP address in a web browser Network Configuration The unit s network values display upon selecting Network from the main menu The following sect...

Page 22: ...s the IP address from a pool of addresses DHCP Select Enable to permit Dynamic Host Configuration Protocol DHCP DHCP automatically assigns a leased IP address to the WiPort unit Auto IP The WiPort gen...

Page 23: ...A subnet mask defines the number of bits taken from the IP address that are assigned for the host part Default Gateway The gateway address or router allows communication to other LAN segments The gat...

Page 24: ...device server s initialization at startup CPU Configuration Mode The WiPort provides a high performance mode that supports the baud rates 460 Kbps and 921 Kbps When running the serial port at 460 Kbps...

Page 25: ...seconds the WiPort should abandon attempting a connection to the host list Host Information Host Address Enter or modify the host s IP address Port Enter the target port number Channel 1 and Channel...

Page 26: ...w control manages data flow between devices in a network to ensure it is processed efficiently Too much data arriving before a device is prepared to manage it causes lost or retransmitted data Baud Ra...

Page 27: ...of the byte sequence indicates whether to send the data frame or the entire buffer Select True to send only the data frame Send Trailing Bytes Select the number of bytes to send after the end of seque...

Page 28: ...or passive connections Connect Mode Active Connection Active Connect Select None to disable Active Connect Otherwise indicate the connection type from the available list Never Accept Incoming rejects...

Page 29: ...ction state Default setting is None Use Hostlist If this option is set to True the device server scrolls through the host list until it connects to a device listed in the host list table Once it conne...

Page 30: ...o configure a channel s UDP settings 1 From the main menu click Connection for either Channel 1 or Channel 2 to display the Connection Settings page for the selected channel 2 In the available fields...

Page 31: ...te triggers based on any combination of the configurable pins when selected as user I O functions Optionally use a two byte serial string to initiate a trigger Each trigger is independent of the other...

Page 32: ...ve Inactive or None The configurable pins are disabled if they are all set to None If both the serial sequence and the configurable pins are disabled the trigger is disabled To configure the WiPort s...

Page 33: ...ication Interval The notification interval is the minimum time allowed between individual triggers If a trigger event occurs within the minimum interval since the last trigger it is ignored Re notific...

Page 34: ...nstead of an Access Point Ad Hoc Network Name Enter the network name for the Ad Hoc network Ad Hoc Network Channel Select from the pull down menu the radio channel for the Ad Hoc network The default v...

Page 35: ...M Pin Configuration There are 11 configurable hardware pins on the WiPort unit For each pin configure the pin function communication direction and its activity level For more information see Configura...

Page 36: ...dicates channel 1 status and extended diagnostics when the Diagnostics LED is lit Serial Status LED out chan 2 Indicates channel 2 status Diagnostics LED out Indicates errors and configurations Reset...

Page 37: ...how a typical device Not all devices display information in the same manner Accessing Setup Mode Telnet Access Note Alternatively use DeviceInstaller to access Telnet Select the device from the main w...

Page 38: ...running a terminal emulation program to your unit s serial port The default serial port settings are 9600 baud 8 bits no parity 1 stop bit no flow control 2 Reset the WiPort unit by cycling the unit...

Page 39: ...ddresses enter it manually The IP address must be set to a unique value in the network Enter each octet and press Enter between each section inputted The current value is displayed in parentheses IP A...

Page 40: ...not changed and the IP is 0 0 0 0 then the DHCP name defaults to CXXXXXX XXXXXX is the last 6 digits of the MAC address shown on the label on the bottom side of the unit For example if the MAC address...

Page 41: ...ed in hexadecimal notation The current value is displayed in parentheses I F Mode 4C _ Note RS 422 and RS 485 are available on Channel 2 only WiPort 485 models if the WiPort is used with the WiPort ev...

Page 42: ...low Flow control sets the local handshaking method for stopping serial input output The current value is displayed in parentheses Flow 0 _ Use the following table to select flow control options Table...

Page 43: ...to initiate a connection using TCP Set the port to a non zero value when the unit is in a passive mode or when using UDP instead of TCP Connect Mode Connect Mode defines the unit s connection method...

Page 44: ...not already established Default setting b Response Character Response A single character is transmitted to the serial port when there is a change in connection state C connected D disconnected N host...

Page 45: ...omit the port number from a command string the internally stored remote port number starts a connection If a partial IP address is presented in a command string it is interpreted to be the least signi...

Page 46: ...6 Hostlist Example Baudrate 9600 I F Mode 4C Flow 00 Port No 10001 ConnectMode C0 25 Hostlist No Entry Change Hostlist N Y 01 IP address 000 172 000 19 000 0 000 1 Port 0 23 02 IP address 000 172 000...

Page 47: ...chine accumulating phone charges for each connection Modem Mode allows you to replace modems with WiPorts and to use an Ethernet connection instead of a phone call By not having to change communicatio...

Page 48: ...erwise formatted correctly with OK and takes no further action When an active connection is in effect the unit transfers data and does not process commands received from the serial interface When a co...

Page 49: ...les character echo and responses n 1 enables character echo and responses ATVn Enables 1 character response or full verbose n 0 enables 1 character response n 1 enables full verbose Note The unit reco...

Page 50: ...TCP connection closes even if the remote site does not acknowledge the disconnection 4 When there is a network connection to or from the serial port the state LED turns off instead of blinking 5 When...

Page 51: ...ackets are sent to the network The standard algorithm is optimized for applications in which the unit is used in a local environment The alternate packing algorithm minimizes the packet count on the n...

Page 52: ...al line before the set time expires Enter time in the format mm ss where m is the number of minutes and s is the number of seconds DisConnTime 0 0 To disable the inactivity timeout enter 00 00 Range i...

Page 53: ...il server 0 0 0 0 Unit Domain Recipient 1 Recipient 2 Trigger 1 Serial trigger input disabled Channel 1 Match 00 Trigger input1 X Trigger input2 X Trigger input3 X Message Priority L Min notification...

Page 54: ...serial trigger input N Trigger input1 A I X X Trigger input1 A I X X Trigger input1 A I X X Message Priority L Minimum notification interval 1 s Re notification interval 0 s Set the configurable pins...

Page 55: ...n standard as an additional means of security To modify WLAN and WEP settings select 4 WLAN from the Change Setup menu Enable WLAN The current value is displayed in parentheses By default WLAN is enab...

Page 56: ...ious consequences TCP Keepalive Time TCP Keepalive time defines how many seconds the unit waits during a silent connection before checking whether the currently connected network device is still on th...

Page 57: ...5 _ Security Settings Change security settings via Telnet or serial connections only not on the Web Manager Note As recommended set security over the dedicated network or over the serial setup If the...

Page 58: ...required disable this capability for security purposes Disable Port 77FEh N _ The default setting is the N No option which enables remote configuration As a result configure the unit by using DeviceIn...

Page 59: ...nit s Channel 1 configuration Channel 2 configuration E mail settings and Expert settings to the factory default settings The server configuration settings for IP address gateway IP address and netmas...

Page 60: ...nel 11 Security 0 None Data Rate 11Mbps Expert Settings TCP keepalive 45 seconds ARP cache timeout 600 seconds High CPU performance mode Disabled Disable Monitor Mode N No HTTP port number 80 SMTP por...

Page 61: ...ail notification and triggers are disabled Exit Configuration Mode To exit setup mode Select option 9 Save and exit from the Change Setup menu to save all changes and reboot the device All values are...

Page 62: ...the directions active levels and states can be dynamically controlled and probed through special port 77F0 Features TCP and UDP can be used The protocol supports up to 32 GPIO for future products Fun...

Page 63: ...alid command only one byte with value 0FFh is returned Command Parameter 1 Byte 0 1 2 3 4 Pin Number 0 7 8 15 16 23 24 31 When sending a command TCP and UDP wait for the response before sending the ne...

Page 64: ...it is active high 3 3V when active 0V when inactive Command 13h Get Current States Send No parameters Response 1 parameter Bytes 1 4 States Bit X 1 means GPIO X is active 0 means it is inactive Comma...

Page 65: ...ue in the second parameter 0 means the state for that GPIO will not change Bytes 5 8 New States Bit X 1 means GPIO X will become active 0 means it will become inactive Response 1 parameter Bytes 1 4 U...

Page 66: ...and details 1Bh command 1Bh 01h 00h 00h 00h the mask that determines which GPIOs will be changed Bit 0 and 9 are 1 GPIO0 and GPIO9 will be changed bit 1 is 0 GPIO1 will remain the same 01h 00h 00h 00h...

Page 67: ...that you have successfully entered Monitor Mode Entering Monitor Mode via the Network Port To enter Monitor Mode using a Telnet connection 1 Establish a Telnet session to the configuration port 9999...

Page 68: ...s mode G0 G1 Ge Gf Get configuration from memory page Gets a memory page of configuration information from the device S0 S1 Se Sf Set configuration to memory page Sets a memory page of configuration i...

Page 69: ...uide for information about reloading firmware using DeviceInstaller The other methods are discussed below Using TFTP Graphical User Interface To download new firmware from a computer 3 Use a TFTP clie...

Page 70: ...tp i 192 168 1 111 put H2_FW_200 fwx FWX1 tftp i 192 168 1 111 put wpt_wm110 cob WEB1 Recovering the Firmware Using the Serial Port If for some reason the firmware is damaged you can recover the firmw...

Page 71: ...Make sure that your unit s IP address is unique When troubleshooting the following problems make sure that the WiPort is powered up Confirm that you are using a good network connection Diagnostic LED...

Page 72: ...Mode message You may have entered the Ethernet address incorrectly with the ARP command Confirm that the Ethernet address that you entered with the ARP command is correct The Ethernet address may onl...

Page 73: ...ommands at the DOS prompt of your computer ARP D X X X X X X X X is the IP of the device server PING X X X X X X X X is the IP of the device server If you get a response then there is a duplicate IP a...

Page 74: ...the No Connection With The Device Server message displays Your computer is not able to connect to port 30718 77FEh on the device server Make sure that port 30718 77FEh is not blocked with any router t...

Page 75: ...h Friday excluding holidays Technical Support Europe Middle East and Africa Phone 49 0 89 31787 817 Email eu_techsupp lantronix com or eu_support lantronix com Firmware downloads FAQs and the most up...

Reviews: