


28
4.
Align
PIN1
of the processor with the
corner cutout of the heat sink (if
there are two corner cutouts on one
heat sink, either will do).
5.
With a little pressure, push the four
corners of the carrier down to
engage their latching features with
the corresponding corners of the
heat sink. You might hear a clicking
sound when the latch clicks into
place.
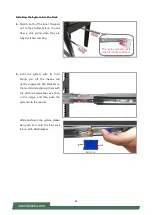
6.
Go through the four corners to check
if the latches are engaged. If correctly
latched, the corners of the carrier
should be tightly attached to the
heat sink, and no gap in-between is
observed.
Installing the PHM onto the Motherboard
1.
Remove the dust cover from the
socket contacts of the motherboard.
Note
: Inspect the surface of
the socket under sufficient
light to ensure there is no
contamination or damage prior to the
PHM installation.
Cutout
5
6
Unlatched
1
4
1
Summary of Contents for NCA-5520
Page 16: ...16...
Page 44: ...44 3 Fix the lock screws on the Ear Brackets to both front posts...
Page 63: ...63 Super IO Configuration...
Page 79: ...79 NVMe Configuration Network Stack Configuration...
Page 86: ...86 Server ME Configuration...
Page 89: ...89 Processor Configuration...
Page 91: ...91 Per Socket Configuration Feature Options Description CPU Socket0 Configuration None None...
Page 106: ...106 View System Event Log...