background image

Chapter 2: Motherboard Information


19 


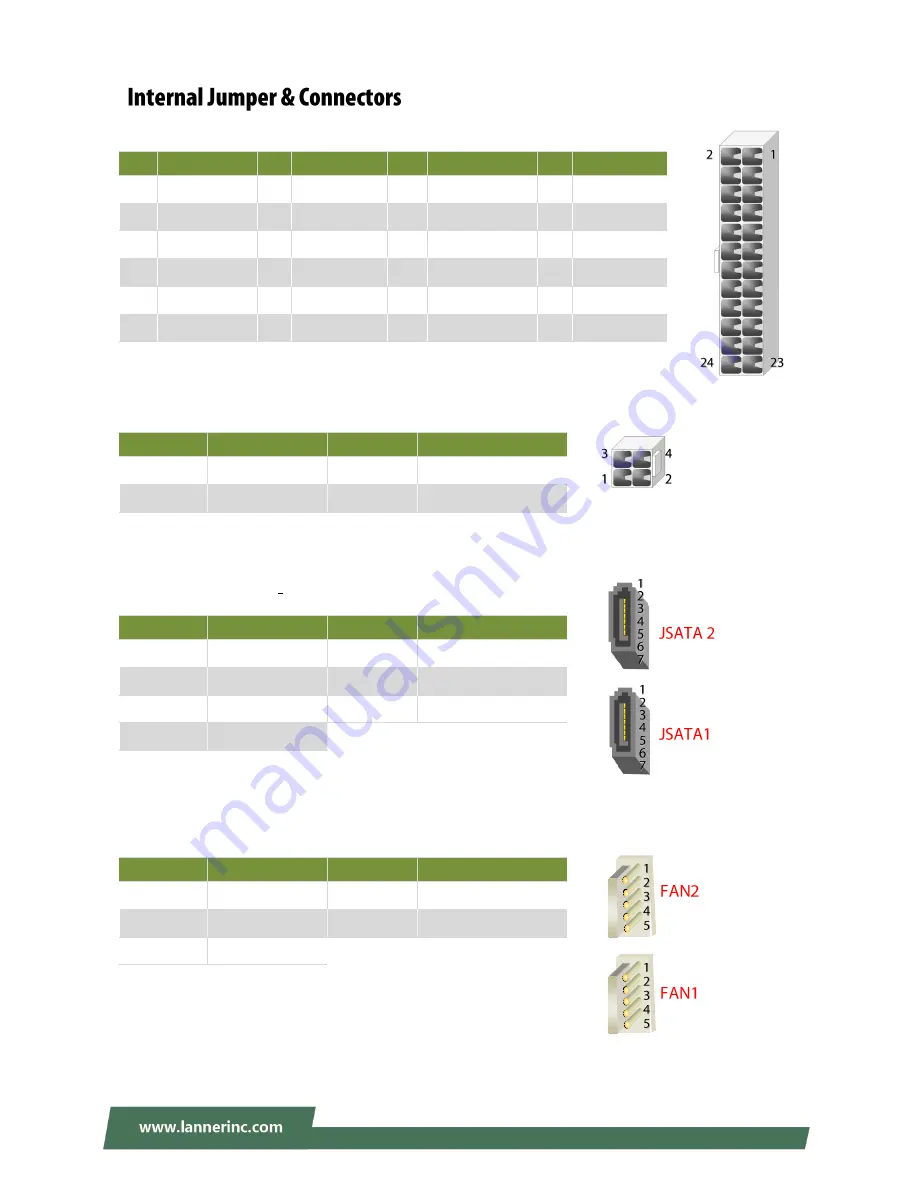
ATX1: 

24-Pin ATX Power Connector


ATX2: 

4-pin Power Connector 


JSATA2 & JSATA1: 

180° SATA Connector (with SATA DOM)   


FAN1-2

: Fan Connector 


Pin 

Description 

Pin  Description 

Pin 

Description 

Pin  Description 

+3.3V 

+3.3V 

+3.3V 

-12V 

Ground 

Ground 

+5V 

PSON- 

Ground 

10 

Ground 

11 

+5V 

12 

Ground 

13 

Ground 

14 

Ground 

15 

Power Good 

16 

NC 

17 

Stand-By 5V 

18 

+5V 

19 

+12V 

20 

+5V 

21 

+12V 

22 

+5V 

23 

3.3V 

24 

Ground 

Pin 

Description 

Pin 

Description 

GND 

+12V 

GND 

+12V 

Pin 

Description 

Pin 

Description 

GND 

TX+ 

TX- 

GND 

RX- 

RX+ 

SATA Power 


Pin 

Description 

Pin 

Description 

GND 

12V 

RPM Sense 

RPM Sense 

PWM Status 


Summary of Contents for NCA-2510

Page 1: ...1 NCA 2510 User Manual Version 1 1 Date of Release 2018 06 26 Network Computing...

Page 2: ...nal manufacturer reserves the right to make improvements to the products described in this manual at any time without notice No part of this manual may be reproduced copied translated or transmitted i...

Page 3: ...ice pursuant to Part 15 of the FCC Rules These limits are designed to provide reasonable protection against harmful interference when the equipment is operated in a commercial environment This equipme...

Page 4: ...p ensuring that it makes good skin contact If no wrist strap is available ground yourself by touching the metal part of the chassis Periodically check the resistance value of the antistatic strap whic...

Page 5: ...seul si des conditions dangereuses sont pr sentes Ne consid rez jamais que l alimentation est coup e d un circuit v rifiez toujours le circuit Cet appareil g n re utilise et met une nergie radiofr que...

Page 6: ...e Une bonne mise la terre connexion la terre est tr s importante pour prot ger l quipement contre les effets n fastes du bruit externe et r duire les risques d lectrocution en cas de foudre Pour d sin...

Page 7: ...on Date Descriptions 1 0 2017 11 16 1 st Official Release 1 1 2018 06 26 Modified Specifications Modified Appendix C Setting up Console Redirections Add Battery Precautions Modified Approvals and Comp...

Page 8: ...r Panel 14 Block Diagram 15 Motherboard Layout 18 Internal Jumper Connectors 19 Opening the Chassis 25 Installing the Disk Drive s 26 Installing the IPMI Card 29 Installing the NIC Module 31 Installin...

Page 9: ...9 Advanced Setup 46 IntelRCSetup 64 Security 69 Boot Menu 72 Save and Exit Menu 73 Warranty Policy 80 RMA Service 80 RMA Service Request Form 81...

Page 10: ...urity Platform 1x Accessory Pack 1x Power Cable 1x Console Cable 1x Mounting Ear Bracket Kit and 1x SATA Cable Note If you should find any components missing or damaged please contact your dealer imme...

Page 11: ...10GbE SFP with Intel Fortville XL710 BM1 Ethernet controller and Gen3 Bypass IAC AST2302 IPMI Intelligent Platform Management Interface Card with GbE management port IAC AST2302VGA VGA card for netwo...

Page 12: ...er Button 1x ATX Power switch Console 1x RJ45 USB 2x USB 2 0 LCD Module 2x 20 character LCM 4 x keypads Display From OPMA slot Optional Power input AC power inlet on PSU Storage HDD SSD Support 2x 2 5...

Page 13: ...le Port 1x Console port F5 USB Port 2x USB 2 0 port F6 MGMT Port 1x Management port F7 IPMI Port 1x RJ45 for IPMI IPMI card required F8 GbE SFP Ports GbE ports 1 4 SFP ports 5 8 by SKU F9 LAN Module 1...

Page 14: ...ired R2 Console VGA Port 2x reserved holes for Console VGA cable R3 Cooling Fans 2x swappable independent fan R4 Power Button 1x ATX Power button R5 Power Supply 1x 150W PSU Note Please refer to Appen...

Page 15: ...Chapter 2 Motherboard Information 15 The block diagram indicates how data flows among components on the motherboard Please refer to the following figure for your motherboard s layout design...

Page 16: ...NCA 2510 User Manual 16...

Page 17: ...Chapter 2 Motherboard Information 17...

Page 18: ...1 1 A A AT T TX X X1 1 1 J J JC C CM M MO O OS S S1 1 1 J J JR R RT T TC C C1 1 1 J J JL L LC C CM M M1 1 1 S S SW W W1 1 1 S S SW W W3 3 3 C C CO O ON N NN N N2 2 2 J J J2 2 21 1 1 J J JT T TP P PM...

Page 19: ...cription 1 3 3V 2 3 3V 3 3 3V 4 12V 5 Ground 6 Ground 7 5V 8 PSON 9 Ground 10 Ground 11 5V 12 Ground 13 Ground 14 Ground 15 Power Good 16 NC 17 Stand By 5V 18 5V 19 12V 20 5V 21 12V 22 5V 23 3 3V 24 G...

Page 20: ...n Description 1 GND 2 GND 3 FP_RST_SEL 4 FP_RST_SEL Pin Description Pin Description 1 GND 2 GND 3 FP_SWIN_R 4 FP_SWIN_R Pin Description Pin Description 1 GND 2 FP_SWIN_R Pin Description Pin Descriptio...

Page 21: ...M_RESET_N 12 Ground Pin Description Pin Description Pin Description Pin Description 1 VCC 2 IOGND 3 LSTIN 4 VEE 5 LAFD 6 LINIT 7 LPD1 8 LPD0 9 LPD3 10 LPD2 11 LPD5 12 LPD4 13 LPD7 14 LPD6 15 LCD 16 VC...

Page 22: ..._3 3_DUAL 175 VDD_3 3_DUAL 177 GND 179 GND 181 VDD_5_DUAL 183 VDD_5_DUAL 185 RSVD 187 RSVD 189 RSVD 191 RSVD 193 RSVD 195 GND 197 RSVD 199 RSVD 2 GND 4 RSVD 6 GND 8 DVI_TX0_H 10 DVI_TX0_L 12 GND 14 DV...

Page 23: ...BUS2 J10 Gen3 Bypass Firmware Update Pin Description Pin Description 1 2 Normal Default 2 3 Clear CMOS Pin Description Pin Description 1 2 Normal Default 2 3 Clear RTC Pin Description Pin Description...

Page 24: ...n Description Pin Description 1 2 Normal Default 2 3 Firmware Update Pin Description Pin Description 1 CLK 2 LAD1 3 RST 4 LAD0 5 LRAME 6 POWER 7 LAD3 8 9 LAD2 10 GND Pin Description Pin Description 1...

Page 25: ...please remove all power connections to completely shut down the device Also please wear ESD protection gloves when conducting the steps narrated in this chapter 1 Loosen the two thumb screws from the...

Page 26: ...disk drive installation procedures based on their HDD SSD designs 1 Locate the 2 5 disk bay area in the chassis 2 Loosen the only screw that secures the HDD tray 3 Slide the tray towards the direction...

Page 27: ...ray secure them on the tray with two disk screws locked on each side of the disk 7 Have the cable ends go under and pass through the CPU dusk cover and then insert one end of the SATA data cable into...

Page 28: ...ble with the disk The SATA connection between a disk and the system is now built up Repeat Step 7 8 to establish the SATA connection of the other disk 9 Reverse the procedures narrated in Step 3 and t...

Page 29: ...for installing an IPMI card 1 Locate the OPMA socket 2 Align the notch of the card with the socket key in the slot 3 Insert the module at 30 degrees into the socket until it is fully seated in the co...

Page 30: ...ecure the card with a screw that comes with it To remove the card loosen the screw that secures it to the motherboard push aside the two metal leaves that hold the card to release it from the socket b...

Page 31: ...allation 1 Rotate the two lock screws counterclockwise and loosen them 2 Remove the door and locate the PCIe slot for module insertion 3 Insert your NIC Ethernet module The module shown in the image b...

Page 32: ...NCA 2510 User Manual 32 4 Once the module is firmly seated rotate clockwise and tighten the two lock screws 4...

Page 33: ...installing an mSATA card 1 Locate the mSATA slot 2 Align the notch of the module with the socket key in the slot 3 Insert the module at 30 degrees into the socket until it is fully seated in the conne...

Page 34: ...with the socket key in the slot 4 Push the module on its both corners into the slot until it is firmly seated The latches will automatically snap locked Warning The Harcuvar system can take up to 9 m...

Page 35: ...nner and have the PCIe expansion card you want to install ready 1 Power off this system and remove the system cover Locate the PCIe Expansion Slot 2 Loosen the only screw that secures the PCIe slot co...

Page 36: ...d screws 6 Assemble the Riser Card and Bracket A with four screws 7 Install your PCIe Expansion Card into the Bracket assembly as shown in the picture by carefully inserting the connector into the Ris...

Page 37: ...nnector on the motherboard Ensure that the golden connectors of the Bracket are firmly seated in place 10 On the rear panel use a screw to secure the slot Cover Bracket and the Grip onto the chassis 1...

Page 38: ...o prevent the chassis from falling over for the bracket assembly alone cannot provide sufficient support to the chassis With Slide Rail Kit Mounting Ear Brackets This method is rather complicated but...

Page 39: ...are matched and then secure the bracket onto the chassis with three provided screws 3 Repeat Step 2 to attach the bracket to the other side of the chassis 4 Install the chassis into the rack with the...

Page 40: ...ole screws for securing the system on the rail posts 2x Slide Rails A rail consists of the following parts 2 Unpack a slide rail and slide the Inner Rail all the way to the end 3 Stretch the bracket t...

Page 41: ...g Ear Brackets Now you shall install the slide rail assemblies onto the rack 8 This slide rail kit does NOT require screw fixing Simply aim at three available screw holes on the rack front and snap th...

Page 42: ...10 Stretch both of the Inner Rails out to their fullest extent You will hear a click sound when they are fully stretched and locked 11 Hold the system with its front facing you lift the chassis and ge...

Page 43: ...also push and hold the Rail Lock tab on both brackets Push the system all the way in until it stops To remove the system from the rack gently pull it outwards towards you while pushing the Release Ta...

Page 44: ...be directed to the BIOS main screen 4 Instructions of BIOS navigations Control Keys Description select a setup screen for instance Main IntelRCSetup Security Boot and Save Exit select an item option...

Page 45: ...Setup 45 Setup main page displays a description of BIOS information and project version information You can also setup the System Time and System Date here The screenshots presented in section are for...

Page 46: ...NCA 2510 User Manual 46 Use to select Advanced setup screen Under this screen you may use to select an item you want to configure...

Page 47: ...Chapter 4 BIOS Setup 47 This option allows you to configure parameters about BIOS support for the security device Press Enter to access the submenu The default is Enabled...

Page 48: ...48 This option allows you to configure parameters about Super IO Chip Press Enter to access the submenu Select Serial Port 1 Configuration or Serial Port 2 Configuration to enter sub setting screen Th...

Page 49: ...Chapter 4 BIOS Setup 49 This option allows you to configure Smart Fan properties and monitor the fan status...

Page 50: ...NCA 2510 User Manual 50 Enter Smart Fan Control to change fan mode The default is Smart Fan Mode...

Page 51: ...4 BIOS Setup 51 If with the case s support enabling this option will have the unit sound when someone opens the case of this unit which is considered against your organization s policy The default is...

Page 52: ...NCA 2510 User Manual 52 This option allows you to configure Digital I O pin properties Select the desired pin and press Enter to modify The default is Output Low...

Page 53: ...Chapter 4 BIOS Setup 53 This option allows you to enable or disable Watchdog Timer function The default is Disabled...

Page 54: ...NCA 2510 User Manual 54 This option allows you to configure parameters about serial port console redirection Press Enter to access the submenu The default is Enabled...

Page 55: ...n keys etc VT UTF8 Uses UTF8 encoding to map Unicode chars onto 1 or more bytes ANSI Extended ASCII char set Bits per second 9600 19200 38400 57600 115200 Selects serial port transmission speed The sp...

Page 56: ...ed Enable VT UTF8 Combination Key Support for ANSI VT100 terminals Recorder Mode Disabled Enabled With this mode enabled only text will be sent This is to capture Terminal data Putty KeyPad VT100 LINU...

Page 57: ...Chapter 4 BIOS Setup 57 This option allows you to configure parameters to be programmed into PCI Latency Timer Register...

Page 58: ...NCA 2510 User Manual 58 PCI Express Settings This option allows you to enable or disable PCI Express Device Relaxed Ordering...

Page 59: ...Chapter 4 BIOS Setup 59 PCI Express GEN 2 Settings This option allows you to enable or disable PCI ExpressGEN2 related setting...

Page 60: ...NCA 2510 User Manual 60 This option allows you to enable or disable UEFI Network Stack The default is Disabled...

Page 61: ...k Do Not Launch UEFI Legacy Controls the execution of UEFI and Legacy PXE OpROM Storage Do Not Launch UEFI Legacy Controls the execution of UEFI and Legacy Storage OpROM Video Do Not Launch UEFI Legac...

Page 62: ...e default is Enabled XHCI Hand off Enabled Disabled This is a workaround for QSes without XHCI hand off support The XHCI ownership change should be claimed by XHCI driver The default is Enabled USB Ma...

Page 63: ...default is 20 sec Device reset time out 10 sec 20 sec 30 sec 40 sec Set USB mass storage device Start Unit command time out 10 20 30 or 40 seconds Default is 20 sec Device power up delay Auto Manual S...

Page 64: ...NCA 2510 User Manual 64 Use to select the Chipset menu item from the BIOS setup screen to enter the IntelRCSetup Setup screen Users can select any of the items in the left frame of the screen...

Page 65: ...enabled for TM2 to be available GV3 must be enabled for Turbo Auto Enable for B0 CPU stepping all others disabled change setting to override CPU C State Disabled Enabled Enables the Enhanced Cx state...

Page 66: ...NCA 2510 User Manual 66...

Page 67: ...Chapter 4 BIOS Setup 67 This option enables or disables fast boot which skips memory training and attempts to boot using last known good configuration The default is Enabled...

Page 68: ...u to configure SATA Controller properties SATA Configuration Enables Disables SATA Controller if supported by current CPU SKU The default is Enabled Enabling the SATA controller you can respectively m...

Page 69: ...ord User Password Item Description Administrator Password If ONLY the Administrator s password is set then this only limits access to Setup and is only asked for when entering Setup User Password If O...

Page 70: ...cription Attempt Secure Boot Disabled Enabled Secure Boot is activated when Platform Key PK is enrolled System mode is User Deployed and CSM function is disabled Secure Boot Mode Standard Custom Secur...

Page 71: ...ou to provision factory default Secure Boot keys when System is in Setup Mode Install Factory Default keys None Forces System to enter User Mode install all Factory Default keys Enroll Efi Image None...

Page 72: ...Select the Boot menu item from the BIOS setup screen to enter the Boot Setup screen Item Value Description Quiet Boot Disabled Enabled Enables or disables Quiet Boot option Boot mode select LEGACY UEF...

Page 73: ...new system configuration parameters can take effect This window will appear after the Save Changes and Exit option is selected Select Yes to save changes and exit Setup Discard Changes and Exit Select...

Page 74: ...Activity B Bl li in nk ki in ng g A Am mb be er r Data access activity Off No data access activity Link Activity B Bl li in nk ki in ng g A Am mb be er r Link has been established and there is activit...

Page 75: ...s been established and there is no activity on this port Blinking Green Link has been established and there is activity on this port Off No link has been established Speed Solid Green Operating as a 1...

Page 76: ...is resumed to be malfunctioning and the processor s reset signal is asserted Thus the processor will be restarted as if a human operator had cycled the power To execute the utility enter the number of...

Page 77: ...ne end of the console cable to console port of the system and the other end to the serial port of the Remote Client System 2 Configure the following settings in the BIOS Setup menu BIOS Advanced Seria...

Page 78: ...booting process starts system off or upon software request during run time 4 Software programmable bypass or normal mode 5 Software programmable timer interval JUST ON watchdog timer used during JUST...

Page 79: ...y package of NCA 2510 For the latest driver update please visit Intel download center at https downloadcenter intel com use the keyword search or the filter to access the driver s product page and the...

Page 80: ...xpense 5 The following conditions are excluded from this warranty Improper or inadequate maintenance by the customer Unauthorized modification misuse or reversed engineering of the product Operation o...

Page 81: ...Appendix F Terms and Conditions 81 When requesting RMA service please fill out the following form Without this form enclosed your RMA cannot be processed...

Reviews: