


7
Press the flashing Shelf Button to turn Off the
beeper.
To erase a Manual Program press and hold the
READ/CLEAR
Button until the Status Screen
displays
"88888"
then release.
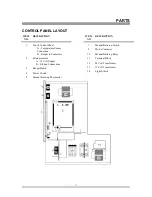
TEMPERATURE RECALL
BUTTON
When pressed, the
TEMP
Button will display, in
the Status Screen, the actual oven temperature.
READ/CLEAR BUTTON
The
READ/CLEAR
Button will change the
oven from a running program to
"EntEr",
allowing the operator to select a product which is
programmed at a different temperature.
To change from any Status Screen display to
"EntEr"
push and hold the
READ/CLEAR
Button until
"88888"
appears in the Status
Screen then release the button. The Status
Screen will display
"EntEr"
and the control is
ready to accept a new operator command.
The
READ/CLEAR
Button can also be used to
"read" an existing program.
To read an existing program, press the
READ/CLEAR
Button twice and then press the
Product Button to be read.
The Status Screen will scroll through the product
program parameters (temperature, time etc.).
Always start the "read" sequence with the Status
Screen displaying
"EntEr"
.
MANUAL BACK-UP
Should the computer control system develop a
fault causing it not to function the Manual Back-
up Switch, when energized, will bypass the
computer and change the oven control to a
mechanical thermostat. This will allow the oven
to continue operating until service can be
performed on the computer.
The Manual Back-up can also be used until the
computer is programmed.
The switch for the Manual Back-up is located
behind the louvered door, below the control
panel.
When the Back-up switch in the On (up)
position the oven temperature is controlled by a
mechanical thermostat located next to the switch.
Rotate the thermostat knob clockwise until the
desired temperature appears at the top of the
knob.
When in the Manual Back-up mode, the
computer will turn completely off and will not
time any products.
If service is required on the Lang computer, refer
to the Lang Authorized Service Agency
Directory for the nearest repair agency.
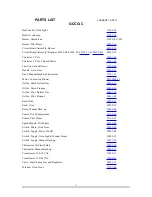
Summary of Contents for GCCO-C
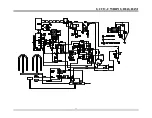
Page 16: ...13 GCCO C WIRING DIAGRAM...


