


9
SERVICE
WARNING
SERVICE ON THIS, OR ANY OTHER LANG APPLIANCE, MUST BE PERFORMED BY
QUALIFIED PERSONNEL ONLY. CONSULT YOUR AUTHORIZED SERVICE STATION
DIRECTORY OR CALL THE FACTORY AT 206-881-7569 FOR THE SERVICE STATION
NEAREST YOU.
CALIBRATION
The Lang Computerized Control is electronically
calibrated. Calibration of the control is not
necessary nor is it available.
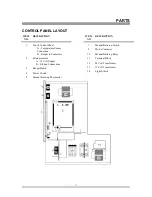
CONTROL PANEL REMOVAL
WARNING
DISCONNECT THE OVEN FROM POWER
Remove the two sheet metal screws going
vertically into the top of the control panel.
Open the oven doors and remove the 2 bolts
holding the lower trim piece in place.
Remove the one sheet metal screw holding the
bottom of the control panel to the lower trim
piece.
Remove the lower trim piece from the oven.
Remove the one sheet metal screw from the
lower right corner of the control panel behind
the trim piece.
Grasp the control panel assembly and gently pull
it forward on its slide until access is gained to
the control components.
Take care when sliding the control assembly in
or out so as not to snag any wires or kink the
manual thermostat capillary tube.
Reverse the above procedure for installation.
MOTOR REMOVAL
WARNING
DISCONNECT THE OVEN FROM POWER.
Remove the oven racks and rack slides from the
oven cavity.
Remove the four thumb screws located at the
corners of the fan baffle. Remove the fan baffle
from the oven.
Remove the eight 1/4 - 20 bolts from the motor
plate located behind the blower wheel.
Grasp the motor plate and slide the entire motor
assembly into the oven compartment.
Remove the wires from the motor and safety
thermostat. Be sure to mark the wires for proper
replacement.
IMPORTANT NOTE:
Before removing the blower wheel from the
motor shaft measure the distance from the motor
plate to the back of the blower wheel. Fan
spacing is critical to the proper operation of the
oven.
Loosen the set screws holding the fan to the
motor shaft.
Using a three finger wheel puller, grasp the
puller ring on the blower wheel hub and tighten
the puller until the blower comes off of the
motor shaft.
Remove the four 5/16 bolts holding the motor to
the motor mount.
Reverse the above procedure for replacement.
IMPORTANT NOTE
When replacing the blower wheel onto the motor
shaft adjust the motor so the blower spins
straight with the motor plate before tightening
the motor to the motor mount.
SAFETY THERMOSTAT
REMOVAL
WARNING
DISCONNECT THE OVEN FROM POWER
Remove the oven racks and rack slides from the
oven cavity.
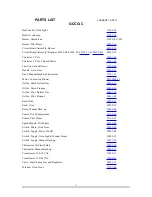
Summary of Contents for GCCO-C
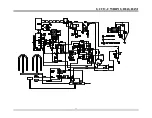
Page 16: ...13 GCCO C WIRING DIAGRAM...