OPERATING INSTRUCTIONS
3-19
Third Axle Flip Operation
(Option)
Flip Axle Up
1.
To flip from road position, use the manual height
control to raise rear of trailer
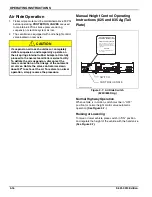
Control Operating Instructions (825 and 835 Ag
(Tail Plate)” on page 3-16 and “Operating
Instructions (835 Construction) (Curbside
Bolster)” on page 3-17.)
2.
Turn switch for flip axle air bags to the “OFF” position.
This will allow flip axle to settle down for easy
removal of flip axle lower retaining pins
NOTE
“ON” position is for road use of flip only.
3.
Remove lower retain pins and place in pin storage
location.
DANGER
4.
Flip the axle up:
a.
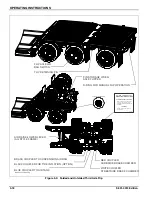
For manual operation, use d-ring on bottom of
flip axle bumper to attach chain from lifting
device (overhead crane, loader, excavator, etc.)
to lift and flip the flip axle assembly over onto the
trailer frame /trunnion bed.
b.
For hydraulic operation, with gooseneck attached
to main frame and hydraulic lines for flip coupled
at the gooseneck, operate the auxiliary hydraulic
control lever to flip the flip axle assembly over
onto the trailer frame/trunnion bed.
5.
Disconnect flip axle electrical harness from trailer
frame and shut off air supply to brake chambers (red
and white couplers).
6.
Return trailer to normal ride height.
a.
On AG trailer, turn manual height control switch
to “OFF” position.
b.
On Construction trailer, return control handle to
normal ride position.
Flip Axle Down
1.
Reconnect flip axle electrical harness to trailer frame
and turn on air supply to brake chambers (red and
white couplers).
2.
To flip to road position, use the manual height control
to raise rear of trailer
Operating Instructions (825 and 835 Ag (Tail
Plate)” on page 3-16 and “Operating Instructions
(835 Construction) (Curbside Bolster)” on
page 3-17.)
3.
Check that switch for flip axle air bags is in “OFF”
position. This will allow flip axle to settle down for
easy installation of flip axle lower retaining pins
4.
Double check that lower retain pins are removed.
DANGER
5.
Flip the axle down for road position:
a.
For manual operation, use d-ring on bottom of
flip axle bumper to attach chain from lifting
device (overhead crane, loader, excavator, etc.)
to lift and flip the flip axle assembly over to road
position.
b.
For hydraulic operation, with gooseneck attached
to main frame and hydraulic lines for flip coupled
at the gooseneck, operate the auxiliary hydraulic
control lever to flip the flip axle assembly over to
road position.
6.
Reinsert lower retain pins.
7.
Turn switch for flip axle air bags to the “ON” position.
This will allow flip axle air bags to inflate and operate
with trailer height control. The flip axle lower retaining
pins are now tight.
8.
Return trailer to normal ride height.
a.
On AG trailer, turn manual height control switch
to “OFF” position.
b.
On Construction trailer, return control handle to
normal ride position.
Stand clear of flip axle during flip operation.
Stand clear of flip axle during flip operation.
Summary of Contents for 825D Series
Page 2: ......
Page 6: ...iv F 691 0913 Edition...
Page 14: ...2 6 F 691 0913 Edition STANDARD SPECIFICATIONS...
Page 40: ...3 26 F 691 0913 Edition OPERATING INSTRUCTIONS Page Intentionally Blank...
Page 60: ...4 20 F 691 0913 Edition MAINTENANCE AND LUBRICATION Figure 4 13 Axle and Brake Assembly...
Page 77: ...TROUBLESHOOTING GUIDE 5 9 Notes...
Page 78: ...5 10 F 691 0913 Edition TROUBLESHOOTING GUIDE...
Page 79: ......


