background image

NOTES:

5-4

Summary of Contents for 7430 Series

Page 1: ...MODEL 7430 VERTICAL HARROW OPERATOR S MANUAL 1900 NORTH STREET MARYSVILLE KANSAS 66508 785 562 5381 F 531 0809 08 09...

Page 2: ...authorized for specific work will be limited where appropriate to the hours listed in the Landoll Corporation authorized Labor Rate Guide USER S OBLIGATION 1 Read the Operator s Manual 2 Understand t...

Page 3: ...MODEL 7430 VERTICAL HARROW OPERATOR S MANUAL PURCHASED FROM DATE ADDRESS PHONE NO SERIAL NO i...

Page 4: ...NOTES ii...

Page 5: ...ION OPTION 3 26 3 14 FINAL ASSEMBLY 3 27 4 OPERATION AND MAINTENANCE 4 1 4 1 TRACTOR PREPARATION 4 2 4 2 VERTICAL HARROW PREPARATION 4 2 4 3 ATTACHING TO THE TRACTOR 4 3 4 4 HYDRAULIC LIFT SYSTEM 4 3...

Page 6: ...IF NOT AVOIDED WILL RESULT IN DEATH OR SERIOUS INJURY WARNING WARNING INDICATES A POTENTIALLY HAZARDOUS SITUA TION WHICH IF NOT AVOIDED COULD RESULT IN DEATH OR SERIOUS INJURY CAUTION CAUTION INDICAT...

Page 7: ...ance of your Landoll equipment Drawings in this section locate adjustment points on the equipment NOTE IF THE EQUIPMENT IS IMPROPERLY ASSEMBLED OR MAINTAINED THE WARRANTY IS VOID IF YOU HAVE ANY QUEST...

Page 8: ...NOTES 1 2...

Page 9: ...26 3 13 7 13 7 22 44 46 10 10 12L x 15 Load Range F 2 1 4 8 Bolt 18 920 7430 33 33 2 17 11 13 11 22 56 58 14 14 12L x 15 Load Range F 2 7 8 Center Frame 2 1 4 Wings 8 Bolt 23 380 Specifications are s...

Page 10: ...65 81 90 112 9 16 12 55 62 80 100 110 137 9 16 18 60 75 90 112 130 162 5 8 11 75 94 110 137 170 212 5 8 18 85 106 130 162 180 225 3 4 10 130 162 200 250 280 350 3 4 16 150 188 220 275 320 400 7 8 9 12...

Page 11: ...Ring ORS O Ring Boss ORB 4 11 12 10 12 14 16 5 15 16 18 20 6 18 20 18 20 24 26 8 38 42 32 35 50 60 10 57 62 46 50 72 80 12 79 87 65 70 125 135 14 160 180 16 108 113 92 100 200 220 20 127 133 125 140...

Page 12: ...2 4 9 102 26 3 4 30 1 4 7430 33 top p1 30 1 2 Figure 2 1 Wing Stabilizer and Light Bracket Placement 26 Model Left Half...

Page 13: ...2 5 8 130 26 3 4 30 1 4 48 1 2 7430 33 top p2 36 1 2 Figure 2 2 Wing Stabilizer and Light Bracket Placement 26 Model Right Half...

Page 14: ...2 6 13 1 4 100 1 2 114 20 7430 33 top p1 34 Figure 2 3 Wing Stabilizer and Light Bracket Placement 33 Model Left Half...

Page 15: ...2 7 13 1 4 132 114 20 23 1 4 23 1 4 46 7430 33 top p2 Figure 2 4 Wing Stabilizer and Light Bracket Placement 33 Model Right Half...

Page 16: ......

Page 17: ...ER DISC BLADES ARE EXTREMELY SHARP EXERCISE EXTREME CARE WHEN WORKING ON OR NEAR DISC BLADES DO NOT ALLOW DISCS TO ROLL OVER OR FALL ONTO ANY BOD ILY PART DO NOT ALLOW WRENCHES TO SLIP WHEN WORKING NE...

Page 18: ...HITCH CLEVIS HOSE HOLDER BRACKET 3 4 16 HEX NUT SAFETY CHAIN ASSEMBLY 1 1 8 7 HEX LOCK NUT 10 AND 14 GA MACHINE BUSHINGS HITCH MOUNT PLATE 1 1 8 7 X 7 1 2 HEX HEAD CAP SCREW CENTER FRAME ASSEMBLY 3 4...

Page 19: ...n depending on matching trac tor drawbar height See Section 4 11 for proper adjustment 3 1 3 Move the tongue jack to the forward mounting tube and rotate to parking position to support the front of th...

Page 20: ...10 HEX LOCK NUT 1 8 HEX LOCK NUT STEEL BUSHING LEVELER BALL JOINT LINK 11 3 4 LEVELER LINK FLANGE BEARING 5 16 X 2 1 2 SPRING SLOTTED PIN LEVELER SCREW ASSEMBLY HE HEAD CAP SCREW 1 8 X 4 1 2 HEX HEAD...

Page 21: ...the top end and 1 1 4 flange bearing into bottom end of the 11 3 4 leveler links Insert the bushings on the flat side of the link 3 2 6 Insert plastic wear flange bearings into the round tube end of...

Page 22: ...3 1 2 HEX HEAD CAP SCREW 5 16 X 2 1 2 SPRING SLOTTED PIN 1N FLAT WASHER LEVELER CROSS BRACKET 3 4 10 X 3 1 2 HEX HEAD CAP SCREW 1 8 X 4 HEX HEAD CAP SCREW FLANGE BEARING LEVELER L LINK 1 2 STEEL BUSH...

Page 23: ...m bly into the front end of the leveler tube and fasten with two 5 8 11 x 3 1 2 hex head cap screws and hex lock nuts Insert a plastic wear flange bearing into the flat side of each leveler cross brac...

Page 24: ...X 2 HEX HEAD CAP SCREW LEVELER PIN 5 16 X 2 1 2 SPRING SLOTTED PIN 1N FLAT WASHER LEVELER CROSS BRACKET 3 4 10 X 3 1 2 HEX HEAD CAP SCREW 1 8 X 4 HEX HEAD CAP SCREW FLANGE BEARING LEVELER L LINK 1 8 X...

Page 25: ...eveler cross bracket Install the plastic wear flange bearing from the tube side of the bracket 3 4 7 Slide the leveler cross brackets onto the leveler cylinder cross and secure with wash ers and 5 16...

Page 26: ...VE MOUNT PLATE WELDED TO CENTER FRAME 5 16 18 HEX LOCK NUT 3 8 16 X 1 1 4 HEX HEAD CAP SCREW 5 8 11 HEX LOCK NUT 5 8 11 HEX NUT 5 8 11 X 3 HEX HEAD CAP SCREW 3 8 16 HEX NUT CENTER LIFT CENTER FRAME DE...

Page 27: ...gh the depth stop mounting plate on the center lift and secure with a 5 8 11 hex lock nut 3 5 2 Insert 90 deg elbow fittings in the back and right side of the limit valve 3 5 3 Using 5 16 18 x 4 hex h...

Page 28: ...X LOCK NUT FOLD CYLINDER MOUNT 5 8 X 4 X 6 1 2 U BOLT LOCATION ON 26 MODEL 5 8 11 HEX LOCK NUT FOLD CYLINDER MOUNT 5 8 X 4 X 7 3 4 U BOLT 33 MODEL 26 MODEL LOCATION ON MODEL S 33 58 7 16 Figure 3 6 Fo...

Page 29: ...s See Figure 3 6 3 6 2 For 33 models assemble two fold cylin der mounts to the center frame using 5 8 x 4 x 7 3 4 u bolts and hex lock nuts Place one mount on the middle cross bar over the leveler spr...

Page 30: ...ER 1 8 HEX LOCK NUT LEFT REAR WING DISC GANG ASSEMBLY 1N FLAT WASHER HINGE PIN 1 2 X 2 1 4 SLOTTED SPRING PIN LEFT FRONT FRAME DISC GANG ASSEMBLY 1 2 X 2 1 4 SLOTTED SPRING PIN HINGE PIN 1 1 2 THRUST...

Page 31: ...blies to the center section using 3 4 10 x 2 grade 8 hex head cap screws and hex lock nuts See Figure 3 7 Use a 3 4 10 x 2 1 2 grade 8 hex head cap screw manifold mounting bracket and hex lock nut on...

Page 32: ...X 6 HEX HEAD CAP SCREW 3 4 10 HEX LOCK NUT GAUGE WHEEL SPACER 1 8 HEX LOCK NUT WING LIFT WHEEL ASSEMBLY LEFT WING FRAME wing assembly WING STABILIZER U BOLT WING STABILIZER BRACKET 3 16 HAIR PIN 5 8...

Page 33: ...rs and hex lock nuts Securely tighten the mounting screws to eliminate any slack and unneces sary wear 3 9 4 Mount the wing stabilizer brackets to the wing frames using u bolts and hex lock nuts See F...

Page 34: ...150 HOSE ASSEMBLY 1 2 13 X 3 1 2 HEX HEAD CAP SCREW AND HEX LOCK NUT MANIFOLD BRACKET 16 PORT MANIFOLD 3 8 X 150 HOSE ASSEMBLY 3 3 10 SLAVE DECAL LIMIT VALVE 3 8 X 196 HOSE ASSEMBLY 3 4 16 MALE COUPL...

Page 35: ...D PIN 1 1 4N FLAT WASHER 5 16 X 2 1 2 SPRING SLOTTED PIN 90 ELBOW 3 8 X HOSE ASSEMBLY 3 4 16 MALE COUPLER W RESTRICTOR 64 3 8 X 215 HOSE ASSEMBLY 1 2 13 X 3 1 2 HEX HEAD CAP SCREW AND HEX LOCK NUT MAN...

Page 36: ...DECAL HYDRAULIC CYLINDER 4 X HYDRAULIC CYLINDER 3 3 4 X 10 3 8 X 190 HOSE ASSEMBLY 1 2 13 X 3 1 2 HEX HEAD CAP SCREW AND HEX LOCK NUT MANIFOLD BRACKET 16 PORT MANIFOLD 3 8 X 190 HOSE ASSEMBLY 3 3 10...

Page 37: ...EMBLY 3 8 X 61 HOSE ASSEMBLY ADAPTER 90 90 ELBOW W RESTRICTOR 3 8 X 75 HOSE ASSEMBLY 3 8 X 4 HOSE ASSEMBLY 3 4 16 MALE COUPLER 1 2 2 3 8 X 215 HOSE ASSEMBLY 13 X 3 1 2 HEX HEAD CAP SCREW AND HEX LOCK...

Page 38: ...linders and both ends of all lift cylinders 3 10 7 Install the front manifold to the manifold bracket on the front center gang using 1 2 13 x 3 1 2 hex head cap screws and hex lock nuts 3 10 8 On 33 m...

Page 39: ...n the back bar of the frame 3 23 elect assy MAIN WARNING LIGHT HARNESS WING STABILIZER U BOLT LH BRACKET WELDMENT YELLOW REFLECTOR AMBER SINGLE LAMP RED REFLECTOR ORANGE STRIPE 5 8 11 FLANGE HEAD SERR...

Page 40: ...G SLOTTED PIN ADJUSTMENT PIN 1 X 8 ADJUSTMENT BOLT CONNEX BUSHING 1 1 2 FLANGE BEARING 1 1 2 PIVOT BUSHING 5 16 X 1 1 2 SPRING SLOTTED PIN PIVOT PIN MACHINERY BUSHING REEL ARM 5 8 11 HEX LOCK NUT REEL...

Page 41: ...pring as sembly 3 12 3 Attach heavy spring assembly to lower hole on rear center or wing frame or double chopper mount with 3 8 x 4 spring slotted pins through adjustment pin 3 12 4 Attach reel arm sp...

Page 42: ...head cap screws and hex lock nuts See Figure 3 16 IMPORTANT THE REAR JACK TUBE SHOULD BE LOCATED TO THE REAR OF THE VERTICAL HARROW NEAR THE CENTER OF THE FRAME 3 13 2 Slide rear jack tube into rear...

Page 43: ...lt in implement damage Follow instruc tions for charging the hydraulic fold system See Section 4 5 3 14 5 Connect lights to the tractor and verify operation 3 14 6 Check tires for proper inflation 3 1...

Page 44: ...NOTES 3 28...

Page 45: ...TAKE PREVENTIVE MEASURES AGAINST ACCIDENTAL LOWERING CAN RESULT IN SERIOUS PERSONAL INJURY DANGER ALWAYS LOCK THE TRACTOR DRAW BAR IN THE CENTER POSITION WHEN TRANSPORTING THE UNIT FAILURE TO DO SO C...

Page 46: ...tor drawbar in the center position 4 2 VERTICAL HARROW PREPARATION 4 2 1 Prior to operating the 7430 Vertical Har row inspect it thoroughly for good operating condition 4 2 2 Replace worn or missing p...

Page 47: ...ING ESCAPING HYDRAULIC FLUID CAN CAUSE SERIOUS PERSONNEL IN JURY RELIEVE SYSTEM PRESSURE BEFORE REPAIRING ADJUSTING OR DISCONNECTING WEAR PROPER HAND AND EYE PROTECTION WHEN SEARCHING FOR LEAKS USE CA...

Page 48: ...4 Lower and raise the unit to verify that all cylinders are working si multaneously throughout the stroke If the cylinders are not working evenly or together fully extend the lift cylinders and contin...

Page 49: ...re it is full of the manufacturer s recommended hydraulic fluid Connect the cylinder hoses to the tractor and fully extend and retract the cylinders several times The cylinder rod travel should be smo...

Page 50: ...AFE DISTANCE AWAY 4 5 6 Slowly engage the tractor lever and fold unfold the wing frames When the wings are unfolded continue holding the tractor le ver to fully extend all fold cylinders This will all...

Page 51: ...t be achieved by raising the lift wheels off the ground Little or no weight on the lift wheels will cause the frame sections to gouge side draft and buckle producing inconsistent cutting depth 4 6 4 D...

Page 52: ...istance from the walk ing beam spindle to the bottom side of the frame See Figure 4 7 Measure the same distance on the wing frame The wing frames are generally set to the same distance or slightly hig...

Page 53: ...out to adjust the front to rear level See Figure 4 9 By turning the leveler handle in clock wise will lower the rear gangs in deeper By turning the leveler screw out counter clock wise will raise the...

Page 54: ...ndicator rod from the leveler tube See Figure 4 11 4 10 3 Loosen the 1 1 2 6 hex lock nut at the rear of the leveler tube an adjustment wrench is provided for this 4 10 4 Screw the leveler tube out to...

Page 55: ...leveler screw manual or hydrau lic in or out until the pressure is relieved on the leveling system See Sections 4 9 and 4 10 c Remove the 1 8 X 4 hex head cap screw and hardware from the leveler ball...

Page 56: ...l function as a spring loaded scraper 4 12 2 Scraper blades have two positions and are reversible The blades are initially set in the front position to position scraper closer to the spool This positi...

Page 57: ...wheels to carry some weight but not enough to hold the wing from reaching oper ating depth set with the main lift hydraulics IMPORTANT EXCESSIVE DOWN PRESSURE CAN CAUSE THE IMPLEMENT TO THROW A CENTE...

Page 58: ...ith mixed re sults and is not covered by warranty Disc blade manufacturers will not cover any alter ations to blades other than the place of man ufacture Results from roll sharpening dam age may not b...

Page 59: ...equal approximately 3 16 adjustment in depth 4 16 2 The gauge on the side of the depth stop tube gives a reference for depth setting The A setting refers to maximum operating depth IMPORTANT FOR MAXI...

Page 60: ...he hub to keep contaminants out and al low grease to pass 4 17 11 Install a new cotter pin and replace the hub cap 4 18 HYDRAULIC MAINTENANCE 4 18 1 Check the tractor hydraulic fluid level per tractor...

Page 61: ...ves and slopes to avoid tipping Equip ment altered other than the place of manu facture may reduce the maximum transport speed Additional weight added tanks har rowing attachments etc may reduce imple...

Page 62: ...ght 4 19 10 Install transport locks on both lift and fold systems Do not depend solely on imple ment hydraulics for transport See Figure 4 17 WARNING FAILURE TO USE TRANSPORT LOCK PINS DURING TRANSPOR...

Page 63: ...TERVAL Hours unless stated 1 Disc Gang Bearings 1 each 10 2 Radius Rod 2 50 3 Walking Tandem Hubs 1 each 50 4 Wheel Hubs 1 each 50 5 Front Gauge 6 Bolt Wheel Hubs 1 each 50 6 Manual Leveler Tube 1 50...

Page 64: ...ubrica tion will extend service life particularly in se vere operating conditions 4 20 5 The Vertical Harrow is equipped with maintenance free bearings in the lifts lev eler wing hinges and gauge whee...

Page 65: ...NOTES 4 21...

Page 66: ......

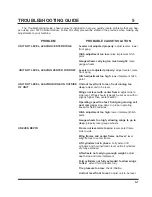
Page 67: ...deep adjust unit to be level Wings not level with center frame adjust side to side level Wings should typically be set even with or slightly higher than center section Operating speed too fast front g...

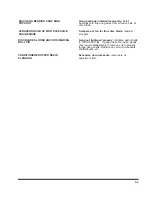
Page 68: ...raulic lever until all cylinders are fully extended Cylinders not installed in proper series Wing cylinders are smaller diameter than center cylinders Reinstall cylinders properly Hoses not properly c...

Page 69: ...set too far from disc blade readjust scrapers DISC BLADES LOOSE AND OR SHEARING ROLL PIN Gang not tightened properly retighten gang shafts to 1250 1500 ft lbs If gangs have ran loose gangs may require...

Page 70: ...NOTES 5 4...

Reviews: