background image

12

Operations

Detergents & General Cleaning 

Techniques

WARNING: Some detergents may 

be harmful if inhaled or ingested, 

causing severe nausea, fainting or 

poisoning. The harmful elements 

may cause property damage or 

severe injury.
AVERTISSEMENT: Certains 

détergents peuvent être 

dangereux s'ils sont inhalés ou 

ingérés, provoquant de fortes nausées, des 

évanouissements et l'empoisonnement. Les 

éléments dangereux peuvent causer des 

dommages à la propriété ou des blessures graves.

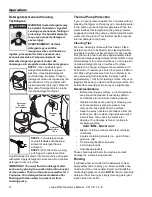
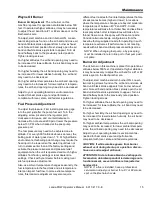
STEP 1:

 Use Landa detergent 

designed specifically for pressure 

washers. Household detergents 

could damage the pump. Prepare 

detergent solution as required by the 

manufacturer. Fill a container with 

pressure washer detergent. Place the 

filter end of detergent pick- up tube 

into the detergent container.

STEP 2:

 Turn detergent valve 

counterclockwise until desired 

amount of detergent flow is 

achieved.

STEP 3:

 With the motor running, 

pull trigger to operate machine. 

Liquid detergent is drawn into the machine and mixed 

with water. Apply detergent to work area. Do not allow 

detergent to dry on surface.

IMPORTANT: You must flush the detergent after 

each use by placing the suction tube into a bucket 

of clean water. Then run the pressure washer for 1-

2 minutes. Turn detergent valve clockwise after 

flushing with clean water to prevent air from 

entering pump.

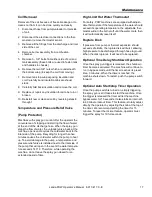
Thermal Pump Protection

If you run your pressure washer for 3 minutes without 

pressing the trigger on the spray gun, circulating water 

in the pump can reach high temperatures. When the 

water reaches this temperature, the pump protector 

engages and cools the pump by discharging the warm 

water onto the ground. This thermal device prevents 

internal damage to the pump.

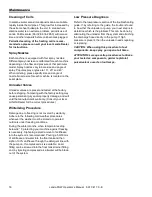
Cleaning Tips

Pre-rinse cleaning surface with fresh water. Place 

detergent suction tube directly into cleaning solution 

and apply to surface at low pressure (for best results, 

limit your work area to sections approximately 6 feet 

square and always apply detergent from bottom to top). 

Allow detergent to remain on surface 1-3 minutes. Do 

not allow detergent to dry on surface. If surface 

appears to be drying, simply wet down surface with 

fresh water. If needed, use brush to remove stubborn 

dirt. Rinse at high pressure from top to bottom in an 

even sweeping motion keeping the spray nozzle 

approximately 1 foot from cleaning surface. Use over

-

lapping strokes as you clean and rinse any surface. For 

best surface cleaning action spray at a slight angle.

Recommendations:

Before cleaning any surface, an inconspicuous 

area should be cleaned to test spray pattern 

and distance for maximum cleaning results.

If painted surfaces are peeling or chipping, use 

extreme caution as pressure washer may 

remove the loose paint from the surface.

Keep the spray nozzle a safe distance from the 

surface you plan to clean. High pressure wash 

a small area, then check the surface for 

damage. If no damage is found, continue to 

pressure washing.


CAUTION - Never use:

Bleach, chlorine products and other corrosive 

chemicals

Liquids containing solvents (i.e., paint thinner, 

gasoline, oils)

Tri-sodium phosphate products

Ammonia products

Acid-based products

These chemicals will harm the machine and will 

damage the surface being cleaned.

Rinsing

It will take a few seconds for the detergent to clear. 

Apply safety latch to spray gun. Remove black soap 

nozzle from the quick coupler. Select and install the 

desired high pressure nozzle. 

NOTE: 

You can also stop 

detergent from flowing by simply removing detergent 

siphon tube from bottle.

Landa PHW Operator’s Manual   8.917-417.0 - E

WARNING

DETE

RGEN

T V

ALV

E

VAL

VUL

A DE DET

ER

ENTE

SO

UP

APE 

DE 

DET

ER

GENT

Detergent 

Bucket  

(not Included)

Detergent 

Pick-Up 

Tube

Detergent 

Valve

Summary of Contents for PHW

Page 1: ...t les parti es isol es des poig n e pisto lets et lance s RIES GO DE ASF IXIA Use el prod uc to en un area de venti laci n adec uada RISQ UE D AS PHY XIE Utilis er dans un endr oit bien a r RISK OF A...

Page 2: ...2 Landa PHW Operator s Manual 8 917 417 0 E Machine Data Label...

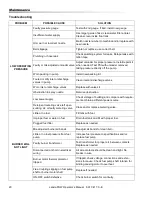
Page 3: ...nce 14 Maintenance And Service 14 Pump Lubrication 14 Fuel 14 Electrode Setting 14 Transformer Check 14 Fuel Control System 14 Fuel Pressure Adjustment 14 Wayne Oil Burner 15 Fuel Pressure Adjustment...

Page 4: ...ion They are listed in this general order Preventative Maintenance Maintenance And Service Pump Lubrication Fuel Burner Air Adjustment Cleaning of Coils Spray Nozzles Unloader Valves Winterizing Proce...

Page 5: ...he operator in the operator s native language by the purchaser owner making sure that the operator comprehends its contents Owner and or user must study and maintain for future reference the manufactu...

Page 6: ...fi NE JAMAIS utiliser un adaptateur avec ce produit WARNING Keep wand hose and water spray away from electric wiring or fatal electric shock may result AVERTISSEMENT Garder la lance le boyau et le jet...

Page 7: ...nes ou des animaux car cela risquerait de causer des blessures graves ou m me la mort WARNING This machine produces hot water and must have insulated components attached to protect the operator AVERTI...

Page 8: ...utiliser l int rieur m me si les fen tres et les portes sont ouvertes 17 Avoid installing machines in small areas or near exhaust fans Adequate oxygen is needed for combustion or dangerous carbon mono...

Page 9: ...t unit turn switc h on gr ip wan d se curel y and trigg er spra y gun 7 To hea t wate r turn burn er switc h on 8 To app ly dete rgen t see Ope rator s Man ual 9 To shut dow n mac hine turn burn er of...

Page 10: ...must be used refrain from using 90 bends If the pipe can not go straight up then use only 45 bends and go to the next larger size pipe The overall pipe length must not exceed 6 feet in length Air adju...

Page 11: ...e op en am e ch is pe rm it t sp ray ids ARNING AV ER TISS EM EN T RIE SG O DE EX PL OS IO N Us e el pro du cto en re as do nd e el fue go llam a se an pe rm itid os No roc ie liqu i do s in am ab les...

Page 12: ...ater Place detergent suction tube directly into cleaning solution and apply to surface at low pressure for best results limit your work area to sections approximately 6 feet square and always apply de...

Page 13: ...f frozen FREEZE DAMAGE IS NOT COVERED BY WARRANTY ATTENTION Toujours entreposer la laveuse pression dans un endroit o la temp rature ne sera pas inf rieure X C X F La pompe sur cette machine est susce...

Page 14: ...uel tank and replace fuel filter every 100 hours of opera tion Electrode Setting Ignition Circuit Periodically inspect wires spring contact and elec trodes for condition security and proper spacing Tr...

Page 15: ...et can impact fuel flow In more extreme tempera tures this local site adjustment may also require different fuel nozzles for fuel inlet temperatures that are at seasonal extremes higher or lower in lo...

Page 16: ...mage due to freezing is not covered by warranty Adhere to the following cold weather procedures whenever the washer must be stored or operated outdoors under freezing conditions During the winter mont...

Page 17: ...valve is installed next to the inlet side of the pump that will open in the event the water tempera ture exceeds 140 F Therefore while operating the machine do not leave the spray gun closed for an e...

Page 18: ...e more often under severe conditions Maintenance Schedule Replace Fuel Lines Annually Pump Oil 10W 40 Non Foaming Inspect Daily inspect the oil level Change After first 50 hours then every 500 hours o...

Page 19: ...Oil Change Record DateOilChanged Month Day Year Estimated Operating Hours Since Last Oil Change DateOilChanged Month Day Year Estimated Operating Hours Since Last Oil Change Landa PHW Operator s Manua...

Page 20: ...supply Check voltage of building and compare with require ments Obtain a different power source Detergent metering valve left open sucking air or faulty metering valve Close and or replace metering va...
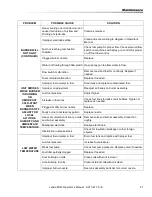
Page 21: ...in fuel Drain tank and replace contaminated fuel Improper air adjustment Readjust air bands on burner assembly Low fuel pressure Adjust higher Air leaks in fuel lines Check fuel lines for leaks or ai...

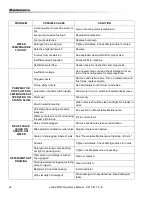
Page 22: ...itch tripped Allow motor to cool switch will automatically reset Motor wet Allow to dry Short in electrical wiring Wire contacts should be clean and tight No breaks in wires Coil liming up causing exc...

Page 23: ...Relief valve defective Replace valve Particle next to poppet Remove internal parts and clean BURNER STAYS ON WHEN SPRAY GUN IS IN OFF POSITION Fuel pump pressure too high Readjust fuel pressure Pressu...

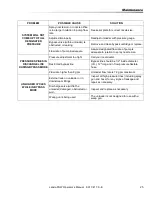
Page 24: ...retainer worn Check and replace if necessary Cracked ceramics Check and replace if necessary OIL DRIPPING Oil seal worn Check and replace if necessary Cracked manifold Check and replace if necessary...

Page 25: ...URE SPIKES IN DISCHARGE LINE DURING BYPASS MODE Pressure adjustment too tight Call your local dealer Restricted bypass line Bypass line should be 1 2 inside diameter I D 12 long and of low pressure fl...

Page 26: ...S 8 917 417 0 Printed in U S A...

Reviews: