Section 1: Assembly & Set-Up
RCFM4014 Rotary Cutter 326-730M
8/11/14
16
Tractor Shutdown Procedure
The following are basic tractor shutdown procedures.
Follow these procedures and any additional shutdown
procedures provided in your tractor Operator’s Manual
before leaving the operator’s seat.
1.
Reduce engine speed and disengage power take-off
if engaged.
2. Park tractor and implement on level, solid ground.
3. Lower implement to ground or onto non-concrete
support blocks.
4. Put tractor in park or set park brake, turn off engine,
and remove switch key to prevent unauthorized
starting.
5. Relieve all hydraulic pressure to auxiliary hydraulic
lines.
6. Wait for all components to come to a complete stop
before leaving the operator’s seat.
7.
Use steps, grab-handles and anti-slip surfaces when
stepping on and off the tractor.
3-Point Hook-Up
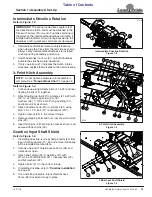
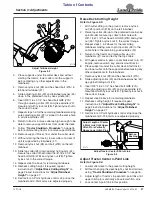
Refer to Figure 1-10 on page 17:
DANGER
!
To avoid serious injury or death:
•
A crushing hazard exists while hooking-up and unhooking
implement. Keep people and animals away while backing-
up to implement or pulling away from implement. Do not
operate hydraulic controls while a person or animal is
directly behind the power machine or near the implement.
•
Do not engage power take-off while hooking-up or
unhooking the driveline, or while someone is standing near
the driveline. A person’s body and/or clothing can become
WARNING
!
To avoid serious injury or death:
Always shut tractor down using “Tractor Shutdown
Procedure” provided in this manual before allowing anyone
including the operator to hook-up and unhook implement.
1.
Make sure you have read and follow all Safety Alerts
and Important Notes listed under
on this page before continuing.
2. The cutter is equipped with a Cat. ll and III hitch.
Make sure your tractor’s hitch is compatible with the
cutter’s hitch.
IMPORTANT:
The tractor’s lower 3-point arms must
3. Remove lower linchpins (#8) and hitch pins (#2).
Remove upper hairpin cotter (#7), flat washer (#6),
hitch tube (#4), and hitch pin (#9).
4. Slowly back tractor to cutter while using tractor’s
3-point control lever to align lower 3-point arm hitch
holes with clevis hitch pin holes.
5. Shut tractor down properly. Refer to
6. Attach lower 3-point arms to clevises with hitch
pins (#2). Secure hitch pins with linchpins (#8).
7.
The upper center 3-point link can be attached to the
cutter in one of two locations depending on which
hitch category the tractor has.
a. Connect Cat. ll center 3-point link to the middle
hitch holes in upper hitch plates with clevis
pin (#9), flat washer (#6), and hairpin cotter (#7).
Hitch tube (#4) is not used and should be stored
with cutter for safe keeping.
b. Connect Cat. lll center 3-point link to the upper
hitch holes in upper hitch plates with clevis pin
(#9), hitch tube (#4), flat washer (#6), and hairpin
cotter (#7).
Driveline Hook-up
DANGER
!
To avoid serious injury or death:
•
Tractor power take-off shaft shield, driveline shields, and
gearbox shaft shields must be installed and in good working
condition to avoid driveline entanglement and projectiles
•
Do not engage power take-off while hooking-up or
unhooking the driveline, or while someone is standing near
the driveline. A person’s body and/or clothing can become
•
Do not use a power take-off adapter. The adapter will
increase strain on the tractor’s power take-off shaft causing
possible damage to shaft and driveline. It will also defeat
the purpose of the tractor’s power take-off shield.
•
Make certain driveline yokes are securely fastened at each
end. A loose yoke can work free allowing the driveline to
rotate uncontrollably causing implement damage and
bodily injury or death to anyone nearby.
WARNING
!
To avoid serious injury or death:
•
Always shut tractor down using “Tractor Shutdown
Procedure” provided in this manual before dismounting
•
Check driveline when lowering implement to make sure it
does not interfere with the tractor drawbar. If needed, shut


