Section 1: Assembly & Set-up
RC5610, RC6610, RCM5610, & RCM6610 Series 2 S/N Rotary Cutters 330-539M
5/6/20
17
Standard Clevis Hitch Hook-up
DANGER
!
To avoid serious injury or death:
A crushing hazard exists while hooking-up and unhooking the
implement. Keep people and animals away while backing-up
to the implement or pulling away from the implement. Do not
operate hydraulic controls while a person or animal is directly
behind the power machine or near the implement.
WARNING
!
To avoid serious injury or death:
The ball detent pin must be fully inserted into the park jack
with ball visible and popped out on the far side of the jack
before working on or around an unhooked cutter.
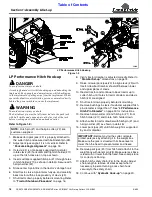
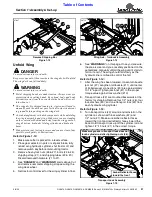
Refer to Refer to Figure 1-8:
1. Make certain park jack (#3) is properly attached
to the cutter hitch and secured with detent pin (#8).
2. Start tractor and raise 3-point arms fully up.
3. Carefully back tractor within close proximity of
clevis (#9).
4. Shut tractor down properly before dismounting. Refer
to
5. Verify tractor drawbar is adjusted correctly. Refer to
dimensions on page 14.
6. Raise or lower park jack (#3) to align clevis (#9) with
tractor drawbar. Drawbar should fit between lower
and upper plates of clevis.
7.
Restart tractor and continue to back tractor up to
cutter hitch until hitch holes in tractor drawbar and
clevis hitch (#9) are properly aligned.
8. Shut tractor down properly before dismounting.
9. Attach cutter to tractor drawbar with customer
supplied hitch pin (#1) and hairpin cotter (#2).
10. Lower park jack (#3) until hitch weight is supported
by drawbar.
11. Remove park jack (#3) from hitch and attach it to the
left-hand wing storage base with detent pin (#8).
Make sure jack base is level or lower than the jack
crank head especially after the wing is folded up. See
cover picture for correct positioning.
NOTE:
Hitch pin (#1) and hairpin cotter (#2) are
customer-supplied.
IMPORTANT:
Before moving the cutter, relocate
park jack by storing it on the left wing deck. Make
sure the jack is stored with its base level or lower
than the head to prevent water and freeze damage.
Standard Clevis Hitch Hook-up
Figure 1-8
12. Attach hitch safety chain (#4) to the tractor. Adjust
chain length to remove all slack except what is
necessary to permit turning. Lock chain hook
securely to the safety chain.
26603


