Lanberg © 2015-2021
10
EN
H.
SYSTEM SETTINGS
1.
Basic settings
a.
Basic
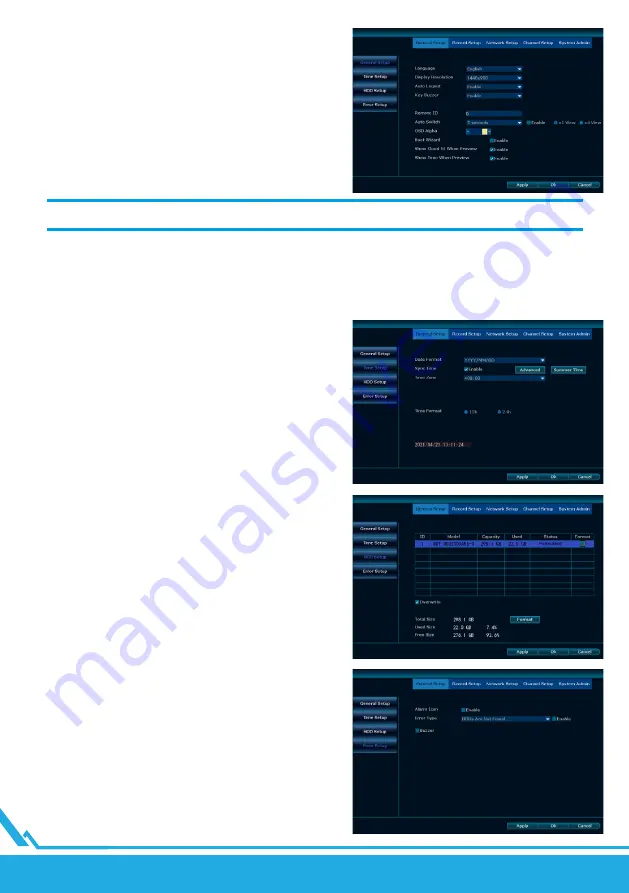
The menu contains options related to the basic recorder settings:
Language
– The language in which the recorder software will
be presented.
Screen resolution
– setting in which quality the image is to be
presented on the monitor connected to the recorder.
NOTE: MAXIMUM RESOLUTION MAY BE LIMITED BY DISPLAY PARAMETERS.
Auto logout
– this function allows you to decide whether the recorder should ask for a password every time you exit
the menu.
Key sound
– this settings determines whether key usage will trigger an audible message.
Auto switching
– frequency of automatic switching of preview from cameras when a single camera is displayed
(or 4 cameras in the case of an 8–channel recorder).
OSD alpha
– menu transparency settings.
b.
Time settings
Date format
– in which format the date should be displayed.
Synchronization
– whether the date should be automatically
synchronized with an external server. If this option is enabled,
the specific address of the server from which the current time is
to be taken can be entered under the button.
Daylight saving time
– allows you to set automatic switching
the daylight saving time on and off.
Time zone
– allows you to set the time zone.
System date
– sets the current date.
System time
– sets the current time.
Time format
– you can choose between 12 and 24 hour
time display.
c.
HDD Settings
This window displays a table showing the currently connected
drives and their details. The total available, occupied and free
memory is listed below the table.
Overwrite
– selecting this option allows the recorder to
overwrite the oldest files in case of lack of free disk space.
Format
– by selecting respective drives you can format them to
clear the memory.
d.
Alert settings
In the menu, you can set whether the system should report
alerts, including which specific errors should be reported.
Alert icon
– selecting this option will cause an icon to be
displayed in the corner of the screen indicating the current alerts.
Error type
– using the drop–down list, you can select the type
of error you are interested in and use the checkmark next to it
to enable it.
Sound
– selecting this option causes alerts to trigger an audible
message when they occur.


