background image

https://www.lairdconnect.com/resources/support 

© Copyright 2021 Laird Connectivity  

All Rights Reserved 

Americas

: +1-800-492-2320 

Europe

: +44-1628-858-940 

Hong Kong

: +852 2762 4823 


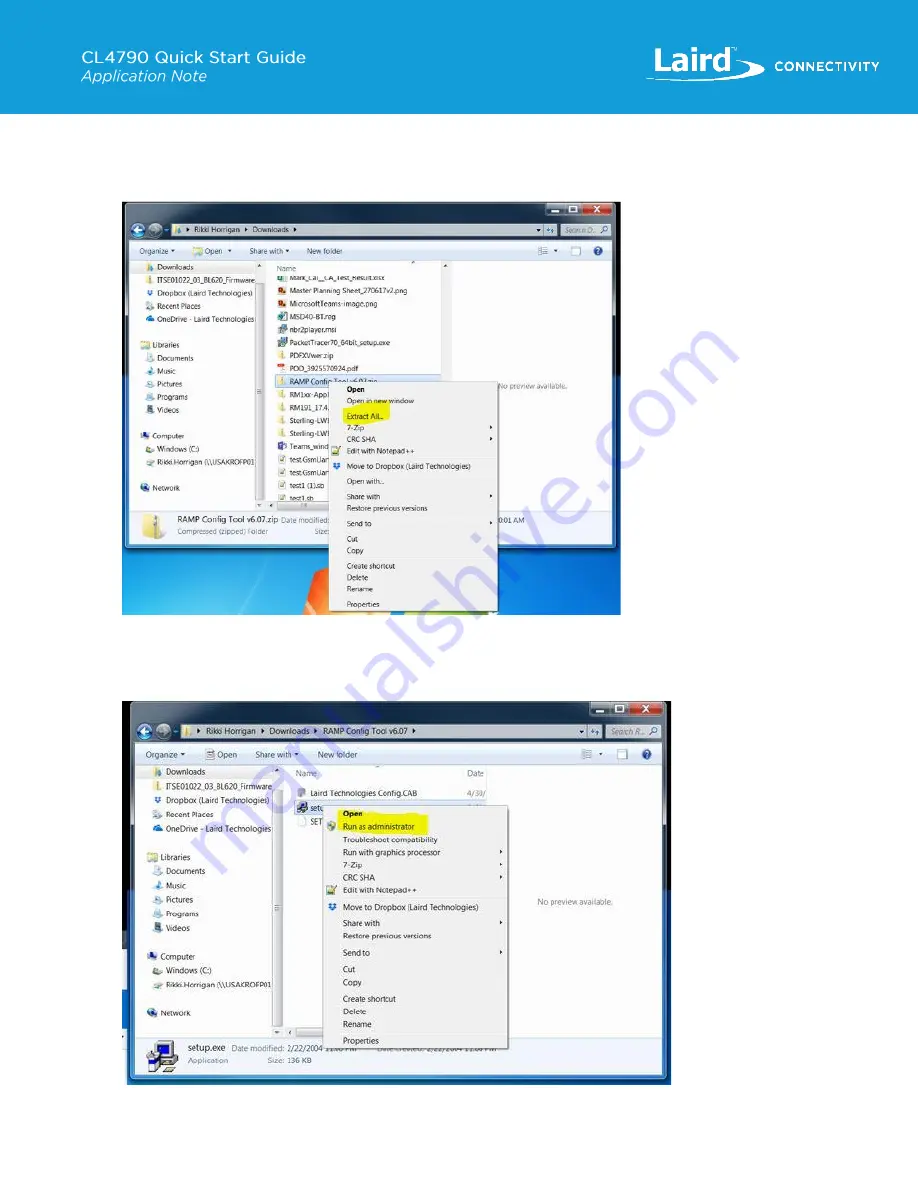
To install the CU follow these steps: 

1.


Once the files have been downloaded, extract them (right-click on file and select "Extract All ") as shown in 

Figure 1

.


Figure 1: Extract All


2.


Install the extracted files. Be sure to run the installation software as administrator (right-click on Setup.exe and select 
“Run as administrator”), as shown i

Figure 2

. 


Figure 2: Run as Admin


Summary of Contents for CL4790

Page 1: ...e following RS485 to USB example ULinx Model 485USBTB 2W RS485 to RS232 combined with RS232 to USB adapter example B B Electronics Model 485SD9TB PC Operating Windows XP or newer Laird Configuration a...

Page 2: ...4823 To install the CU follow these steps 1 Once the files have been downloaded extract them right click on file and select Extract All as shown in Figure 1 Figure 1 Extract All 2 Install the extract...

Page 3: ...icas 1 800 492 2320 Europe 44 1628 858 940 Hong Kong 852 2762 4823 3 Follow the prompts of the Installation software to install the Utility Click OK Figure 3 Figure 3 Follow prompts 4 Note the directo...

Page 4: ...8 858 940 Hong Kong 852 2762 4823 5 Click Continue Figure 5 Figure 5 Continue 6 Reboot your system to complete the installation Figure 6 Figure 6 Reboot Note Be sure to install and run the CU as Admin...

Page 5: ...he CL4790 unit to your PC Depending which variant of the CL4790 is being used you will need to connect to your PC using one of the following setups CL4790 1000 232 can be directly connected to a DB9 S...

Page 6: ...nation RS485 to RS232 RS232 to USB adapter Figure 9 See page 10 of CL4790 Hardware Integration Guide Datasheet for wiring diagram Figure 9 RS485 to RS232 RS232 to USB 485SD9TB USA 19HS 3 Connect the P...

Page 7: ...will not register in the configuration utility 1 Open the CU and click on the PC Settings tab to configure the following PC settings to enable you to communicate with the ConnexLink Unit a Select the...

Page 8: ...https www lairdconnect com resources support 8 Copyright 2021 Laird Connectivity All Rights Reserved Americas 1 800 492 2320 Europe 44 1628 858 940 Hong Kong 852 2762 4823 Figure 12 PC Settings tab...

Page 9: ...been read Figure 13 Read radio Figure 14 Read successful Note If you receive a message that the read was not successful or Unable to enter command mode verify the Baud setting on PC settings tab You...

Page 10: ...Unit To configure using Broadcast method the following basic changes are recommended a Set RF Channel 16 by defaut 2nd unit s RF Channel will also need to be set to same RF Channel to pair b Set Syste...

Page 11: ...uccessful message Figure 17 when complete Click OK to close the message Figure 16 OK to continue Figure 17 OK to close 3 If Interface baud was changed return to PC Settings tab and change baud rate fo...

Page 12: ...first one see steps 1 4 of Pairing Two Units Note The RF Channel and System ID must be set the same on BOTH units for them to connect and pass data 1 Ensure the power supply is connected to both radio...

Page 13: ...pback using female to female pin jumper wire Figure 21 Figure 21 Loopback Jumper 2 Connect power to the 1st radio and make sure that it is at least 10 feet away from the 2nd Unit 3 With the 2nd Unit s...

Page 14: ...he MAC Address of the 2nd radio to the Destination field of the 1st radio 3 Save the changes using the Write Radio button 4 Disable Broadcast mode on 2nd radio 5 Add the MAC Address of the 1st Radio t...

Reviews: