background image


Copyright © 2019 Laia · www.laiatech.com      All rights reserved          

28 

The volume of the left channel   

6)


Input VolR


The volume of the right channel   

7)


ADTS Options 

Optional items: On, Off


8)


Button


Press "apply" button to save parameters, press 

"cancel" button to cancel parameter   

5.5


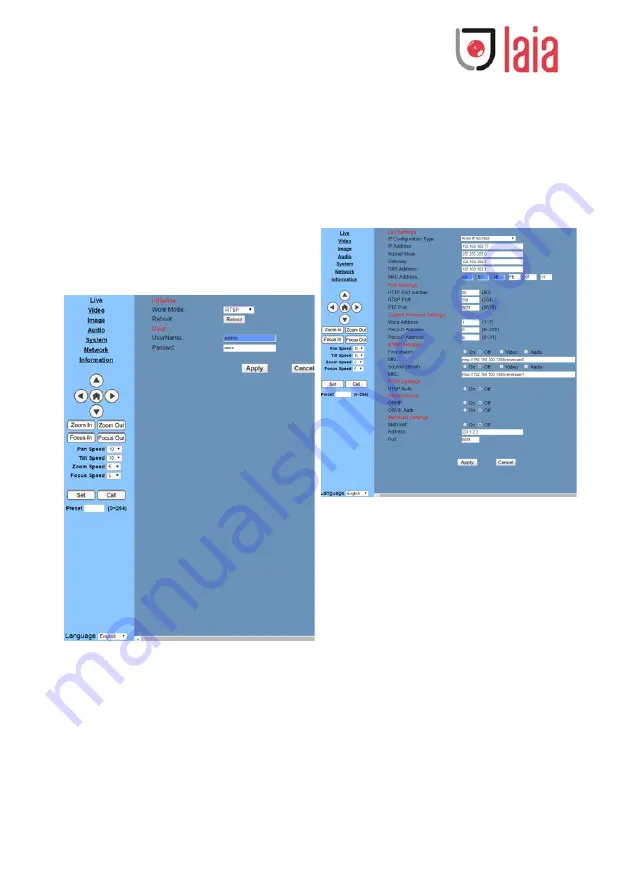
System Setting, please click “System” 


1)


Work Mode 

Work Mode RTSP


2)


Reboot 

Click the "Reboot" button, system restart. 

3)


User and password 

The user can modify the password (letters and 

Numbers only) 

4)


Apply / Cancel   

Modify password and click the "apply" button 

to the login page, press "cancel" button to cancel 
password change. 


5.6


Network Setting, please click “Network” 


1)


Lan Settings 

Default the IP address is 192.168.100.81, The 

MAC address can be modified. 

2)


Port Settings 

A.


HTTP Port 

IP address identifies the network device, the 

device can run multiple web applications, each 
network program using network port to transmit 
data, so data transmission to be carried out 
between the port and port. Port setting is to set up 
WEB SERVER program using which port to transmit. 
When port mapping, need to be consistent with 
the port number(default port: 80) 

Summary of Contents for Follower

Page 1: ...Copyright 2019 Laia www laiatech com All rights reserved 1 Follower User Manual...

Page 2: ...zed engineer Never operating under unspecified temperature humidity and power supply Please use the soft dry cloth to clean the camera If the camera is very dirty clean it with diluted neuter detergen...

Page 3: ..._______6 Main Unit________________________________________________11 Size_____________________________________________________12 IR Remote Controller Explanation ____________________________13 RS 232...

Page 4: ...era head when carrying the camera Don t turn camera head by hand Doing so may result in mechanical damage Don t apply in corrosive liquid gas or solid environment to avoid damaging the cover which is...

Page 5: ...te controller 1PCS User manual 1PCS Quick Start Step1 Please check connections are correct before starting Step2 Setting of the system select switch The option of video format VIDEO SYSTEM 0 1080p60 8...

Page 6: ...2 channels for panorama camera at the same time both teacher tracking and student tracking are use the same devide Changeable Lens Panorama camera can replace the lens compatible C CS mount lens easy...

Page 7: ...high quality HD CMOS sensor can reach maximum 1920 x 1080 high resolution and achieve quality image Ultra high Frame Rate The output frame rate up to 60fps in 1080P AAC Audio Encoding Close up camera...

Page 8: ...oom 32x optional Minimal Illumination 0 5 Lux F1 8 AGC ON Shutter 1 30s 1 10000s White Balance Auto 3000K Indoor 4000K 5000K Outdoor One Push Manual Backlight Compensation Support Digital Noise Reduct...

Page 9: ...al Noise Reduction 2D 3D digital noise reduction Backlight Compensation Support Image Freeze Support Ceiling Installation Support Network Features Video Compression H 265 H 264 MJEPG Video Stream Firs...

Page 10: ...amera 1xRS232 Out 8pin Min DIN Max Distance 30m VISCA network use only for close up camera 1xRS232 Out 8pin Min DIN Max Distance 30m use for control close up camera for panorama camera 1xRS485 2pin Ph...

Page 11: ...tem select switch 9 USB2 0 2 RS232 OUT interface 10 DC IN 12V interface 3 RS232 IN interface 11 Power switch 4 RJ45 interface 12 POWER lamp 5 LINE IN interface 13 RJ45 interface 6 RS485 interface 14 H...

Page 12: ...Copyright 2019 Laia www laiatech com All rights reserved 12 Size...

Page 13: ...ore a preset position SET PRESET Numeric button 0 9 Setting a corresponding numeric key preset position 5 Pan Tilt control Buttons Pressing the Pan Tilt back to the middle position 6 MENU MENU enter o...

Page 14: ...ght compensation Press it again to disable the backlight compensation NOTE Effective only in auto exposure mode Note If a light behind the subject the subject will become dark In this case press the b...

Page 15: ...ndows DB 9 1 DTR 1 CD 2 DSR 2 RXD 3 TXD 3 TXD 4 GND 4 DTR 5 RXD 5 GND 6 GND 6 DSR 7 IR OUT 7 RTS 8 NC 8 CTS 9 RI Camera Mini DIN 1 DTR 1 DTR 2 DSR 2 DSR 3 TXD 3 TXD 4 GND 4 GND 5 RXD 5 RXD 6 GND 6 GND...

Page 16: ...Copyright 2019 Laia www laiatech com All rights reserved 16 VISCA Network Configuration...

Page 17: ...bit 8 bits Stop bit 1bit Parity bit none RS485 Communication Control The camera can be controlled via RS485 Half duplex mode Baud rate 2400 4800 9600 bit s Start bit 1 bit Data bit 8 bits Stop bit 1b...

Page 18: ...ht ExpCompMode Exposure compensation mode Optional items On Off Effective only in Auto mode ExpComp Exposure compensation value Optional items 7 7 Effective only in ExpComp Mode item to On Gain Limit...

Page 19: ...ing figure WB Mode White balance mode Optional items Auto 3000K Indoor 4000K 5000K Outdoor 6500K 1 6500K 2 6500K 3 One Push Manual RG Red gain Optional items 0 255 Effective only in Manual mode BG Blu...

Page 20: ...le switch Optional items On Off AF Zone Interested in focusing area Optional items Top Center Bottom AF Sense Automatic focusing sensitivity options Optional items Low Normal High L R Set Optional ite...

Page 21: ...Protocol Control protocol type Optional items AUTO VISCA PELCO D PELCO P V_Address Protocol address To be decided according to the agreement AUTO VISCA protocol Optional items 1 7 P_D_Address PELCO D...

Page 22: ...0 8 RESTORE DEFAULT Move the cursor to the Restore Default item in the main menu and press home button RESTORE DEFAULT menu appears as shown in the following figure Note Press HOME button to confirm A...

Page 23: ...Connection ways between internet camera and computer as picture 1 1 and picture 1 2 shown Picture 1 1 connect by internet cable Picture 1 2 Connect by router interchanger 4 IP camera visited controlle...

Page 24: ...ssword admin shown as below After login shown as below NOTE If user first time use this camera by internet only for new user must install a player software VLC Please go to VLC webside http www videol...

Page 25: ...al time video pause stop the last picture click recoverable video again 2 Audio control buttons can set slient mode 3 Full screen switch button B PTZ Setup 1 PTZ direction control box Up down left rig...

Page 26: ...width will be taken 6 Bit Rate User can assign bit flow stream normally speaking the bigger bit flow is the clearer the image will be The bit allocation must combine with network bandwidth when the ne...

Page 27: ...the right shows the corresponding numerical Default 6 4 Sharpness Sharpness0 15 slider control on the right shows the corresponding numerical Default 1 5 Hue Hue 0 14 slider control on the right show...

Page 28: ...s only 4 Apply Cancel Modify password and click the apply button to the login page press cancel button to cancel password change 5 6 Network Setting please click Network 1 Lan Settings Default the IP...

Page 29: ...rk camera rtsp protocol of On Off 6 ONVIF Setting Setting the ONVIF protocol and ONVIF authorization On Off 7 Multicast Setting Setting multicast On Off and multicast address default address 224 1 2 3...

Page 30: ...ctromagnetic radiation such as TV or radio transmitters etc Troubleshooting Image No image 1 Check whether the power cord is connected voltage is OK POWER lamp is light 2 Check whether the camera can...

Page 31: ...Ping 2 Disconnect IP Camera with network IP Camera and PC are connected according to the proper operations to re set the IP address 3 Check the server s IP address and subnet mask and gateway address...

Reviews: