-16-
www.igmtools.com
Bevel ripping is performed the same as ripping
but with the saw blade set to an angle not
perpendicular with the table surface. To tilt the
blade to the left, anywhere between 0° and 45°.
This is used most often when cutting bevels,
compound mitres or chamfers.
After changing the bevel angle verify the
alignment of the guard and splitter; make sure
there is clearance with the saw blade.
Digital reading calibration
Step 1: Set the wheel perpendicular to the
work table on the scale is 0°, press ZERO to
reset, 0.0 will be displayed..
Step 2: Turn the cast iron wheel to set 45°,
press and hold the SET button.
Step 3: While holding SET, press and hold
ZERO for 3 seconds.
When the ZERO button is released, 45° is
displayed
8.3 Ripping small workpieces
Do not attempt rip cuts if the work piece is
too small, as this will oblige you to place your
hands too close to the blade and put you at
serious risk of injury. When ripping narrower
widths; use a push block or a push stick in
order to avoid placing hands near the blade.
8.4 Cross cutting
Cutting against the grain, to shorten the length
of a board is crosscutting. With some smaller
sized and rectangular pieces, you often have
the choice of ripping or crosscutting. Always
use the mitre gauge, when crosscutting; never
cut a piece unsupported. The mitre gauge may
be used in either slot, but most operators prefer
the left groove for typical work. When the blade
is tilted for bevel cutting, use the table slot that
does not cause interference with your hand or
the saw blade guard.
To begin crosscutting, place the work on the
mitre gauge and, with the motor OFF, slide it up
close to the blade to align the outer edges of
the teeth with your cut mark (see pic).
Keep a firm grip as you pull the mitre gauge
and the wood back away from the blade. Lower
the blade guard, turn on the saw and make the
cut. When the work is cut through, move one or
both cut pieces.
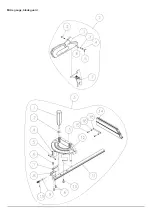
8.5 Angle ruler setting
Stiffness in the groove - for greater rigidity of
the angle ruler in the table groove, there are 2
adjusting screws in the longitudinal profile of
the angle ruler. For greater rigidity in the table
groove, simply tighten the screws more (the
more screws you screw into the profile, the
greater the rigidity). For less rigidity, just loosen
the screws.
Warning: When cross-cutting round stock it
is necessary to secure the workpiece against
rotation by using a suitable jig.
8.5 Bevel cross cutting
This procedure is the same as cross cutting
except that the blade is set to an angle other
than 0. After changing the bevel angle, verify
the alignment of the guard and splitter and
verify that there is clearance with the saw blade.
8.6 Mitre cuts
This operation is the same as cross cutting,
except the mitre gauge is set to an angle. Hold
the work piece firmly against the mitre gauge
and feed the workpiece slowly into the blade to
prevent it from moving during the cut.
Ruler settings
Setting the cutting angle on the ruler - the angle
ruler can be set to + 60 ° - -60 °. By releasing
the ruler handle, you can set the desired cutting
angle by pulling and turning the control knob on
the front of the ruler. Notches are prepared in
the profile for more used angles.
9. Maintenance
To keep you Laguna Tools machine in top
performance for many years please follow
this maintenance schedule and refer to any
instructions.
Daily Check:
• Loose mounting bolts
• Damaged saw blade
• Damaged riving knifes, splitters, or blade
guards
• Worn or damaged wires
• Any other unsafe condition
Weekly Maintenance:
• Clean table surface and mitre slot grooves
• Clean and protect cast-iron table
• Clean rip fence
Monthly Maintenance:
• Clean/vacuum dust buildup from inside
cabinet and off motors.
• Check/replace belt for proper tension, damage
or wear.
Every 6–12 Months:
• Lubricate trunnion slides.
• Lubricate worm gear.
• Lubricate leadscrew.
• Lubricate gearing and gearboxes.
9.1 Internal Components Map
A. Motor
B. Dust Shroud
C. Trunnion Slides (Support)
D. Upper Trunnion
E. Lower Trunnion
F. Arbor Nut
G. Arbor Washer (Flange)
H. Blade
I. Tilt Gearing
J. Height Gearing
K. Belt (behind blade)
L. Worm Screw
M. Tilt Plate
N. Start Capacitor (see spec sheet)
O. Run Capacitor (see spec sheet)
F
G
H
B
E
C
N
A
K
D
C
J
I
M
O
Summary of Contents for Fusion2 2022
Page 2: ...2 www igmtools com...
Page 3: ...3 www igmtools com...
Page 18: ...18 www igmtools com Wiring Diagram Fusion 2 230V...
Page 19: ...19 www igmtools com Fence assembly...
Page 20: ...20 www igmtools com Mitre gauge blade guard...
Page 21: ...21 www igmtools com Motor and trunnion...
Page 22: ...22 www igmtools com Cabinet...


