Replacing Conyeor Belts
71
Replacing Conyeor Belts
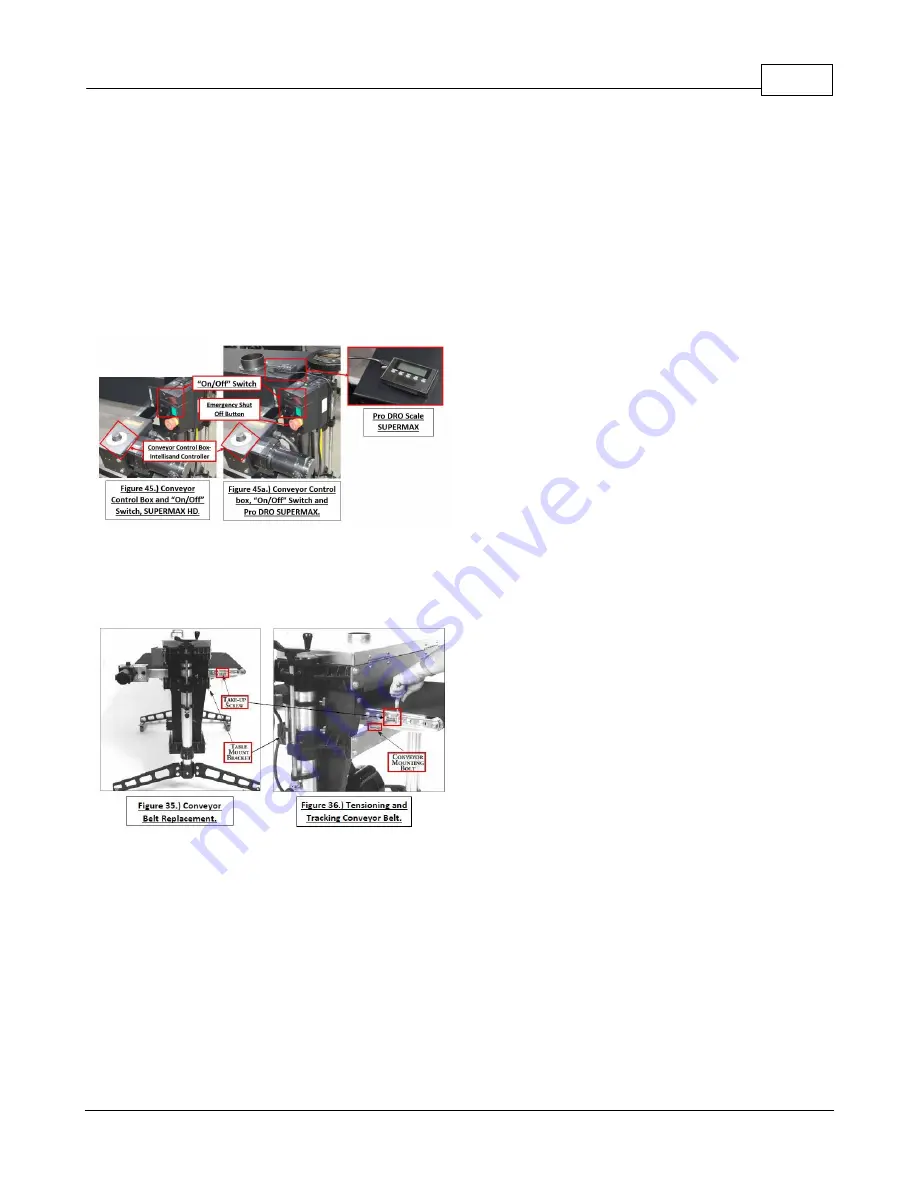
To replace either the variable-speed
“Intellisand Control,” the “On-Off” Switch
, or the
Conveyor Motor
, use
the following disassembly procedure
(See Figure 45 and 45a)
:
To replace the conveyor belt, the conveyor assembly must be removed from the machine. Lower the conveyor table
to its lowest position with the height adjustment handle.
·
Remove the bottom cover from control box.
•
Rotate shaft to access set screws in shaft coupler.
Important:
Disconnect power to sander. a.) Loosen one set screw. b.) Remove the four 5/16" bolts holding the
conveyor motor control box base bracket
(See Figure 45)
.
Remove conveyor motor control box and place on dust cover. Loosen the Conveyor Take-Up Screws
(See Figures
35 and 36)
to relieve belt tension and slide the driven roller fully inward.
Remove the four bolts that attach the conveyor assembly to the table mount brackets,
(See Figure 36)
.
Summary of Contents for 37 x 2
Page 2: ......
Page 17: ...General Information 17 Castings...
Page 18: ...Double Drum Sander 37 x 2 18 Supermax Specifications...
Page 19: ...General Information 19 Supermax Accessory Supply Check List...
Page 47: ...Mainteance 47...
Page 54: ...Double Drum Sander 37 x 2 54...
Page 56: ...Double Drum Sander 37 x 2 56 Drumhead Assembly Exploded View...
Page 57: ...Drumhead Parts List 57 Drumhead Parts List...
Page 58: ...Double Drum Sander 37 x 2 58...
Page 59: ...Conveyor Exploded View 59 Conveyor Exploded View...
Page 60: ...Double Drum Sander 37 x 2 60 Conveyor Parts List...
Page 61: ...Conveyor Parts List 61...
Page 62: ...Double Drum Sander 37 x 2 62 Exploded Diagrams...
Page 63: ...Parts Lists 63 Parts Lists...
Page 77: ...Disassembly Procedure 77...
Page 79: ...Warranties 79 Warranties Laguna Tools Warranty...
Page 80: ...Double Drum Sander 37 x 2 80 Modifications RMA Policy Laguna Tools Packaging RMA Procedure...
Page 81: ...Warranties 81...


