13
TABLE GIBS AND LEVELING
The
table
gibs
on
your
machine
are
factory
adjusted
and
may
never
require
readjustment.
Should
any
adjustment
become
necessary,
do
the
following:
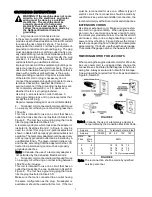
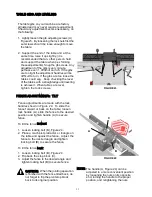
1.
Lightly
loosen
the
gib
adjusting
screws
(A),
Figure
23.
By
loosening
the
lock
nuts
first
the
set
screws
should
be
loose
enough
to
move
the
table.
2.
Support
the
end
o
f
the
table
and
a
t
the
same
time,
raise
it
up
slightly,
(it
is
recommended
that
an-
other
person
hold
and
support
the
table
when
per-
forming
these
adjustments).
Snug
the
gib
screws.
Any
adjustment
of
the
gibs
is
very
minute,
perhaps
even 1,000th
of
an
inch.
If
the
gibs
are
too
tight
the
adjustment
handles
will
be
difficult
to
turn.
If
the
gibs
ar
e
too
loose
the
tables
could
sag.
Keep
checking
the
level
of
the
tables
with
a
straightedge
until
leveling
is
achieved.
When
tables are level,
tighten the lock screws.
FENCE ADJUSTMENTS: TILT
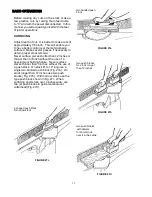
Fence adjustments are made with the lock
handles shown in Figure 24. To slide the
fence f orward or back on the table, loosen
lock handle (A), slide the fence to the desired
position and tighten handle (A) to secure
fence.
To tilt the fence forward:
1. Loosen locking bolt (B), Figure 24.
2. Place a machinist protractor or triangle on
the table and against the fence. Adjust the
fence to the desired angle and tighten
locking bolt (B) to secure the fence.
To tilt the fence back:
1. Loosen locking bolt (B), Figure 24.
2. Flip back the stop block (C).
3. Adjust the fence to the desired angle and
tighten locking bolt (B) to secure fence.
CAUTION: When the jointing operation
is finished with the fence tilted back, do
not forget to flip the pivot stop block
back to its original position.
FIGURE
23
FIGURE
24
NOTE: The handle (A, Figure 24) can be
adjusted to a more convenient position
by loosening the nuts on its opposite
end, turning the handle to the proper
position, and retightening the nuts.
!
A
C
B
A
A


