The reassembly of the automatic adjuster and the wheel
cylinder is carried out in reverse sequence, paying attention to
the following:
- piston thrust screws are tightened to torque 4-7 N•m (0.4-
0.7 kgf•m);
- slot A (see fig. 6-19) on thrust rings should be directed ver-
tically upward; vertical deviation should be no more than 30
°
.
Such position of the slot provides complete air bleeding from the
brake mechanism;
- for preliminary compression of thrust rings the pistons are
press-fitted in the cylinder body with a special tool having the
form of a cylinder with a cone inner aperture;
- the effort of press-fitting the piston in the cylinder should be
no less than 350 N (35 kgf); in case effort was less than 350 N
(35 kgf) - replace the thrust ring;
- when press-fitting the piston in the cylinder it is necessary to
maintain the sizes of 4.5-4.8 mm and 67 mm (maximum) (see fig.
6-19) for free landing of the brake drum;
- before refitting the components in the cylinder body thickly
grease them with brake liquid.
After reassembly check the movement of each piston in the
cylinder body. They should freely move within the limits of 1.25-
1.65 mm. The last established in place is the protective cap 2.
Component inspection
Wheel cylinders.
Ensure the cleanness of working surfaces
of the cylinder, pistons and thrust rings. The surfaces should be
absolutely smooth, without roughness, to avoid liquid leak and
premature wear of sealings and pistons. The defects on the cylin-
der mirror can be eliminated by lapping or polishing. However, no
increase of the cylinder inner diameter is allowed.
Inspect screw 3 (see fig. 6-20), spring 6, thrust cup 7 and
retainers 5. If necessary, renew damaged components.
Renew sealings 8. Inspect protective caps 10 and renew if
necessary.
Shoes.
Carefully check the shoes for damages or deforma-
tions.
Check the tension of the upper and lower return springs; if
necessary, renew.
The springs should have no residual deformations when
stretched with effort of 350 N (35 kgf) for lower springs and 420
N (42 kgf) - the upper ones.
Check the linings for dirt or traces of greasing, if necessary,
carefully clean with metal brush and wash with white-spirit,
besides, check for leaks of greasing inside the drum; eliminate
malfunctions. Renew shoes, if the friction lining thickness is less
than 1.5-2 mm.
131
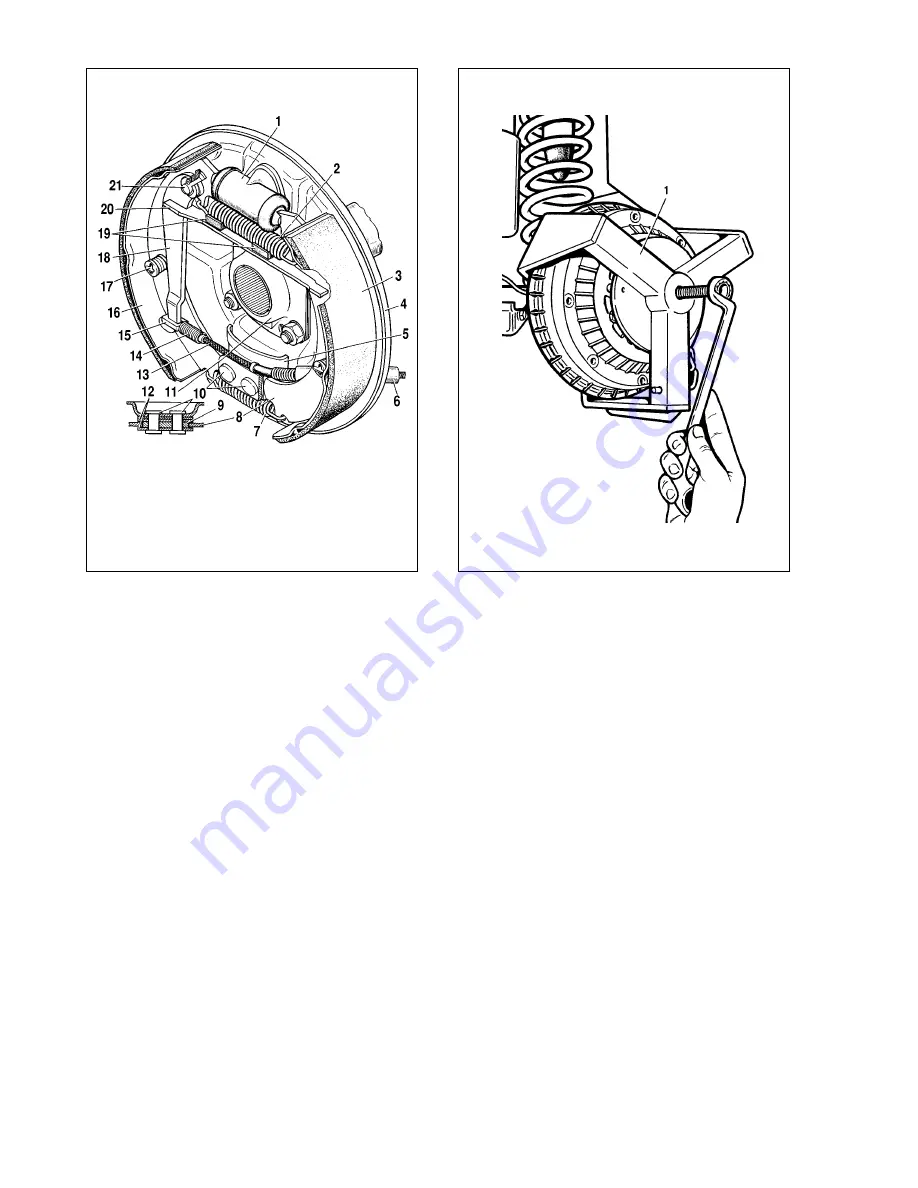
Fig. 6-17. Rear wheel brake mechanism:
1 - wheel cylinder; 2 - upper return spring; 3 - friction lining; 4 - backplate;
5 - inner plate; 6 - rear cable sheath; 7 - lower return spring; 8 - front brake shoe;
9 - thrust plate; 10 - rivet; 11 - oil deflector; 12 - guide plates; 13 - handbrake
rear cable; 14 - rear cable spring; 15 - rear cable end; 16 - rear brake shoe;
17 - steady post; 18 - shoe manual control lever; 19 - rubber pads;
20 - expander strut; 21 - shoe manual control lever pin
Fig. 6-18. Removing the brake drum:
1 - remover tool 67.7823.9519
Summary of Contents for Niva 4x4
Page 80: ...135 ...
Page 81: ...136 ...


