background image

LaCie Ethernet Disk mini

User Manual

Using the NAS Administration Page

page 

Fig. ..A.

5.6. Shares Menu

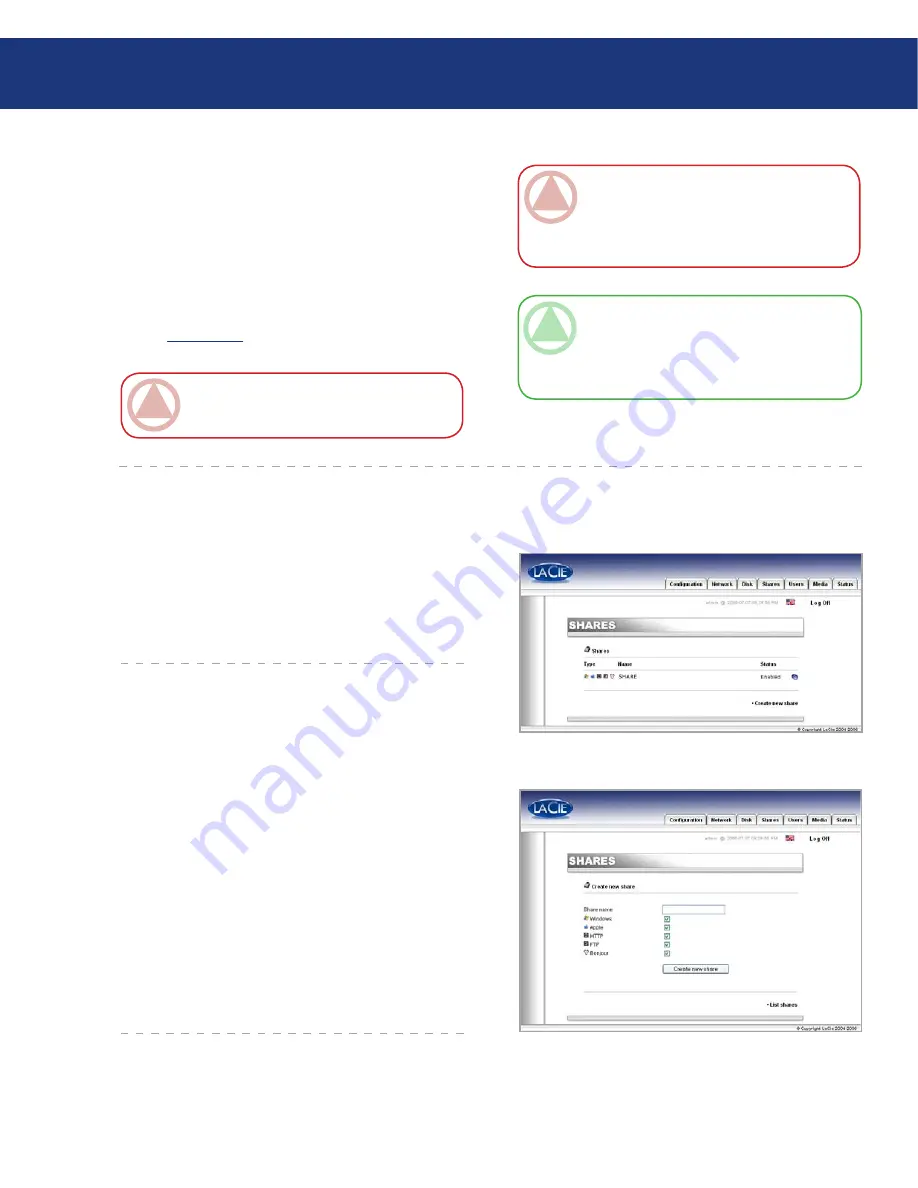
From  this  window  you  will  be  able  to  create  and 

to select a share and to modify its properties. You can 

choose from Windows, Apple, Bonjour, HTTP or FTP 

(Fig. 5.6.A.).

From this window you will be able create a share.  

First, click on Create a new share..., then choose a name 

for the new share, then select the protocols which will be 

used to access the Ethernet Disk mini. You can choose 

from Windows, Apple, Bonjour, HTTP or FTP (Fig. 

5.6.1.A.).

5.6.1. Create New Share

Fig. ...A.

IMpOrTANT INFO:

 The Ethernet Disk mini 

supports  drives  formatted  with  the  following  file 

systems: MS-DOS/FAT 32, HFS+ and Linux file 

system formats (ext2/ext3/reiserfs)

TEChNICAl NOTE:

 If there is a partition on 

the external USB drive, each partition will appear as 

one share in the Ethernet Disk mini.  By default, all 

services (FTP, HTML, etc.) are activated.

Accessing External Hard Drives

Because the external hard drive appears as an Ether-

net Disk mini share, access the external hard drive vol-

ume as you would for Ethernet Disk mini shares.  Refer 

to chapter 5.5. for details.

Once the drive is recognized, Users can be assigned 

access (by default, Users will not have access).  See chap-

ter 5.7. 

Users Menu

 for details.

IMpOrTANT INFO:

 By default, only the ad-

ministrator has access to the external storage.

Summary of Contents for 301136U - Ethernet Disk Mini NAS Server

Page 1: ...Connection 16 3 4 Driver Installation USB Only 17 3 4 1 Windows XP and 2000 Users 17 3 4 2 Mac Users 18 3 5 Installing and Running the IP Configurator Wizard 19 3 6 Configure Your Drive On a Local Area Network with no DHCP Server 20 3 7 Disconnecting Your LaCie Hard Drive Ethernet Connection 21 4 Accessing the Shared Storage 22 4 1 Windows XP 2000 Users 22 4 2 Mapping the Network Drive Windows Use...

Page 2: ...t a Share 37 5 7 Users Menu 37 5 7 1 Add A User 38 5 7 2 Edit a User 38 5 7 3 Change Administrator Password 39 5 9 Status Menu 40 5 9 1 FTP and HTTP Protocols 40 5 9 2 System Log 40 6 Ethernet Disk mini Media Server Functionality 41 6 1 About UPnP Media Server 41 6 2 Configuring Media Server Functions 42 6 2 1 Enabling the MediaServer 42 6 2 2 Selecting Shares with Media Content 42 6 2 3 Restartin...

Page 3: ...e pur suant to Part 15 of the FCC Rules These limits are designed to provide reasonable protection against harmful interference in a residential installa tion This equipment generates uses and can radiate radio frequency en ergy and if not installed and used in accordance with the instructions may cause harmful interference to radio communications However there is no guarantee that interference wi...

Page 4: ... or use it near water or in damp or wet conditions Never place objects con taining liquids on the LaCie Ether net Disk mini as they may spill into its openings Doing so increases the risk of electrical shock short cir cuiting fire or personal injury Make sure that the computer and LaCie Ethernet Disk mini are elec trically grounded If the devices are not grounded there is an increased risk of elec...

Page 5: ...ption It is essential that only the supplied power cord be used Important Info Any loss corruption or destruction of data while using a LaCie drive is the sole responsibility of the user and under no circumstances will LaCie be held liable for the recovery or restoration of this data To help prevent the loss of your data LaCie highly recommends that you keep TWO copies of your data one copy on you...

Page 6: ...ure the network settings as well When connected to a network the LaCie Eth ernet Disk mini becomes a Network Attached Storage device capable of supporting a limited number of users connecting simultaneously You can easily manage the LaCie Ethernet Disk mini through the Internet with the Web Administration tool create users assign access rights and passwords and configure the network parameters of ...

Page 7: ...re currently most drives do not require a fan Only the largest capacity drives may need a fan To find out if your drive includes a fan please refer to the item number and product datasheet Some models of the Ethernet Disk mini have a ther mo regulated smart fan which activates when the heat inside the casing reaches a certain temperature The smart fan operates at two different speeds and adjusts a...

Page 8: ...on Please refer to the instruction sheet included with the drive stand for specific instructions The LaCie Ethernet Disk mini can be incorporated into standard 19 computer equipment racks using the LaCie Rackmount Kit sold separately Please refer to the instructions included with the LaCie Rackmount Kit for specific instructions Fig 1 2 A Fig 1 2 B Standalone Installation Rackmount Installation ...

Page 9: ...outer Wired or wireless switch or router Internet access Internet access Important Info The LaCie Ethernet Disk mini is compatible with the MacIntel pro cessors Your LaCie Ethernet Disk mini page Important Info The LaCie Ethernet Disk mini is compatible with Gigabit and Fast Ethernet switches and routers Important Info The Ethernet Disk mini s performance is affected heavily by such external force...

Page 10: ...d to be repaired or serviced it must be returned in its original packaging LaCie Ethernet Disk mini Vertical stand kit Ethernet cable Hi Speed USB 2 0 cable External power supply Quick Install Guide LaCie Storage Utilities CD ROM 1 3 5 2 4 6 Your LaCie Ethernet Disk mini should contain the following 1 LaCie Storage Utilities 7 2 3 5 Quick Install Guide ethernetdiskmini 6 7 4 ...

Page 11: ...mains lit to show that the drive is on and blinks to indicate drive activity Front View 1 1 Important Info Do not unplug the power chord or turn off the power strip to turn the Ethernet Disk mini on or off Press the On Off power button for 5 seconds to properly shut down the drive Your LaCie Ethernet Disk mini page 11 Fig 2 3 A Important Info The Ethernet Disk mini will restart automatically after...

Page 12: ...Fast Ethernet 10 100 6 Ventilation Outlet These holes help to keep your drive cool during operation Be sure not to block these openings when using your drive 7 Rackmount Grooves These grooves are used for mounting the drive in the Desk Rack kit sold separately or placing your drive in standard 19 computer equipment racks using the LaCie Rackmount Kit sold separately See sections 1 2 Racking Option...

Page 13: ... connectors on certain computers Ethernet Hardware This illustration will help you to identify the Ether net cable and port Fig 2 4 B Ethernet Cable and Cable End Your LaCie Ethernet Disk mini page 13 Fig 2 4 C USB 2 0 icon Fig 2 4 D USB 1 1 icon USB Icons These icons will help you easily identify the USB interfaces They appear on USB cables and next to the USB port connectors on certain computers...

Page 14: ...tting your Ethernet Disk mini up and running Ethernet Connection Step 1 Connecting the External Power Supply Page 15 Step 2 Connecting the Ethernet Cable Page 16 Step 3 Installing and Running the IP Configurator Wizard Page 19 3 1 Installation Steps Important Info The Ethernet and USB cables can be connected simultaneously only if there is a DHCP server on the network or machine USB Connection Ste...

Page 15: ... connects to the LaCie Ethernet Disk mini and the other cable B connects to a power outlet such as a wall outlet or a surge protector USB 2 0 USB C A B Fig 3 2 A Connect Cable A to your LaCie Ethernet Disk mini Connect Cable B to the Power Supply brick C Connect Cable B to a surge protector or wall outlet You are now ready to connect the interface cable to your drive and to your computer 1 2 3 ...

Page 16: ...i A 1 Connect the USB cable into the USB port on the back of the LaCie Ethernet Disk mini A Fig 3 3 2 B Fig 3 3 1 B Fig 3 3 2 A A A B 2 Connect the other end of the Hi Speed USB 2 0 cable into an available USB port on your computer B 3 Press the blue On Off Button on the front of the drive Now move on to step 3 3 4 Driver Installation USB only 2 Connect the other end of the Ethernet cable into an ...

Page 17: ...d Fig 3 4 C Once the device is detected and the driver is loaded the task bar in the lower right hand corner of your screen will show the following icon which indi cates that the network interface is being initialized either with DHCP if available or with APIPA Once the wizard has finished click Finish and move on to the next step 3 5 Installing and Running the Configuration Wizard 1 2 3 4 5 6 Fig...

Page 18: ...preference pane will display a message stating that a new network interface has been recog nized Fig 3 4 2 B Click OK The device is ready If APIPA see note at the bot tom of page 17 has been used the Network prefer ence pane will say that the new interface will use a self assigned IP address Fig 3 4 2 C You can check the IP address by clicking on the Configure button Move on to the next step 3 5 I...

Page 19: ...ers Insert the LaCie Ethernet Disk mini CD ROM into your computer s CD ROM drive The CD should appear on the desktop Double click the CD icon then double click Install the IP configurator Follow the Wizard to complete installation From the application folder open Utilities LaCie IP Configurator Follow the steps indicated in the Wizard Once the Wizard locates your Ethernet Disk mini repre sented by...

Page 20: ...t Disk mini The easiest way to modify your LaCie Ethernet Disk mini s network configuration is to use the LaCie IP Configurator See chapter 3 5 Installing and Running the Configuration Wizard for information on installing the network configuration software Run the software from the Start Menu PC users or the Utilities folder Mac users When the Wizard opens select Advanced Mode Uncheck the DHCP box...

Page 21: ...ion From the Web administration page click on the configuration tab and then click on the shutdown button see chapter 5 Configure Your Drive Using the NAS Administration Page for more informa tion Fig 3 7 A OR Press the On Off button on the front of the LaCie Ethernet Disk mini and hold the button down for 3 seconds The On Off button will flicker for a few seconds before powering off Fig 3 7 A ...

Page 22: ...ss In the logon window that opens Fig 4 1 C type User Name admin Password admin This user name and password is the factory default if you have already created a user input your user name and password The LaCie Ethernet Disk mini will appear as a drive with one share folder on the network For faster connections and usability LaCie recom mends you map the network drive For details see chapter 4 2 Ma...

Page 23: ...twork Drive Windows Users Only For faster time connections and usability LaCie recommends that you map your shared drive To map a shared drive Select the Tools menu from Windows Explorer Click on Map a drive Fill in the appropriate information Fig 4 2 A and press Finish This creates a direct access to the shared drive from My Computer for more infor mation about drive mapping refer to your Windows...

Page 24: ...i or ftp IP Address For AFP access type Apple K and in the address field type afp edmini or afp IP Address In the logon window that opens type User Name admin Password admin This user name and password is the factory default if you have already created a user input your user name and password In the Select Volumes to Mount window select SHARE and click OK The network drive will mount on your deskt...

Page 25: ...nqueror and type in the IP ad dress of the LaCie Ethernet Disk mini into the address field For FTP access ftp IP address For HTTP access http IP address For SMB CIFS access in order for this to method to work the services need to be properly configured smb IP address 4 4 Linux Users ...

Page 26: ...ogram from the Start Menu PC users or from the Applications folder Mac users Follow the steps indicated in the Wizard Once the Wizard locates your Ethernet Disk mini repre sented by its IP address select it and click Connect Figs 5 1 A 5 1 B Once the NAS Administration Page opens in your default browser click on the Administration link In the logon window that opens type User Name admin Password a...

Page 27: ...by running the IP Configuration Wizard Once the NAS Administration Page opens in your default browser click on the Administration link In the logon window that opens Fig 5 1 D type User Name admin Password admin This user name and password is the factory default if you have already created a user input your user name and password The NAS Administration page will open in your default browser 1 2 3 ...

Page 28: ...side the Language selector to find your lan guage and then click Submit Changes to activate your language You may come back to this page at any time by clicking on the language s flag located just below the program tabs Fig 5 2 1 A 5 2 1 Setting The User Language Fig 5 2 1 A Fig 5 2 2 A You can close the Web Administration program at any point while the Web page is open by clicking Log Off located...

Page 29: ...s name Type the name and click the Submit Changes button The default machine name for the LaCie Ethernet Disk mini is EDmini Fig 5 3 1 A 5 3 1 Machine Name Fig 5 3 1 A Important Info The Configuration page allows you to check the software version of your drive Technical note Machine name changes will be registered in the local DNS servers ONLY after a restart Using the NAS Administration Page page...

Page 30: ...ig 5 3 2 A 5 3 2 Windows Workgroup Fig 5 3 2 A CAUTION A workgroup name can contain up to 15 characters including letters numbers and the following characters _ It cannot contain any spaces and must begin with a letter or number Using the NAS Administration Page page 30 Here you can modify the AppleTalk Zone to which the LaCie Ethernet Disk mini is attached If you have altered the AppleTalk Zone c...

Page 31: ... Sub mit Changes button to activate your changes Fig 5 3 4 A 5 3 4 Select a Time Zone Fig 5 3 4 A Here you can modify the date and time settings of the LaCie Ethernet Disk mini If you have altered the date and time click the Submit Changes button to ac tivate your changes Fig 5 3 5 A 5 3 5 Change Date and Time Fig 5 3 5 A Using the NAS Administration Page page 31 ...

Page 32: ...e settings Then select the source Windows workgroup or specify server name The second way to set up synchronization is to se lect the Windows Workgroup or server and to enter the server name 1 2 5 3 6 Network Synchronization Fig 5 3 6 A At the bottom of the Configuration menu you can press either the Restart button or Shutdown button By clicking on either of the buttons a prompt will appear to ale...

Page 33: ... DHCP Server or Configure Manually Fig 5 4 1 A Obtain Configuration From DHCP Server This method is used when the LaCie Ethernet Disk mini is connected to a DHCP enabled network with a DHCP server In this case the server automatically as signs the IP address for the LaCie Ethernet Disk mini Configure Manually This method is used when the LaCie Ethernet Disk mini is connected to a non DHCP enabled ...

Page 34: ...JumboFrame Size The Ethernet Disk mini sup ports frame i e packets sizes larger than 1500 bytes on the Gigabit Ethernet interface JumboFrame capability extends supported frame size to 9000 bytes 9KB In general the higher the frame size the better the network performance Important Info If the DHCP server s automatic IP address configuration function is se lected activated and there is no DHCP serve...

Page 35: ...stem format cannot be changed Fig 5 5 1 A 5 5 2 Adding Additional Storage Space You can add additional storage space to your LaCie Ethernet Disk mini by connecting an external hard drive using the Hi Speed USB 2 0 port Connect the hard drive to the LaCie Ethernet Disk mini using the Hi Speed USB 2 0 port Fig 5 5 2 A In the Web Administration Page click on the Disk tab One volume is automatically c...

Page 36: ... Info The Ethernet Disk mini supports drives formatted with the following file systems MS DOS FAT 32 HFS and Linux file system formats ext2 ext3 reiserfs Technical note If there is a partition on the external USB drive each partition will appear as one share in the Ethernet Disk mini By default all services FTP HTML etc are activated Accessing External Hard Drives Because the external hard drive a...

Page 37: ...ig 5 6 2 A Using the NAS Administration Page page 37 Fig 5 7 A 5 7 Users Menu Technical note By default newly created users do not have access to any shares From this window you will be able to manage your users by creating new users and modifying their pass word as well as changing the Administrator s password Fig 5 7 A Technical note The names of shares users will be changed automatically to low...

Page 38: ...a user s name you will be able to modify passwords and to de lete a user Fig 5 7 2 A 5 7 2 Edit a User Click on the Users tab By clicking on the Add new user line you will be able to create a new user and assign them a name password and access privileges Fig 5 7 1 A 1 2 Fig 5 7 1 A CAUTION The name cannot contain any of the following characters and space ...

Page 39: ...choosing For security purposes it is recommended that you alter the default password and write down and store the new password in a secure location Fig 5 7 3 A 5 7 3 Change Administrator Password Fig 5 7 3 A Using the NAS Administration Page page 39 Technical note By default the administrator logon is admin and the password is admin ...

Page 40: ...rotocol is always active and cannot be turned off FTP file transfer protocol however can be enabled or disabled To disable FTP for the Ethernet Disk mini click on the Status tab and un der Services click the Disable button that corresponds to the FTP service entry Fig 5 9 A On this page you can download a log of Ethernet Disk mini activities Click the Clear Log button to start a fresh log 5 9 2 Sy...

Page 41: ...rver can stream any content whether it be music videos or photos to a Digital Media Adapter DMA connected to a display TV or audio system The Ethernet Disk mini media server will automati cally organize music photo video files using embedded metadata information to allow quick and easy display from any digital media adapter Once enabled and configured the ED mini media server will allow you to enj...

Page 42: ...t type you would like to share by clicking on the Music Photo and Video box Click on Apply Changes to confirm your selection The media server will now search for the content you elected to share in the Status section of the Media menu page After a few minutes refresh your browser and you will see the result of the server scan The scanned content should now be available for playback from your digit...

Page 43: ...arket It is our goal to provide you with a friendly easy to use format that will help you quickly install and utilize the many functions of your new device If your manual does not reflect the configurations of the product that you purchased please check our web site for the most current version available Problem Question to Ask Solution The drive is not recognized by the computer Does your compute...

Page 44: ...tact your LaCie reseller or LaCie Customer Support The drive doesn t appear on the network By default the Ethernet Disk mini is configured to retrieve its IP address from a DHCP server If your network is managed by a DHCP server and you cannot access your Ethernet Disk mini try checking your DHCP server s log To get the IP address run the LaCie IP configurator software tool which is located on the...

Page 45: ...scanned for sharing Restart the DMA in order to renew the server discover function on the network Restart the media server from the management section in the Media tab of the NAS Administration page Media content is not playable on your DMA Either Content format playback is not supported by the DMA The DMA might need to be updated to support new formats If content is protected then the DMA cannot ...

Page 46: ...t Information to Include in Email Correspondence Information Where to Find Information 1 LaCie Ethernet Disk mini serial number Located on a sticker at the back of drive or on the original packaging 2 LaCie Ethernet Disk mini file format Mac users Select the hard drive icon and press Command I or press the Control key and choose Get Info Windows users Right click the hard drive icon and select Pro...

Page 47: ...cie com fr contact LaCie Germany Contact us at http www lacie com de contact LaCie Italy Contact us at http www lacie com it contact LaCie Japan Contact us at http www lacie com jp contact LaCie Netherlands Contact us at http www lacie com nl contact LaCie Norway Contact us at http www lacie com no contact LaCie Spain Contact us at http www lacie com es contact LaCie Sweden Contact us at http www ...

Page 48: ...r any loss of data during the use of this device or for any of the problems caused as a result LaCie will not under any circumstances be liable for direct special or consequential damages such as but not limited to damage or loss of property or equipment loss of profits or revenues cost of replacement goods or expense or inconvenience caused by service interrup tions Any loss corruption or destruc...

Reviews: