background image

LaCie NAS OS 4 User Manual

1

LACIE NAS OS 4 USER MANUAL

CLICK HERE TO ACCESS AN UP-TO-DATE ONLINE VERSION

of this document. You will find the most recent content as well as expandable illustrations, easier
navigation, and search capability.
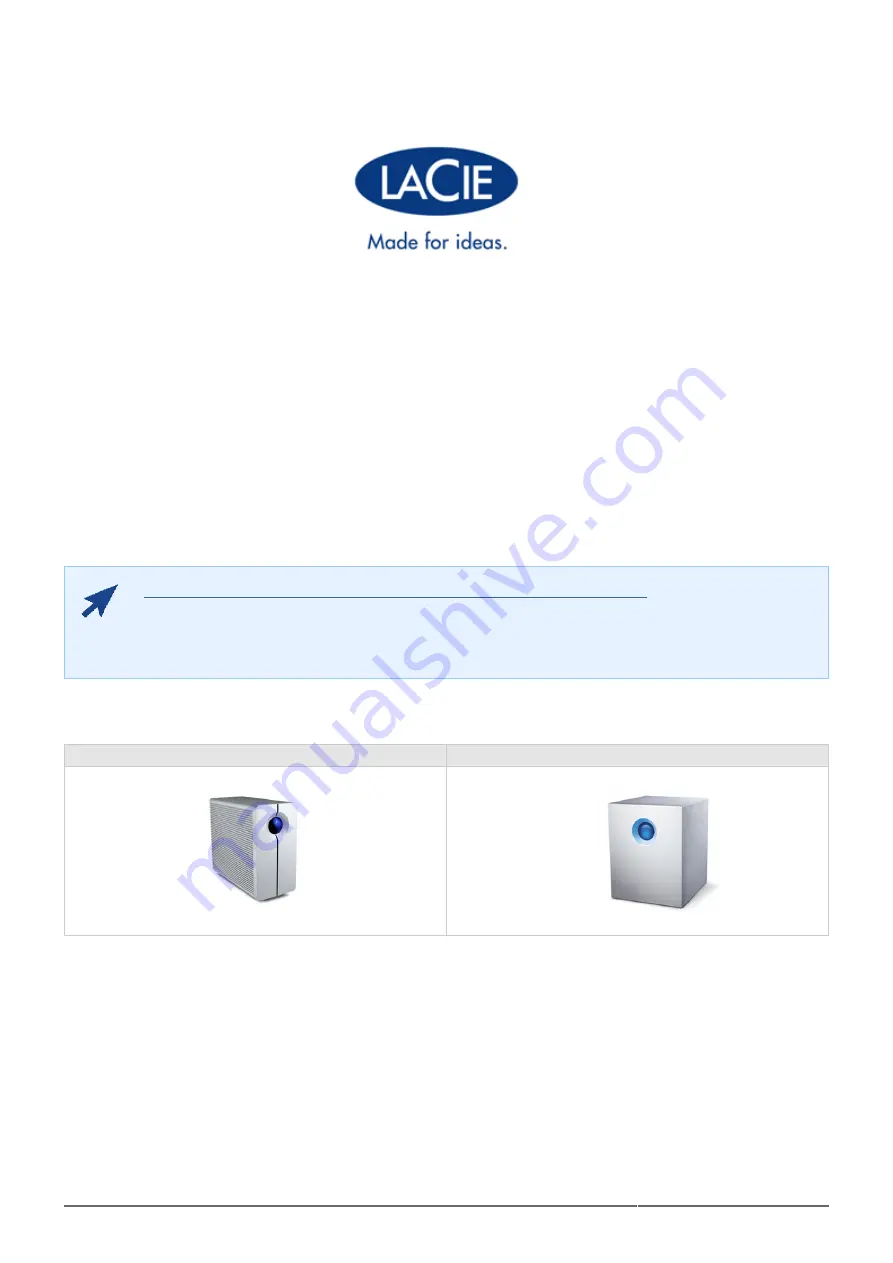
LaCie 2big NAS

LaCie 5big NAS Pro


Summary of Contents for 2big NAS

Page 1: ... NAS OS 4 USER MANUAL CLICK HERE TO ACCESS AN UP TO DATE ONLINE VERSION of this document You will find the most recent content as well as expandable illustrations easier navigation and search capability LaCie 2big NAS LaCie 5big NAS Pro ...

Page 2: ...eagate NAS OS 4 user manual LaCie NAS OS 4 and Seagate NAS OS 4 are similar operating systems with identical operations However the App Manager has limited funtionality for LaCie NAS OS devices While Seagate NAS OS devices can download the full range of apps LaCie NAS OS devices only have access to Filebrowser and Sdrive BOX CONTENT LaCie 2big NAS LaCie 5big NAS Pro Product Ethernet cable External...

Page 3: ...Linux 2 6 and later Web browsers Internet Explorer 7 0 or higher Firefox 3 0 or higher Safari 3 0 or higher Chrome 2 0 or higher Network Computer with an Ethernet network adapter Ethernet switch or router 10 100 1000 Mb s Important info Your LaCie product s performance can be affected by such external forces as network activity hardware distance and setup For optimal performance use Gigabit Ethern...

Page 4: ... User Manual 4 VIEWS OF THE PRODUCT FRONT VIEW LaCie 2big NAS LaCie 5big NAS Pro Front LED button The LED button signals the status and health of the device For further details see LED 1 Behavior and Button Functions ...

Page 5: ...ig NAS Left drive status LED see LED Behavior and Button Functions 1 ON OFF 2 Gigabit Ethernet 3 USB 2 0 expansion 4 eSATA expansion 5 Right drive status LED see LED Behavior and Button Functions 6 Drive tray handle 7 Drive lock 8 Power connector 9 ...

Page 6: ...rive status LED see LED Behavior and Button Functions 1 Drive tray handle 2 Drive lock 3 USB 2 0 expansion x2 4 USB 3 0 expansion x2 5 Gigabit Ethernet x2 6 VGA port for maintenance 7 Power connector 8 Reset button see LaCie NAS Rescue 5big NAS Pro 9 ...

Page 7: ...up shutdown activity Blinking red and blue RAID synchronization software update Blinking red Warning Solid red Error Front and disk LEDs The front and rear LEDs indicate drive status and activity This section describes the behavior of the LED indicators Note that even if you have turned off the front LED using Device Manager Settings events triggering a red light will always cause the front LED to...

Page 8: ... Blinking red Solid red for non functional disk s RAID is degraded data is intact but the array is no longer protected should another disk fail Activity LED for all disks Temperature alert Fan is not spinning The NAS is receiving power via a connected UPS Solid red Activity LED for working disks Temperature alert critical level the product is preparing to power off The power supply has been cut an...

Page 9: ...t to shut down immediately A long push can result in data loss and should only be used when a short push does not work Factory settings rescue LaCie 2big NAS The front LED button can be used in tandem with the ON OFF switch to revert the device to its factory settings see Reset to Factory Conditions 2big NAS LaCie 5big NAS Pro The front LED button can be used in tandem with the reset button on the...

Page 10: ...rotect against overheating The 5big s solid aluminum casing diverts and dissipates heat keeping the drives cooler even after extended periods of activity Within the casing a whisper quiet thermo regulated Noctua fan automatically adapts its speed to the internal temperature As a result the fan cools the components which is vital for long term use ...

Page 11: ...e it is normal that the external casing is warm to the touch Make sure that the vent on the back bezel is not obstructed and that there is a natural airflow across the casing Upright stack rackmount configuration Heat dissipation is maximized when this LaCie product is in the upright position When stacking the LaCie 2big NAS you must attach rubber feet if included on the under side of your drives ...

Page 12: ...ernet port on the back of the product and to an available Ethernet port 1 on your router Refer to your router s documentation if necessary Connect the power supply to a wall outlet and to the product 2 LaCie 2big NAS LaCie 5big NAS Pro Caution Only use the AC adapter supplied with your specific LaCie device Do not use a power supply from another LaCie device or another manufacturer Using any other...

Page 13: ...button on the back of the device to the ON position LaCie 5big NAS Pro Lightly push the the front LED button The front LED turns on and then blinks The front LED blinks for approximately three minutes before turning 2 solid blue You can access the device once the LED is solid blue LaCie 2big NAS LaCie 5big NAS Pro ...

Page 14: ...rator login the default is admin The time zone Make certain to note your login and password for future use 4 Choose Finish to access the NAS OS Home page 5 NEXT STEPS Simplify NAS access LaCie recommends that you install the software utility Seagate Network Assistant before moving forward with the device configuration Seagate Network Assistant gives you instant information on your firmware IP addr...

Page 15: ...re with hard disks see Connect to the Network for instructions on how to connect to your network CHOOSE COMPATIBLE HARD DRIVES The LaCie 5big NAS Pro has been tested and certified for use with select Seagate hard drives Go to Network Hard Drives to review compatible hard drives LaCie recommends selecting disks that are equal in storage capacity For example if the first disk slot has a 1TB hard dis...

Page 16: ...ated since you received your NAS The software that you download is not NAS OS Rather it is a utility to create a NAS OS Rescue and Install key To update the LaCie key Insert it into a USB port on a computer with a connection to the internet 1 Go to LaCie 5big NAS Pro support 2 Choose the LaCie NAS OS Installer for your computer Mac or Windows The installer begins downloads as 3 soon as it is selec...

Page 17: ... the MAC address Connecting a VGA monitor to the VGA port located on the back of the LaCie 5big Following the initial boot process Step 3 the system provides the MAC and IP addresses If the monitor is receiving a signal but the image is black try connecting a USB keyboard to one of the USB ports also located on the back of the LaCie 5big The system may have reverted to energy conservation mode whi...

Page 18: ... a wall outlet and to the product 2 Connect the LaCie key to one of the USB ports on the LaCie 5big 3 Caution Only use the AC adapter supplied with your specific LaCie device Do not use a power supply from another LaCie device or another manufacturer Using any other power cable or power supply may cause damage to the device and void your warranty Always remove the AC adapter before transporting yo...

Page 19: ... 3 Remove the sticker and power on the LaCie 5big Remove the sticker on the back of the enclosure 1 Press the front LED button to power on the device 2 Important info Power the device on before inserting hard disks into the drive slots ...

Page 20: ...the proper slot order Fasten the hard drive to the hard disk tray Find a suitable work area with adequate space and a flat even surface Make certain that all necessary components are available LaCie 5big NAS Pro Hard Disk Trays Hard drives Hard disk tray screws Use only the screws that are provided with your LaCie 5big Phillips head screwdriver Confirm that the head of the screwdriver is the prope...

Page 21: ...the four tray slots Do not overly tighten the 3 screws Doing so can affect the integrity of the screw holes on the hard drive as well as the threads on the screws Repeat the process if you are adding more than one hard disk 4 Carefully insert the full hard drive tray into the empty disk slot 1 far left You will feel resistance when the 5 hard drive tray is most of the way in the bay Gently push th...

Page 22: ... adding more than one hard disk insert full hard drive trays into empty slots in the enclosure Make 7 certain to follow the slot numbers For example the second hard disk should be inserted into disk slot 2 the third disk into disk slot 3 etc ...

Page 23: ...but the image is black try connecting a USB keyboard to one of the USB ports on the back of the device The system may have reverted to energy conservation mode which you can exit by striking one of the keys on the USB keyboard Enter one of the MAC addresses that you noted in Step 1 It is not necessary to enter the colons 2 Choose Start Install 3 Choose Continue at the prompt to install NAS OS To a...

Page 24: ...ormation on your firmware IP address and MAC address It also provides quick access to shares and NAS OS See Seagate Network Assistant for instructions Configure your NAS For details on how to configure and use your LaCie NAS go to Shares Access and Transfer File and Device Manager Install Sdrive for local and remote access Sdrive gives you easy access to shares and NAS OS on local and offsite netw...

Page 25: ... Network for instructions on how to connect to your network CHOOSE COMPATIBLE HARD DRIVES Review the following before adding hard drives to your LaCie 2big NAS The LaCie 2big NAS has been tested and certified for use with select Seagate hard drives Go to Network Hard Drives to review compatible hard drives LaCie recommends selecting disks that are equal in storage capacity For example if the first...

Page 26: ...thernet cable to the Ethernet port on the back of the product and to an available Ethernet port 2 on your router Refer to your router s documentation if necessary Connect the power supply to a wall outlet and to the product 3 Push the power button on the back of the device to the ON position The front LED will turn on and then 4 begin blinking blue Once the LED stops blinking move on to the next s...

Page 27: ...ty in the images the Ethernet and Power cables have been removed LaCie recommends that you maintain both connections while continuing with the installation steps Remove the sticker from the back of the device 1 The disk tray s may be locked To unlock use the included disk drawer key to turn the lock until the slot is 2 vertical ...

Page 28: ...aCie NAS OS 4 User Manual 28 Draw out the disk tray by inserting your finger into the space behind the disk tray handle and pulling to 3 disengage it Grasp the disk tray handle and carefully extract it 4 ...

Page 29: ...LaCie NAS OS 4 User Manual 29 Repeat the process if you are adding a second disk 5 ...

Page 30: ...c wristband or an anti static mat to ground yourself when handling the hard disk To secure the disk in the disk tray Place the empty disk tray onto the flat work area with the handle on the bottom left 1 Many disks have a label on one side and the printed circuit board on the opposite side With its label side 2 facing up gently place the hard disk within the disk tray Keep the side with the printe...

Page 31: ...ile continuing with the installation steps Carefully insert the full disk tray into an empty disk slot You will feel resistance when the disk tray is most of 1 the way in the bay Gently push the disk tray handle firmly until you feel it snap into place The disk tray handle should be flush with the back of the enclosure If you are adding the second disk insert it next 2 Use the disk lock tool to lo...

Page 32: ...LaCie NAS OS 4 User Manual 32 The disk LEDs on the rear of the product will blink blue Wait a full minute before moving on to the next step 4 ...

Page 33: ...serted into the LaCie NAS will be formatted and all data deleted Press and hold the front button for at least 5 seconds Once the LED begins to blink blue and red release the 1 button After a period of 10 to 16 minutes initialization will have completed The system is ready once the front LED 2 turns solid blue ...

Page 34: ...to enter the colons 2 Choose Start Install 3 Choose Continue at the prompt to install NAS OS To accommodate the installation all data stored on the 4 hard disks will be deleted It takes approximately five minutes to format the hard drives and install NAS OS Once it is finished you are 5 prompted to create an administrator password You can also change The name of the device The administrator login ...

Page 35: ...ormation on your firmware IP address and MAC address It also provides quick access to shares and NAS OS See Seagate Network Assistant for instructions Configure your NAS For details on how to configure and use your LaCie NAS go to Shares Access and Transfer File and Device Manager Install Sdrive for local and remote access Sdrive gives you easy access to shares and NAS OS on local and offsite netw...

Page 36: ...ve a failed hard drive or a hard drive that you wish to swap for another disk with greater capacity Caution After continuous use of the LaCie NAS hard drives may be hot Use caution when removing a hard drive Unlock the drive tray using the included disk drawer key to turn the lock until the slot is vertical 1 Draw out the hard drive tray by inserting your finger into the space behind the tray hand...

Page 37: ...rasp the tray handle and carefully extract the drive 3 To reuse the disk tray unfasten the drive s screws and affix the new disk to the tray Detailed instructions 4 are available at Connect to the Network Diskless LaCie 5big NAS Pro ...

Page 38: ...ard drive to the disk tray go to Connect to the Network Diskless LaCie 5big NAS Pro Carefully insert the tray into an empty hard drive bay Make certain to press the drive tray handle firmly until 1 you feel the drive snap into place Use the disk drawer key to lock the drive 2 ...

Page 39: ...account on lacie com register your product and fill out a support ticket Create an account here www lacie com us mystuff login htm logout rtn mystuff Note LaCie is dedicated to providing high quality products that enrich the lives of our customers To help LaCie offer the best customer support we encourage you to create an account and register your product at www lacie com us mystuff login htm logo...

Page 40: ...he back and that the outlet the power supply is connected to is powered on or has a sufficient supply of power Q Is the blue light on the front of the device flickering for an inordinate period of time A See LED Behavior and Button Functions for details Q Did you follow the correct installation steps A Review Connect to the Network Q Are both ends of the Ethernet cable firmly connected A Disconnec...

Page 41: ...ll functioning You can check the status of your hard drives by running a SMART test see Monitoring Hard clicking is a very noticeable sound and is akin to hearing metal on metal impacts This behavior is usually indicative of a physical failure If nothing traumatic happened to the hard drive prior to this starting consider it to be soft clicking and troubleshoot the problem as suggested above The V...

Page 42: ... NAS Pro System Repair The Rescue will reset your LaCie 5big NAS Pro to its factory default while attempting to preserve the shares and data LaCie cannot guarantee that all your data will be saved Factory default includes the reversion of all NAS OS parameters e g Users Settings Network etc to their original states Install LaCie NAS OS The Rescue will format the LaCie 5big NAS Pro hard drives befo...

Page 43: ...and IP address information Connect a VGA monitor to the NAS s VGA port VGA Monitor While not obligatory you can connect a compatible monitor to the LaCie 5big NAS Pro before following the Rescue Steps Doing so will help you confirm that the LaCie 5big NAS Pro boots from the LaCie USB Key to enter Rescue mode You can also review the device s IP and MAC addresses once it has entered Rescue mode The ...

Page 44: ...N 1 Ethernet port If you still do not see your device in Seagate Network Assistant follow the instructions below Launch Seagate Network Assistant 1 Select Preferences 2 Windows Right click on the Seagate Network Assistant icon in the system tray 1 Mac Click on the Seagate Network Assistant icon in the menu 2 Enable IPConf Support by clicking on Activate 3 Caution Some versions of the LaCie Seagate...

Page 45: ...with NAS OS 4 You can experience problems when attempting a rescue on a NAS OS 4 device with a NAS OS 3 key The software that you download onto the LaCie key NAS is not the NAS OS Rather it is a utility to run the NAS OS Rescue so that you can install or repair the NAS OS To update the LaCie key Insert it into a USB port on a computer with a connection to the internet 1 Go to LaCie 5big NAS Pro su...

Page 46: ... LaCie 5big NAS Pro is preserved LaCie highly recommends that you back up all shares before moving forward with the Rescue If you cannot access the NAS volumes the Rescue provides an option to retrieve data via FTP Following the backup if applicable turn the NAS off Step 3 Connect the LaCie key to the NAS Connect the LaCie USB key to one of the USB ports on the LaCie 5big NAS Pro 1 ...

Page 47: ...l into the E boot port on the back of the device You will feel minor 2 resistance as you push the reset button While you are pushing the reset button with the drive lock tool turn on the LaCie 5big NAS Pro by pushing 3 the front LED button DO NOT remove the drive lock tool as the LaCie 5big NAS Pro powers on Doing so will prevent the LaCie 5big NAS Pro from using the LaCie USB Key as the boot devi...

Page 48: ...utton 10 seconds after all the rear disk LEDs turn solid blue 4 The reset button is required when disks are present in the NAS since it sets the boot priority to the key If there are no disks in the NAS the device will boot directly from the LaCie key ...

Page 49: ...The default name of your LaCie 5big NAS Pro lacie 5big pro will differ if you have changed it Enter one of the MAC addresses in the available field It is not necessary to enter the colons 2 At the prompt select your preferred type of Rescue and follow the onscreen instructions 3 The NAS OS Rescue will perform a file system check fsck to determine if the device was improperly powered off or crashed...

Page 50: ...ower switch on the rear of the product Keep the front button pressed until the front LED becomes solid red then release it 3 The LED blinks red Within five seconds press the front button once to confirm the reset The front LED blinks 4 blue for several seconds The front LED blinks red blue during a system reset The LaCie 2big NAS is ready when it reboots and the front LED is static blue FORMAT DEL...

Page 51: ...FEATURE The table below provides the maximum amount of elements allowed for specific features Feature Maximum Users 2048 Groups 256 Shares 256 iSCSI Targets Unlimited 5big NAS Pro and 16 2big NAS Volumes 5 5big NAS Pro and 2 2big NAS Volume size 108TB ...

Page 52: ...mmunications However there is no guarantee that interference will not occur in a particular installation If this equipment does cause harmful interference to radio or television reception which can be determined by turning the equipment off and on the user is encouraged to try to correct the interference by one of the following measures Reorient or relocate the receiving antenna 1 Increase the sep...

Page 53: ...osoft Corporation Other trademarks mentioned in this manual are the property of their respective owners LICENCES AND FREE SOFTWARE Your LaCie product ships with copyrighted software that are licensed under the GPL AFL Apache Apple BSD GNU LGPL MIT OpenLDAP OpenSSL PHP Python and Creative Common It also includes free software the source code for which can be downloaded from the LaCie website www la...

Page 54: ...CCI If this is used near a radio TV receiver it may cause radio interference Install the equipment according to the manual This statement does not apply to the LaCie CloudBox MANUFACTURER S DECLARATION FOR CE CERTIFICATION We LaCie solemnly declare that this product conforms to the following European standards Electromagnetic Compatibility Directive 2004 108 EC Low Voltage Directive 2006 95 EC ...

Page 55: ...ortant info 1TB Terabyte 1 000GB 1GB 1000MB 1MB 1 000 000 Bytes Total accessible capacity varies depending upon operating environment typically up to 10 less per TB HEALTH AND SAFETY PRECAUTIONS Only qualified persons are authorized to carry out maintenance on this device Read this User Manual carefully and follow the correct procedure when setting up the device Do not open a disk drive or attempt...

Page 56: ...r an extended period of time Otherwise there is an increased risk of electrical shock short circuiting or fire Use only the power supply shipped with the device if applicable Do not use the LaCie device near other electrical appliances such as televisions radios or speakers Doing so may cause interference which will adversely affect the operation of the other products Do not place the LaCie device...

Page 57: ...hen the equipment is used normally and is properly serviced when needed If you discover a defect covered by the warranty set forth above your sole and exclusive remedy will be for LaCie in its sole discretion to i repair or replace the product at no charge to you or if a repaired unit or replacement product is not available ii to refund the current market value of your product You acknowledge and ...

Page 58: ...nal causes e to damage caused by operating the product outside the permitted or intended uses described by LaCie f to damage caused by service including upgrades and expansions performed by anyone who is not a representative of LaCie or a LaCie Authorized Service Provider g to a product or part that has been modified to alter functionality or capability without the written permission of LaCie or h...

Page 59: ...aCie for repair LaCie cannot under any circumstances guarantee the integrity of data remaining on a returned drive We make no provisions for data recovery and cannot be held liable for any data loss on drives or media returned to LaCie All products returned to LaCie must be securely packaged in their original box and shipped with postage prepaid except for Products registered under the Advance Car...

Reviews: