background image

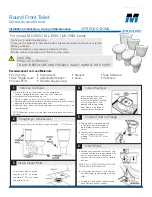
Installation Instructions/Instrucciones de Instalación

Toilet Installation

LACAVA 

4

12”

305

1. Install the water supply and drainage outlet as marked. 

Tile and seal the floor to prevent chemical reaction and damage 

to the porcelain of the toilet. 


6”

150

water supply valve

wall

drainage outlet

floor

2. Align the flange with the drainage outlet and mark the location of 

the screws, drill pilot holes, insert anchors. Then, after inserting the two 

T# screws  from the bottom of the flange into their position, attach the

flange onto the floor over the drainage outlet.  


T# screws

plastic anchors

flange

fixing screws

Installed

3. Turn the toilet bowl upside down on a soft material to prevent damage 

or scratches, and apply the sealing gasket (e.g. wax ring) onto the water 

outlet tightly, make sure the waste pipe is not abstructed. 


soft material

gasket

waste outlet

4. Holding the toilet up (2 people are recommended), align the toilet over 

the flange, slide the T# screws to align with the installation holes in the 

toilet base. Then seat the product down and press firmly until it’s flat on the 

floor and the sealing gasket is engaged. If the toilet is lifted again, the wax ring

must be replaced with a new one to ensure a proper seal. 

5. Affix the nut set onto the T# screws as shown, first by hand, then tighten 

with a wranch until firm. NOTE: Do not overtighten to prevent damage to 

porcelain. Cover the nut sets with the decorative caps and cover.    

decorative cover

T# screws

nut caps

nut 

metal washer

plastic washer

6. Attached the water supply line between the toilet and the water supply

valve. (If filter needed, it should be attached to the toilet inlet pipe first.) 

Turn on the water supply and check for any leaks. 


tank 

toilet inlet pipe

filter

water supply valve

water supply line

gasket if needed

gasket if needed

6”

150

TIP: Install the toilet seat hinges on the bowl before 

outfitting it with the sealing gasket and setting it on 

the floor flange.

Summary of Contents for Trenta GL58

Page 1: ...lleto cuidadosamente antes de la instalación LACAVA recomienda que este aparato sea instalado por un técnico y no se hace responsable de los daños causados por una instalación incorrecta Es la responsabilidad del propietario garantizar que este aparato cumpla con todos los códigos de plomería locales Por favor consulte nuestros Términos y Condiciones que se encuentran en este folleto para informac...

Page 2: ...e sizes in inches are rounded up to the nearest 1 16 Nota Los planos proporcionados en este documento tienen el propósito de dar al usuario una idea del producto y no están hechos a escala Los tamaños de pulgadas se redondean al más cercano 1 16 Outlet diam OD 3 ID 2 18 1 4 464 14 3 8 365 13 5 8 346 7 178 28 5 8 727 3 4 19 12 305 16 1 2 419 6 152 30 3 4 78 INLET M 7 8 ...

Page 3: ...e reference this sheet and the corresponding part when requesting parts Nota Por favor r eferirse a esta pagina y la parte correspondiente cuando ordene partes Flush Valve Fill Valve Hose Floater Button kit GL58 FV Replacement flush system kit including fill valve flush valve and flush button kit ...

Page 4: ...e toilet up 2 people are recommended align the toilet over the flange slide the T screws to align with the installation holes in the toilet base Then seat the product down and press firmly until it s flat on the floor and the sealing gasket is engaged If the toilet is lifted again the wax ring must be replaced with a new one to ensure a proper seal 5 Affix the nut set onto the T screws as shown fi...

Page 5: ...oater 5 Water fill valve is broken 5 Replace the fill valve half flush volume adjustment Slow drainage 1 Inadequate flushing water 1 Troubleshoot inadequate flushing water steps 2 Drainage pipes are clogged 2 Clean the drainage pipes 3 The drainage is not aligned with the pipes 3 Reinstall the toilet Leakage 1 Leak on the fill valve 1 Fasten the nuts on the underside of the toilet tank 2 Leak on t...

Page 6: ...from spinning while securing the screw Align the toilet seat with the toilet deck Screw the bolts securely Insert the toilet seat fully into the anchors to test the alignment and operation Press the buttons to lift to remove the toilet seat Make any necessary adjustments Put the hinge covers over the hinges Mount the toilet seat Make sure the hinges are fully inserted into the holes in the seat As...

Page 7: ...o enjoy our products for many years to come Para mejores resultados por favor cuide des este producto de acuerdo con las siguientes instrucciones Sólo utilice agua tibia y un detergente suave es decir el jabón para lavar la vajilla para la limpieza Si se utiliza otro limpiador revise la etiqueta para asegurarse de que es seguro para el uso del material para su limpieza y siempre prueba en un área ...

Page 8: ...AVA proporciona una Garantía Limitada de por Vida en sus grifos Esto garantiza que cualquier grifo instalado en una aplicación residencial no presentara defectos en el material o de fabricación mientras que el consumidor original posea su casa Cualquier producto instalado en una aplicación comercial está cubierto bajo garantía por un año LACAVA garantiza que todos los otros productos no presentara...

Page 9: ...ther it was our error If we verify it was our mistake we will promptly ship the missing item s to the purchaser by standard ground at our cost RETURN POLICIES If the product is not satisfactory for any reason different from defects it can be returned to LACAVA up to 30 days from the shipping date after obtaining a Return Goods Authorization RGA valid for 60 days If the product is not returned to L...

Page 10: ...gente chofer de la compañía cualquier alteración visible en el empaque En el caso que falten artículos también hay que informar a LACAVA y enviar todos los documentos relacionados con un plazo de 24 horas a partir de la fecha de entrega Vamos a abrir una investigación interna y verificar el recuento de inventario para determinar si fue un error de nuestra parte Si nos damos cuenta que fue nuestro ...

Reviews: